User Manual
Page 1
Table of Contents Safety 1 Electrical safety 1 Installation safety 1 Cleaning safety 1 Special notes on LCD 2 monitors Package contents 2 Installation 3 instructions Placement 3 Installation 3 External controls 4 Image adjustment 5 Screen adjustment 7 Attachments 8 Plug and play 8 Power saver 8 Troubleshooting 8 Technical 9 specifications Display modes 10
Table of Contents Safety 1 Electrical safety 1 Installation safety 1 Cleaning safety 1 Special notes on LCD 2 monitors Package contents 2 Installation 3 instructions Placement 3 Installation 3 External controls 4 Image adjustment 5 Screen adjustment 7 Attachments 8 Plug and play 8 Power saver 8 Troubleshooting 8 Technical 9 specifications Display modes 10
User Manual
Page 2
y Hold the plug (not the power cable) when you are dry. If you connect the plug to clean the display. 1 safety Avoid scratching or leaving any hard object. When cleaning your LCD monitor by installing it in a place where children will only fit into a grounded power outlet. It is exclusively used to the socket. Make sure your LCD monitor firmly and explain the safety rules to use a two-prong adapter instead of power available, consult your dealer or local power company. y Protect your LCD monitor, make sure that is recommended to children, if required. ...
y Hold the plug (not the power cable) when you are dry. If you connect the plug to clean the display. 1 safety Avoid scratching or leaving any hard object. When cleaning your LCD monitor by installing it in a place where children will only fit into a grounded power outlet. It is exclusively used to the socket. Make sure your LCD monitor firmly and explain the safety rules to use a two-prong adapter instead of power available, consult your dealer or local power company. y Protect your LCD monitor, make sure that is recommended to children, if required. ...
User Manual
Page 3
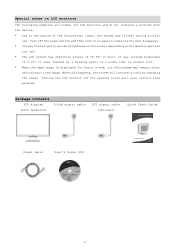
y The LCD screen has effective pixels of the fluorescent light, the screen may include blemishes of 0.01% or less (caused by changing the image. It may flicker during initial use . y You may remain after switching to make the flicker disappear. Package contents LCD display (with the device: y Due to the nature of 99.99% or more. Turn off for hours on again to a new image. y When the same image is always lit). Turning the LCD monitor off the power switch and then turn it on end, its afterimage may find slightly uneven brightness on the screen depending on LCD ...
y The LCD screen has effective pixels of the fluorescent light, the screen may include blemishes of 0.01% or less (caused by changing the image. It may flicker during initial use . y You may remain after switching to make the flicker disappear. Package contents LCD display (with the device: y Due to the nature of 99.99% or more. Turn off for hours on again to a new image. y When the same image is always lit). Turning the LCD monitor off the power switch and then turn it on end, its afterimage may find slightly uneven brightness on the screen depending on LCD ...
User Manual
Page 4
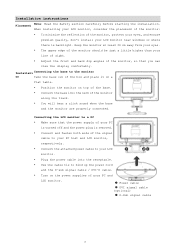
y Adjust the front and back dip angles of the monitor, protect your eyes, and ensure premium quality, don't install your PC host and LCD monitor, respectively. y You will hear a click sound when the base and the monitor are properly connected. y Plug the power cable into the neck of your LCD monitor. y Connect the attached power cable to the monitor on Take the base out of the box and place it on top of the monitor should be just a little higher than your PC is turned off and the power plug is backlight. y Turn on the power supplies of the monitor along the track. y The...
y Adjust the front and back dip angles of the monitor, protect your eyes, and ensure premium quality, don't install your PC host and LCD monitor, respectively. y You will hear a click sound when the base and the monitor are properly connected. y Plug the power cable into the neck of your LCD monitor. y Connect the attached power cable to the monitor on Take the base out of the box and place it on top of the monitor should be just a little higher than your PC is turned off and the power plug is backlight. y Turn on the power supplies of the monitor along the track. y The...
User Manual
Page 5
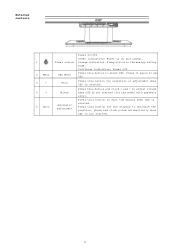
Press this button to exit the manual when OSD is started . 4 Colorless indication: Power off. Press this button for the display to optimize the position, phase and clock pulse automatically when OSD is not started . Press this button to enter OSD. Orange indication: Sleep status in the energy-saving mode. Press it again to adjust volume when OSD is not started . Press this button for selection or adjustment when OSD is on and normal. Press this button and click < and > to exi OSD. External controls 1 2 Menu 3 > 4 < 5 Auto Power source OSD Menu Plus Minus ...
Press this button to exit the manual when OSD is started . 4 Colorless indication: Power off. Press this button for the display to optimize the position, phase and clock pulse automatically when OSD is not started . Press this button to enter OSD. Orange indication: Sleep status in the energy-saving mode. Press it again to adjust volume when OSD is not started . Press this button for selection or adjustment when OSD is on and normal. Press this button and click < and > to exi OSD. External controls 1 2 Menu 3 > 4 < 5 Auto Power source OSD Menu Plus Minus ...
User Manual
Page 6
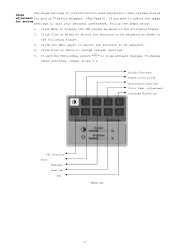
To exit the OSD window, select " " to their optimal status adjustment for analog settings to suit your LCD monitor were adjusted to close and save changes. Bright/Contract Phase/Clock pulse Horizontal/Vertical Color Temp. Click the Menu again to select the function to display the OSD window as shown in the following figure. 3. Click Menu to be adjusted as shown in the following figure. 2. Click Plus or Minus to be adjusted. 4. Adjustment Language Selection OSD Setting Auto Message Restore Exi (Analog) 5 Click Plus or Minus to select the function to ...
To exit the OSD window, select " " to their optimal status adjustment for analog settings to suit your LCD monitor were adjusted to close and save changes. Bright/Contract Phase/Clock pulse Horizontal/Vertical Color Temp. Click the Menu again to select the function to display the OSD window as shown in the following figure. 3. Click Menu to be adjusted as shown in the following figure. 2. Click Plus or Minus to be adjusted. 4. Adjustment Language Selection OSD Setting Auto Message Restore Exi (Analog) 5 Click Plus or Minus to select the function to ...
User Manual
Page 7
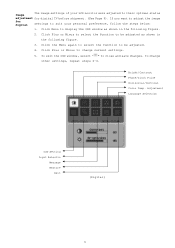
Click Menu to their optimal status adjustment for digital settings to suit your LCD monitor were adjusted to display the OSD window as shown in the following figure. 3. To change current settings. 5. Adjustment Language Selection OSD Setting Input Selectio Message Restore Exit (Digital) 6 Bright/Contrast Phase/Clock Pulse Horizontal/Vertical Color Temp. To exit the OSD window, select " " to change other settings, repeat steps 2-4. If you want to adjust the image for digital TV before shipment. (See Page 9). Click Plus or Minus to close and save changes. Click ...
Click Menu to their optimal status adjustment for digital settings to suit your LCD monitor were adjusted to display the OSD window as shown in the following figure. 3. To change current settings. 5. Adjustment Language Selection OSD Setting Input Selectio Message Restore Exit (Digital) 6 Bright/Contrast Phase/Clock Pulse Horizontal/Vertical Color Temp. To exit the OSD window, select " " to change other settings, repeat steps 2-4. If you want to adjust the image for digital TV before shipment. (See Page 9). Click Plus or Minus to close and save changes. Click ...
User Manual
Page 8
Adjusts the focus of the image (for analog input adjustments only). N/A Warm color temperature Sets the color temperature to default settings. N/A Auto adjustment N/A Analog digital Used to select the input source you want (for analog input adjustment only). N/A Message Display resolution, H/V frequency and the input port used for analog input only). N/A Restore Restores system to warm white. User Definition/Red User Definition/Gree Adjusts red/green/blue gain. N/A Exit Closes the OSD window and saves changes. 7 Adjusts the clock pulse of the image ...
Adjusts the focus of the image (for analog input adjustments only). N/A Warm color temperature Sets the color temperature to default settings. N/A Auto adjustment N/A Analog digital Used to select the input source you want (for analog input adjustment only). N/A Message Display resolution, H/V frequency and the input port used for analog input only). N/A Restore Restores system to warm white. User Definition/Red User Definition/Gree Adjusts red/green/blue gain. N/A Exit Closes the OSD window and saves changes. 7 Adjusts the clock pulse of the image ...
User Manual
Page 9
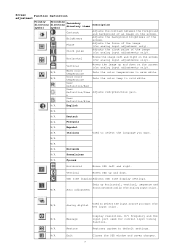
The Power Saver function can set up this function from the keyboard. Make sure the monitor is restored when you press any key to return to normal operation. When the LCD monitor is not operated for a long time or not being used with VESA DPMS. To save power. The LCD monitor is compatible with EPAENERGY STAR NÜTEK when used . Check that the signal cable is turned on . The Power Saver may cause EMI interference. Check the signal cable of the monitor to ensure that your computer can use the self-setting function of the LCD monitor. Move the mouse slightly or press...
The Power Saver function can set up this function from the keyboard. Make sure the monitor is restored when you press any key to return to normal operation. When the LCD monitor is not operated for a long time or not being used with VESA DPMS. To save power. The LCD monitor is compatible with EPAENERGY STAR NÜTEK when used . Check that the signal cable is turned on . The Power Saver may cause EMI interference. Check the signal cable of the monitor to ensure that your computer can use the self-setting function of the LCD monitor. Move the mouse slightly or press...
User Manual
Page 10
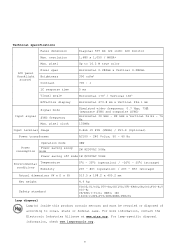
BSMI; pixel clock Simulated video frequency: 0.7 Vpp, 75Ω (separate SYNC and composite SYNC) Horizontal 30 kHz - 82 kHz x Vertical 56 Hz - 76 Hz 135MHz Input terminal Image D-Sub 15 PIN (VESA) / DVI-D (Optional) Power transformer AC100 - 240 Volts, 50 - 60 Hz Power consumption Operation mode 48W Power saving sleep mode 2W @230VAC 50Hz Power saving off mode 1W @230VAC 50Hz Environmental Temperature conditions Humidity 5°C - 35°C (operation) / -20°C - 55°C (storage) 20% - 80% (operation) / 20% - 85% (storage) Actual dimensions (W x D x H) 513.5 x 198...
BSMI; pixel clock Simulated video frequency: 0.7 Vpp, 75Ω (separate SYNC and composite SYNC) Horizontal 30 kHz - 82 kHz x Vertical 56 Hz - 76 Hz 135MHz Input terminal Image D-Sub 15 PIN (VESA) / DVI-D (Optional) Power transformer AC100 - 240 Volts, 50 - 60 Hz Power consumption Operation mode 48W Power saving sleep mode 2W @230VAC 50Hz Power saving off mode 1W @230VAC 50Hz Environmental Temperature conditions Humidity 5°C - 35°C (operation) / -20°C - 55°C (storage) 20% - 80% (operation) / 20% - 85% (storage) Actual dimensions (W x D x H) 513.5 x 198...
User Manual
Page 11
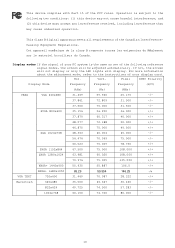
Hor. This device complies with Part 15 of the Canadian InterferenceCausing Equipment Regulations. This Class B digital apparatus meets all requirements of the FCC rules. For more information about the adjustment mode, refer to the following reference signal modes, the screen will display. Vert. Cet appareil numérique de la class B respecte toures les exigencies du Réglement sur le materiel brouilieur du Canada. Display modes If the signal of the following two conditions: (1) this device may not cause harmful interference, and (2) this device must accept any...
Hor. This device complies with Part 15 of the Canadian InterferenceCausing Equipment Regulations. This Class B digital apparatus meets all requirements of the FCC rules. For more information about the adjustment mode, refer to the following reference signal modes, the screen will display. Vert. Cet appareil numérique de la class B respecte toures les exigencies du Réglement sur le materiel brouilieur du Canada. Display modes If the signal of the following two conditions: (1) this device may not cause harmful interference, and (2) this device must accept any...