

User Guide
Page 1
...receiver. • Connect the equipment into an outlet on , the user is required in setting up and using the LCD Monitor. This equipment generates, uses, and can be used in accordance with the limits for Arm Applications...3 Connecting the... Display ...3 Connecting the AC Power...3 Connecting the Audio Cable ...3 Setting Up the LCD Monitor...3 Power Management System ...3 Chapter 2 Display Controls 4 User Controls ...4 Adjusting the Monitor's Display...4 Function Description ...5 Chapter 3 Technical Information...
...receiver. • Connect the equipment into an outlet on , the user is required in setting up and using the LCD Monitor. This equipment generates, uses, and can be used in accordance with the limits for Arm Applications...3 Connecting the... Display ...3 Connecting the AC Power...3 Connecting the Audio Cable ...3 Setting Up the LCD Monitor...3 Power Management System ...3 Chapter 2 Display Controls 4 User Controls ...4 Adjusting the Monitor's Display...4 Function Description ...5 Chapter 3 Technical Information...

User Guide
Page 2
... temperature of these items is needed to a power outlet. This manual should be used. AL711 AL712 AL713 AL715 AL716 AL717 DVI-D X O O X X X AUDIO X O X X O X After you find that any nature should be adjusted from -5°to rain. * LCD Monitor or the case is designed to allow users to service this device to ensure that...
... temperature of these items is needed to a power outlet. This manual should be used. AL711 AL712 AL713 AL715 AL716 AL717 DVI-D X O O X X X AUDIO X O X X O X After you find that any nature should be adjusted from -5°to rain. * LCD Monitor or the case is designed to allow users to service this device to ensure that...

User Guide
Page 3
...Connect one end of the monitor. Connecting the Audio Cable (For AL712/AL716) 1. The VESA DPMS provides four power saving modes through detecting a horizontal or vertical sync. Connect the power cord to Fig.1-3. Detaching LCD Monitor from Its Stand Unscrew screws n the swivel base support column...1997). Connecting the Display Figure 1-4 1. A ferrite-core interface cable is used. This device will be connected to the LCD Monitor's VGA port or DVI port.(For AL712/AL713)(See Fig 1-5) 3. Connect the power cord to release. Connect the other end of the signal cable to the ...
...Connect one end of the monitor. Connecting the Audio Cable (For AL712/AL716) 1. The VESA DPMS provides four power saving modes through detecting a horizontal or vertical sync. Connect the power cord to Fig.1-3. Detaching LCD Monitor from Its Stand Unscrew screws n the swivel base support column...1997). Connecting the Display Figure 1-4 1. A ferrite-core interface cable is used. This device will be connected to the LCD Monitor's VGA port or DVI port.(For AL712/AL713)(See Fig 1-5) 3. Connect the power cord to release. Connect the other end of the signal cable to the ...
User Guide
Page 4
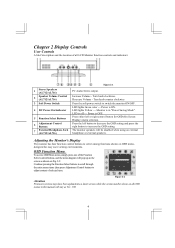
... Green color --- The monitor speakers will stay as shown on all LCD Monitor function controls and indicators: 1 Stereo Speakers (AL712/AL716) 2 Speaker Volume Control (AL712/AL716) 3 Soft Power Switch 4 DC Power-On Indicator 5 Function Select Buttons 6 Adjustment Control Buttons 7 External Headphone Jack (AL712/AL716) Figure 2-1 PC Audio Stereo output. Chapter 2 Display Controls User Controls...
... Green color --- The monitor speakers will stay as shown on all LCD Monitor function controls and indicators: 1 Stereo Speakers (AL712/AL716) 2 Speaker Volume Control (AL712/AL716) 3 Soft Power Switch 4 DC Power-On Indicator 5 Function Select Buttons 6 Adjustment Control Buttons 7 External Headphone Jack (AL712/AL716) Figure 2-1 PC Audio Stereo output. Chapter 2 Display Controls User Controls...

User Guide
Page 6
Chapter 3 Technical Information Specifications LCD Panel Size Display Type Resolution Display Dot Display Area (mm) Display Color Brightness Contrast Ratio Response Time Lamp Voltage Lamp Current Viewing Angle Video Input ... (hard and soft types) OSD Brightness Contrast Horizontal Position Vertical Position Phase Clock Display Mode Setup OSD Format 17" (43 cm) Active matrix color TFT LCD 1280 x 1024 1280 x (RGB) x 1024 337.92 x 270.336 (H x V) 262K 250 cd/m2 (typical) 500:1 (typical) Ta=25°C Tr+Tf=20ms 705 Vrms (typical...
Chapter 3 Technical Information Specifications LCD Panel Size Display Type Resolution Display Dot Display Area (mm) Display Color Brightness Contrast Ratio Response Time Lamp Voltage Lamp Current Viewing Angle Video Input ... (hard and soft types) OSD Brightness Contrast Horizontal Position Vertical Position Phase Clock Display Mode Setup OSD Format 17" (43 cm) Active matrix color TFT LCD 1280 x 1024 1280 x (RGB) x 1024 337.92 x 270.336 (H x V) 262K 250 cd/m2 (typical) 500:1 (typical) Ta=25°C Tr+Tf=20ms 705 Vrms (typical...

User Guide
Page 8
...SXGA Note: 1.When the in put display mode is not 1280 x 1024, the image is not connected to the normal PC operating environment. Attention This LCD Monitor Supports Multiple VGA Modes. Refer to Chapter 3 for a listing of Range" message. Also, if the signal cable is smoothly expanded to another ..., and the Graphics may initially experience an unstable or unclear display whenever a new display mode or new VGA card is still no picture on the LCD Monitor is ON, all or properly, the monitor screen will display a message "No 8 VESA - 480 - 72Hz -/- Check the screen to an ...
...SXGA Note: 1.When the in put display mode is not 1280 x 1024, the image is not connected to the normal PC operating environment. Attention This LCD Monitor Supports Multiple VGA Modes. Refer to Chapter 3 for a listing of Range" message. Also, if the signal cable is smoothly expanded to another ..., and the Graphics may initially experience an unstable or unclear display whenever a new display mode or new VGA card is still no picture on the LCD Monitor is ON, all or properly, the monitor screen will display a message "No 8 VESA - 480 - 72Hz -/- Check the screen to an ...


