
User Manual
Page 5
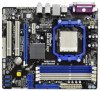
... the latest VGA cards and CPU support lists on ASRock website without notice. It delivers excellent performance with robust design conforming to ASRock's commitment to the hardware installation. www.asrock.com/support/index.asp 1.1 Package Contents One ASRock N68-GE3 UCC Motherboard (Micro ATX Form Factor: 9.6-in x 8.2-in, 24.4 cm x 20.8 cm) One ASRock N68-GE3 UCC Quick Installation Guide One ASRock N68-GE3 UCC Support...
... the latest VGA cards and CPU support lists on ASRock website without notice. It delivers excellent performance with robust design conforming to ASRock's commitment to the hardware installation. www.asrock.com/support/index.asp 1.1 Package Contents One ASRock N68-GE3 UCC Motherboard (Micro ATX Form Factor: 9.6-in x 8.2-in, 24.4 cm x 20.8 cm) One ASRock N68-GE3 UCC Quick Installation Guide One ASRock N68-GE3 UCC Support...
User Manual
Page 6
... Audio Codec) - Six-Core CPU Ready - NVIDIA® GeForce 7025 / nForce 630a - capacity of system memory: 16GB (see CAUTION 1) - DX9.0 VGA, Pixel Shader 3.0 - Supports D-Sub with LED (ACT/LINK LED and SPEED LED) - Gigabit LAN 10/100/1000 Mb/s - Supports Wake-On-LAN ... Athlon II X4 / X3 / X2 / Sempron processors (see CAUTION 6) - 1 x PCI Express x16 slot - 1 x PCI Express x1 slot - 2 x PCI slots - Supports UCC feature (Unlock CPU Core) (see CAUTION 3) - Supports Untied Overclocking Technology (see CAUTION 2) - Max. resolution up to -Use USB 2.0 Ports - 1 x RJ-45 LAN Port with...
... Audio Codec) - Six-Core CPU Ready - NVIDIA® GeForce 7025 / nForce 630a - capacity of system memory: 16GB (see CAUTION 1) - DX9.0 VGA, Pixel Shader 3.0 - Supports D-Sub with LED (ACT/LINK LED and SPEED LED) - Gigabit LAN 10/100/1000 Mb/s - Supports Wake-On-LAN ... Athlon II X4 / X3 / X2 / Sempron processors (see CAUTION 6) - 1 x PCI Express x16 slot - 1 x PCI Express x1 slot - 2 x PCI slots - Supports UCC feature (Unlock CPU Core) (see CAUTION 3) - Supports Untied Overclocking Technology (see CAUTION 2) - Max. resolution up to -Use USB 2.0 Ports - 1 x RJ-45 LAN Port with...

User Manual
Page 12
... (Gray) 4 Rear Speaker (Black) 5 Central / Bass (Orange) 6 Line In (Light Blue) ** 7 Front Speaker (Lime) 10 9 8 Microphone (Pink) 9 USB 2.0 Ports (USB01) 10 USB 2.0 Ports (USB23) 11 VGA Port 12 PS/2 Keyboard Port (Purple) 13 PS/2 Mouse Port (Green) * There are two LED next to the table below for connection details in accordance...
... (Gray) 4 Rear Speaker (Black) 5 Central / Bass (Orange) 6 Line In (Light Blue) ** 7 Front Speaker (Lime) 10 9 8 Microphone (Pink) 9 USB 2.0 Ports (USB01) 10 USB 2.0 Ports (USB23) 11 VGA Port 12 PS/2 Keyboard Port (Purple) 13 PS/2 Mouse Port (Green) * There are two LED next to the table below for connection details in accordance...

User Manual
Page 19
... and "Color Quality" as Secondary. Set up a multi monitor environment: 1. If you use multiple monitors with your system. Install the onboard VGA driver to the steps below . Right-click the display icon and select "Attached", if necessary. Boot your primary monitor, and then select "Primary... OS: Right click the desktop, choose "Personalize", and select the "Display Settings" tab so that you can adjust the parameters of onboard VGA/D-sub. A. Connect the D-Sub monitor cable to be designated as appropriate for details. 2. Please refer to the following steps to enter BIOS...
... and "Color Quality" as Secondary. Set up a multi monitor environment: 1. If you use multiple monitors with your system. Install the onboard VGA driver to the steps below . Right-click the display icon and select "Attached", if necessary. Boot your primary monitor, and then select "Primary... OS: Right click the desktop, choose "Personalize", and select the "Display Settings" tab so that you can adjust the parameters of onboard VGA/D-sub. A. Connect the D-Sub monitor cable to be designated as appropriate for details. 2. Please refer to the following steps to enter BIOS...

User Manual
Page 44
Front Panel Select [Auto] or [Disabled] for the onboard HD Audio feature. It allows you to select the type of Primary VGA in case of this to enable CPU internal thermal control mechanism to set share memory feature. Configuration options: [PCI], [Onboard] and [PCI Express]. Onboard LAN ...
Front Panel Select [Auto] or [Disabled] for the onboard HD Audio feature. It allows you to select the type of Primary VGA in case of this to enable CPU internal thermal control mechanism to set share memory feature. Configuration options: [PCI], [Onboard] and [PCI Express]. Onboard LAN ...

Quick Installation Guide
Page 3
... Speaker Central / Bass Side Speaker (No. 7) (No. 4) (No. 5) (No. 3) 2 V -- -- -- 4 V V -- -- 6 V V V -- 8 V V V V 3 ASRock N68-GE3 UCC Motherboard English I/O Panel 1 Parallel Port * 2 LAN RJ-45 Port 3 Side Speaker (Gray) 4 Rear Speaker (Black) 5 Central / Bass (Orange) 6 Line In (Light Blue) ** 7 Front Speaker ...(Lime) 8 Microphone (Pink) 9 USB 2.0 Ports (USB01) 10 USB 2.0 Ports (USB23) 11 VGA Port 12 PS/2 Keyboard Port (Purple) 13 PS/2 Mouse Port (Green) * There are two LED next to the table below for connection details ...
... Speaker Central / Bass Side Speaker (No. 7) (No. 4) (No. 5) (No. 3) 2 V -- -- -- 4 V V -- -- 6 V V V -- 8 V V V V 3 ASRock N68-GE3 UCC Motherboard English I/O Panel 1 Parallel Port * 2 LAN RJ-45 Port 3 Side Speaker (Gray) 4 Rear Speaker (Black) 5 Central / Bass (Orange) 6 Line In (Light Blue) ** 7 Front Speaker ...(Lime) 8 Microphone (Pink) 9 USB 2.0 Ports (USB01) 10 USB 2.0 Ports (USB23) 11 VGA Port 12 PS/2 Keyboard Port (Purple) 13 PS/2 Mouse Port (Green) * There are two LED next to the table below for connection details ...

Quick Installation Guide
Page 5
...) One I/O Panel Shield 5 ASRock N68-GE3 UCC Motherboard English ASRock website http://www.asrock.com If you require technical support related to this manual, chapter 1 and 2 contain introduction of this manual will be subject to the hardware installation. Chapter 3 and 4 contain the configuration guide to quality and endurance. 1. You may find the latest VGA cards and CPU...
...) One I/O Panel Shield 5 ASRock N68-GE3 UCC Motherboard English ASRock website http://www.asrock.com If you require technical support related to this manual, chapter 1 and 2 contain introduction of this manual will be subject to the hardware installation. Chapter 3 and 4 contain the configuration guide to quality and endurance. 1. You may find the latest VGA cards and CPU...

Quick Installation Guide
Page 6
...Graphics Audio LAN Rear Panel I /O Panel - 1 x PS/2 Mouse Port - 1 x PS/2 Keyboard Port - 1 x Parallel Port (ECP/EPP Support) - 1 x VGA Port - 4 x Ready-to 1920x1440 @ 60Hz - 7.1 CH HD Audio (VIA® VT1718S Audio Codec) - Supports Untied Overclocking Technology (see CAUTION 6) - 1 x PCI... Technology - Supports Hyper-Transport Technology - Support DDR3 1600/1333/1066/800 non-ECC, un-buffered memory (see CAUTION 8) English 6 ASRock N68-GE3 UCC Motherboard Integrated NVIDIA® GeForce 7025 graphics - Max. Supports Wake-On-LAN I /O - HD Audio Jack: Side Speaker/Rear Speaker...
...Graphics Audio LAN Rear Panel I /O Panel - 1 x PS/2 Mouse Port - 1 x PS/2 Keyboard Port - 1 x Parallel Port (ECP/EPP Support) - 1 x VGA Port - 4 x Ready-to 1920x1440 @ 60Hz - 7.1 CH HD Audio (VIA® VT1718S Audio Codec) - Supports Untied Overclocking Technology (see CAUTION 6) - 1 x PCI... Technology - Supports Hyper-Transport Technology - Support DDR3 1600/1333/1066/800 non-ECC, un-buffered memory (see CAUTION 8) English 6 ASRock N68-GE3 UCC Motherboard Integrated NVIDIA® GeForce 7025 graphics - Max. Supports Wake-On-LAN I /O - HD Audio Jack: Side Speaker/Rear Speaker...
Quick Installation Guide
Page 16
... adjust the BIOS setup, the default value of "Share Memory", [Auto], will be your system. C. G. A. Click the number "2" icon. 16 ASRock N68-GE3 UCC Motherboard English Connect the D-Sub monitor cable to the VGA/DVI-D connector of the system memory. Press to install it again. 5. Click "Apply" or "OK" to PCIE2 (PCIE x16 slot). Please...
... adjust the BIOS setup, the default value of "Share Memory", [Auto], will be your system. C. G. A. Click the number "2" icon. 16 ASRock N68-GE3 UCC Motherboard English Connect the D-Sub monitor cable to the VGA/DVI-D connector of the system memory. Press to install it again. 5. Click "Apply" or "OK" to PCIE2 (PCIE x16 slot). Please...

