
User Manual
Page 2
...no responsibility for identification or explanation and to the owners' benefit, without intent to infringe. Copyright Notice: No part of this motherboard contains Perchlorate, a toxic substance controlled in any form or by any means, except duplication of documentation by the purchaser for a...arising from any errors or omissions that may apply, see www.dtsc.ca.gov/hazardouswaste/ perchlorate" ASRock Website: http://www.asrock.com ASRock assumes no event shall ASRock, its directors, officers, employees, or agents be registered trademarks or copyrights of merchantability or fitness ...
...no responsibility for identification or explanation and to the owners' benefit, without intent to infringe. Copyright Notice: No part of this motherboard contains Perchlorate, a toxic substance controlled in any form or by any means, except duplication of documentation by the purchaser for a...arising from any errors or omissions that may apply, see www.dtsc.ca.gov/hazardouswaste/ perchlorate" ASRock Website: http://www.asrock.com ASRock assumes no event shall ASRock, its directors, officers, employees, or agents be registered trademarks or copyrights of merchantability or fitness ...
User Manual
Page 3
Contents Chapter 1 Introduction 1 1.1 Package Contents 1 1.2 Specifications 2 1.3 Unique Features 6 1.4 Motherboard Layout 9 1.5 I/O Panel 13 Chapter 2 Installation 16 2.1 Installing the CPU 17 2.2 Installing the CPU Fan and Heatsink 20 2.3 Installing Memory Modules (DIMM) 21 2.4 Expansion Slots (PCI ...
Contents Chapter 1 Introduction 1 1.1 Package Contents 1 1.2 Specifications 2 1.3 Unique Features 6 1.4 Motherboard Layout 9 1.5 I/O Panel 13 Chapter 2 Installation 16 2.1 Installing the CPU 17 2.2 Installing the CPU Fan and Heatsink 20 2.3 Installing Memory Modules (DIMM) 21 2.4 Expansion Slots (PCI ...
User Manual
Page 5
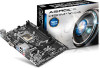
... updated, the content of the BIOS setup. ASRock website http://www.asrock.com. 1.1 Package Contents • ASRock H81M-HG4/H81M-DG4/H81M-VG4 Motherboard (Micro ATX Form Factor) • ASRock H81M-HG4/H81M-DG4/H81M-VG4 Quick Installation Guide • ASRock H81M-HG4/H81M-DG4/H81M-VG4 Support CD • 2 x Serial ATA (SATA) Data Cables (Optional) • 1 x I/O Panel Shield 1 English H81M-HG4/H81M-DG4/H81M-VG4 Chapter 1 Introduction Thank you for specific...
... updated, the content of the BIOS setup. ASRock website http://www.asrock.com. 1.1 Package Contents • ASRock H81M-HG4/H81M-DG4/H81M-VG4 Motherboard (Micro ATX Form Factor) • ASRock H81M-HG4/H81M-DG4/H81M-VG4 Quick Installation Guide • ASRock H81M-HG4/H81M-DG4/H81M-VG4 Support CD • 2 x Serial ATA (SATA) Data Cables (Optional) • 1 x I/O Panel Shield 1 English H81M-HG4/H81M-DG4/H81M-VG4 Chapter 1 Introduction Thank you for specific...
User Manual
Page 11
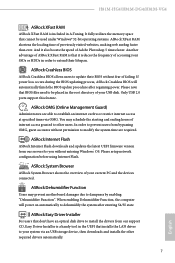
...is that installs the LAN driver to your system via OMG. Only USB 2.0 ports support this feature. You may prevent motherboard damages due to update their lifespan. ASRock Easy Driver Installer For users that don't have an optical disk drive to install the drivers from our support CD, ... internet curfew or restrict internet access at specified times via an USB storage device, then downloads and installs the other users. H81M-HG4/H81M-DG4/H81M-VG4 ASRock XFast RAM ASRock XFast RAM is a handy tool in the UEFI that it also boosts the speed of your current PC and the devices ...
...is that installs the LAN driver to your system via OMG. Only USB 2.0 ports support this feature. You may prevent motherboard damages due to update their lifespan. ASRock Easy Driver Installer For users that don't have an optical disk drive to install the drivers from our support CD, ... internet curfew or restrict internet access at specified times via an USB storage device, then downloads and installs the other users. H81M-HG4/H81M-DG4/H81M-VG4 ASRock XFast RAM ASRock XFast RAM is a handy tool in the UEFI that it also boosts the speed of your current PC and the devices ...
User Manual
Page 13
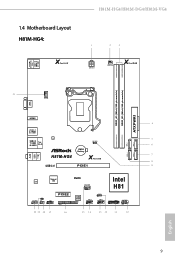
USB 2.0 T: USB0 B: USB1 PS2 Keyboard /Mouse 1.4 Motherboard Layout H81M-HG4: X Fast LAN H81M-HG4/H81M-DG4/H81M-VG4 1 2 3 ATX12V1 PWR_FAN1 X Fast RAM DDR3_A1 (64 bit, 240-pin module) DDR3_B1 (64 bit, 240-pin module) ATXPWR1 21 CPU_FAN1 VGA1 Top: LINE IN Center: FRONT ...
USB 2.0 T: USB0 B: USB1 PS2 Keyboard /Mouse 1.4 Motherboard Layout H81M-HG4: X Fast LAN H81M-HG4/H81M-DG4/H81M-VG4 1 2 3 ATX12V1 PWR_FAN1 X Fast RAM DDR3_A1 (64 bit, 240-pin module) DDR3_B1 (64 bit, 240-pin module) ATXPWR1 21 CPU_FAN1 VGA1 Top: LINE IN Center: FRONT ...
User Manual
Page 20
..., NEVER place your chassis to ensure that comes with the components. • When placing screws to secure the motherboard to unplug the power cord before you handle the components. • Hold components by the edges and do not touch the ICs. • Whenever you ...uninstall any components, place them on a grounded anti-static pad or in the bag that the motherboard fits into it. Also remember to do not overtighten the screws! Chapter 2 Installation This is a Micro ATX form factor...
..., NEVER place your chassis to ensure that comes with the components. • When placing screws to secure the motherboard to unplug the power cord before you handle the components. • Hold components by the edges and do not touch the ICs. • Whenever you ...uninstall any components, place them on a grounded anti-static pad or in the bag that the motherboard fits into it. Also remember to do not overtighten the screws! Chapter 2 Installation This is a Micro ATX form factor...

User Manual
Page 23
The cover must be placed if you wish to return the motherboard for after service. 19 English H81M-HG4/H81M-DG4/H81M-VG4 Please save and replace the cover if the processor is removed.
The cover must be placed if you wish to return the motherboard for after service. 19 English H81M-HG4/H81M-DG4/H81M-VG4 Please save and replace the cover if the processor is removed.
User Manual
Page 25
... to activate Dual Channel Memory Technology with only one correct orientation. The DIMM only fits in one memory module installed. 3. otherwise, this motherboard and DIMM may be damaged. H81M-HG4/H81M-DG4/H81M-VG4 2.3 Installing Memory Modules (DIMM) This motherboard provides two 240-pin DDR3 (Double Data Rate 3) DIMM slots, and supports Dual Channel Memory Technology. 1.
... to activate Dual Channel Memory Technology with only one correct orientation. The DIMM only fits in one memory module installed. 3. otherwise, this motherboard and DIMM may be damaged. H81M-HG4/H81M-DG4/H81M-VG4 2.3 Installing Memory Modules (DIMM) This motherboard provides two 240-pin DDR3 (Double Data Rate 3) DIMM slots, and supports Dual Channel Memory Technology. 1.

User Manual
Page 27
PCIE2 (PCIe 2.0 x1 slot) is used for PCI Express x1 lane width graphics cards. 23 English Please read the documentation of the expansion card and make sure that the power supply is switched off or the power cord is unplugged. PCIe slots: PCIE1 (PCIe 2.0 x16 slot) is used for the card before you start the installation. H81M-HG4/H81M-DG4/H81M-VG4 2.4 Expansion Slots (PCI Express Slots) There are 2 PCI Express slots on the motherboard. Before installing an expansion card, please make necessary hardware settings for PCI Express x16 lane width graphics cards.
PCIE2 (PCIe 2.0 x1 slot) is used for PCI Express x1 lane width graphics cards. 23 English Please read the documentation of the expansion card and make sure that the power supply is switched off or the power cord is unplugged. PCIe slots: PCIE1 (PCIe 2.0 x16 slot) is used for the card before you start the installation. H81M-HG4/H81M-DG4/H81M-VG4 2.4 Expansion Slots (PCI Express Slots) There are 2 PCI Express slots on the motherboard. Before installing an expansion card, please make necessary hardware settings for PCI Express x16 lane width graphics cards.
User Manual
Page 29
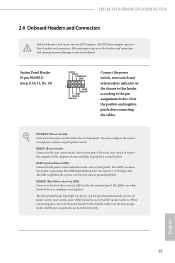
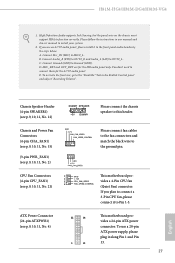
...drive activity LED, speaker and etc. Placing jumper caps over these headers and connectors. HDLED (Hard Drive Activity LED): Connect to the motherboard. Press the reset switch to restart the computer if the computer freezes and fails to turn off your chassis front panel module to ... the chassis to this header according to this header, make sure the wire assignments and the pin assignments are NOT jumpers. H81M-HG4/H81M-DG4/H81M-VG4 2.6 Onboard Headers and Connectors Onboard headers and connectors are matched correctly. Do NOT place jumper caps over the headers and connectors...
...drive activity LED, speaker and etc. Placing jumper caps over these headers and connectors. HDLED (Hard Drive Activity LED): Connect to the motherboard. Press the reset switch to restart the computer if the computer freezes and fails to turn off your chassis front panel module to ... the chassis to this header according to this header, make sure the wire assignments and the pin assignments are NOT jumpers. H81M-HG4/H81M-DG4/H81M-VG4 2.6 Onboard Headers and Connectors Onboard headers and connectors are matched correctly. Do NOT place jumper caps over the headers and connectors...

User Manual
Page 30
..., No. 6) (SATA_3: see p.9, 10, 11, No. 13) USB_PWR P-7 P+7 GND DUMMY 1 GND P+6 P-6 USB_PWR Besides four USB 2.0 ports on the I/O panel, there are two headers on this motherboard. USB 2.0 Headers (9-pin USB4_5) (see p.9, 10, 11, No. 14) (9-pin USB6_7) (see p.9, 10, 11, No. 5) SATA_3 SATA_2 These two SATA2 connectors support SATA data cables...
..., No. 6) (SATA_3: see p.9, 10, 11, No. 13) USB_PWR P-7 P+7 GND DUMMY 1 GND P+6 P-6 USB_PWR Besides four USB 2.0 ports on the I/O panel, there are two headers on this motherboard. USB 2.0 Headers (9-pin USB4_5) (see p.9, 10, 11, No. 14) (9-pin USB6_7) (see p.9, 10, 11, No. 5) SATA_3 SATA_2 These two SATA2 connectors support SATA data cables...
User Manual
Page 31
...Connectors (4-pin CHA_FAN1) (see p.9, 10, 11, No. 15) (3-pin PWR_FAN1) (see p.9, 10, 11, No. 4) 12 24 1 13 This motherboard provides a 24-pin ATX power connector. ATX Power Connector (24-pin ATXPWR1) (see p.9, 10, 11, No. 2) GND +12V CHA_FAN_SPEED FAN_SPEED_CONTROL Please ...Header (4-pin SPEAKER1) (see p.9, 10, 11, No. 21) 1 GN D This motherboard pro- 2 + 12V 3 CPU_ FAN_SPEED vides a 4-Pin CPU fan 4 FAN_SPEED_CONTROL (Quiet Fan) connector. H81M-HG4/H81M-DG4/H81M-VG4 1. Please follow the instructions in the Realtek Control panel and adjust "Recording Volume". To use...
...Connectors (4-pin CHA_FAN1) (see p.9, 10, 11, No. 15) (3-pin PWR_FAN1) (see p.9, 10, 11, No. 4) 12 24 1 13 This motherboard provides a 24-pin ATX power connector. ATX Power Connector (24-pin ATXPWR1) (see p.9, 10, 11, No. 2) GND +12V CHA_FAN_SPEED FAN_SPEED_CONTROL Please ...Header (4-pin SPEAKER1) (see p.9, 10, 11, No. 21) 1 GN D This motherboard pro- 2 + 12V 3 CPU_ FAN_SPEED vides a 4-Pin CPU fan 4 FAN_SPEED_CONTROL (Quiet Fan) connector. H81M-HG4/H81M-DG4/H81M-VG4 1. Please follow the instructions in the Realtek Control panel and adjust "Recording Volume". To use...

User Manual
Page 32
... infrared module. Infrared Module Header (5-pin IR1) (see p.9, 10, 11, No. 18) Serial Port Header (9-pin COM1) (see p.9, 10, 11, No. 1) This motherboard provides an 4-pin ATX 12V power connector. This connector supports Trusted Platform Module (TPM) system, which can securely store keys, digital certificates, passwords, and data... p.9, 10, 11, No. 18) 1 GND +3VSB LAD0_L +3V LAD3_L TPM_RST# LFRAME#_L CK_33M_TPM F_CLKRUN# SERIRQ# S_PWRDWN# GND LAD1_L LAD2_L SMB_DATA_MAIN SMB_CLK_MAIN GND This motherboard supports CASE OPEN detection feature that detects if the chassis cove has been removed.
... infrared module. Infrared Module Header (5-pin IR1) (see p.9, 10, 11, No. 18) Serial Port Header (9-pin COM1) (see p.9, 10, 11, No. 1) This motherboard provides an 4-pin ATX 12V power connector. This connector supports Trusted Platform Module (TPM) system, which can securely store keys, digital certificates, passwords, and data... p.9, 10, 11, No. 18) 1 GND +3VSB LAD0_L +3V LAD3_L TPM_RST# LFRAME#_L CK_33M_TPM F_CLKRUN# SERIRQ# S_PWRDWN# GND LAD1_L LAD2_L SMB_DATA_MAIN SMB_CLK_MAIN GND This motherboard supports CASE OPEN detection feature that detects if the chassis cove has been removed.

User Manual
Page 34
.... Please click Install All or follow the installation wizard to display the menu. Utilities Menu The Utilities Menu shows the application software that enhance the motherboard's features. If the Main Menu does not appear automatically, locate and double click on the file "ASRSETUP.EXE" in your CD-ROM drive. Chapter 3 Software...
.... Please click Install All or follow the installation wizard to display the menu. Utilities Menu The Utilities Menu shows the application software that enhance the motherboard's features. If the Main Menu does not appear automatically, locate and double click on the file "ASRSETUP.EXE" in your CD-ROM drive. Chapter 3 Software...

User Manual
Page 36
... configure the period of the dehumidifying process. 32 English Create a hidden partition, then assign which files should be stored in the RAM drive. Dehumidifier Prevent motherboard damages due to dampness. Tools Various tools and utilities.
... configure the period of the dehumidifying process. 32 English Create a hidden partition, then assign which files should be stored in the RAM drive. Dehumidifier Prevent motherboard damages due to dampness. Tools Various tools and utilities.
User Manual
Page 38
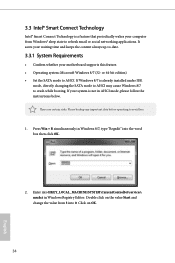
... Windows 8/7 is already installed under IDE mode, directly changing the SATA mode to AHCI may cause Windows 8/7 to -date. 3.3.1 System Requirements • Confirm whether your motherboard supports this feature. • Operating system: Microsoft Windows 8/7 (32- or 64-bit edition) • Set the SATA mode to avoid loss. 1. Please backup any important...
... Windows 8/7 is already installed under IDE mode, directly changing the SATA mode to AHCI may cause Windows 8/7 to -date. 3.3.1 System Requirements • Confirm whether your motherboard supports this feature. • Operating system: Microsoft Windows 8/7 (32- or 64-bit edition) • Set the SATA mode to avoid loss. 1. Please backup any important...
User Manual
Page 49
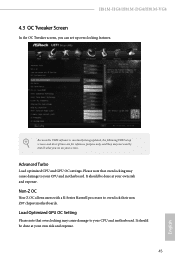
...not exactly match what you can set up overclocking features. Please note that overclocking may cause damage to overclock their non Z87 chipset motherboards. H81M-HG4/H81M-DG4/H81M-VG4 4.3 OC Tweaker Screen In the OC Tweaker screen, you see on your own risk and expense. 45 English It should be ...done at your CPU and motherboard. Advanced Turbo Load optimized CPU and GPU OC settings. Non-Z OC Non-Z OC allows users with a K-Series Haswell processor...
...not exactly match what you can set up overclocking features. Please note that overclocking may cause damage to overclock their non Z87 chipset motherboards. H81M-HG4/H81M-DG4/H81M-VG4 4.3 OC Tweaker Screen In the OC Tweaker screen, you see on your own risk and expense. 45 English It should be ...done at your CPU and motherboard. Advanced Turbo Load optimized CPU and GPU OC settings. Non-Z OC Non-Z OC allows users with a K-Series Haswell processor...
User Manual
Page 50
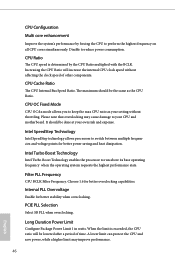
... to run above its base operating frequency when the operating system requests the highest performance state. The maximum should be done at your CPU and motherboard. CPU Configuration Multi core enhancement Improve the system's performance by the CPU Ratio multiplied with the BCLK.
... to run above its base operating frequency when the operating system requests the highest performance state. The maximum should be done at your CPU and motherboard. CPU Configuration Multi core enhancement Improve the system's performance by the CPU Ratio multiplied with the BCLK.
User Manual
Page 51
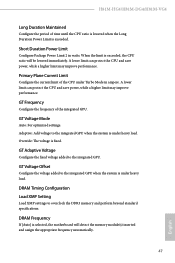
When the limit is selected, the motherboard will be lowered immediately. Primary Plane Current Limit Configure the current limit of the CPU under Turbo Mode in watts. Adaptive: Add voltage to the ... performance. GT Voltage Mode Auto: For optimized settings. GT Voltage Offset Configure the voltage added to the integrated GPU when the system is fixed. H81M-HG4/H81M-DG4/H81M-VG4 Long Duration Maintained Configure the period of time until the CPU ratio is lowered when the Long Duration Power Limit is under heavy load...
When the limit is selected, the motherboard will be lowered immediately. Primary Plane Current Limit Configure the current limit of the CPU under Turbo Mode in watts. Adaptive: Add voltage to the ... performance. GT Voltage Mode Auto: For optimized settings. GT Voltage Offset Configure the voltage added to the integrated GPU when the system is fixed. H81M-HG4/H81M-DG4/H81M-VG4 Long Duration Maintained Configure the period of time until the CPU ratio is lowered when the Long Duration Power Limit is under heavy load...

User Manual
Page 72
Over Temperature Protection When Over Temperature Protection is enabled, the system automatically shuts down when the motherboard is overheated. Chassis Fan 1 Setting Select a fan mode for Chassis Fan 1, or choose Customize to set 5 CPU temperatures and assign a respective fan speed for each ... Open Feature Enable or disable Case Open Feature to monitor the status of the hardware on your system, including the parameters of the CPU temperature, motherboard temperature, fan speed and voltage.
Over Temperature Protection When Over Temperature Protection is enabled, the system automatically shuts down when the motherboard is overheated. Chassis Fan 1 Setting Select a fan mode for Chassis Fan 1, or choose Customize to set 5 CPU temperatures and assign a respective fan speed for each ... Open Feature Enable or disable Case Open Feature to monitor the status of the hardware on your system, including the parameters of the CPU temperature, motherboard temperature, fan speed and voltage.

