User's Manual_E2060SWD
Page 15
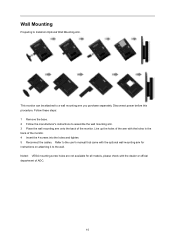
... of the monitor. 4 Insert the 4 screws into the holes and tighten. 5 Reconnect the cables. Line up the holes of AOC. 15 Noted : VESA mounting screw holes are not available for all models, please check with the dealer or official department of the arm with the optional wall mounting arm for instructions on...
... of the monitor. 4 Insert the 4 screws into the holes and tighten. 5 Reconnect the cables. Line up the holes of AOC. 15 Noted : VESA mounting screw holes are not available for all models, please check with the dealer or official department of the arm with the optional wall mounting arm for instructions on...

User's Manual_E2060SWD
Page 23
E2060SW: 1 Auto/Exit 2 ECO(DCR)/< 3 4:3 or Wide / > 4 Menu/Enter 5 Power E960SRD: 1 2 3 4 5 Source/Auto/Exit ECO(DCR)/< > Menu/Enter Power Power Press the Power button to select the Eco mode of brightness and DCR/I -Care)/ < Press the Eco key continuously to turn on when there is no OSD. ( Eco mode hot key may not be available in all models). Eco (DCR/I -Care on /off the monitor. Volume / > When there is no OSD,Press Volume button to active volume adjustment bar,Press
E2060SW: 1 Auto/Exit 2 ECO(DCR)/< 3 4:3 or Wide / > 4 Menu/Enter 5 Power E960SRD: 1 2 3 4 5 Source/Auto/Exit ECO(DCR)/< > Menu/Enter Power Power Press the Power button to select the Eco mode of brightness and DCR/I -Care)/ < Press the Eco key continuously to turn on when there is no OSD. ( Eco mode hot key may not be available in all models). Eco (DCR/I -Care on /off the monitor. Volume / > When there is no OSD,Press Volume button to active volume adjustment bar,Press

User's Manual_E2060SWD
Page 34
...the 'Monitor' button, then click on 'Control Panel'. 3. Driver Monitor Driver Windows 2000 1. If the 'Properties' button is inactive, it means your monitor model and click on 'Have Disk...'. 8. Select the 'Settings' tab then click on 'Properties' button. Click on 'Advanced...'. 5. Click on the 'Next' ... then click on the 'Next' button. 11. Double click on the 'Next' button. 10. Click on the 'OK' button, select your monitor model and click on the 'Display' Icon. 4. Click on 'Driver' and then click on the 'Display' Icon. 4. Double click on 'Update Driver...'...
...the 'Monitor' button, then click on 'Control Panel'. 3. Driver Monitor Driver Windows 2000 1. If the 'Properties' button is inactive, it means your monitor model and click on 'Have Disk...'. 8. Select the 'Settings' tab then click on 'Properties' button. Click on 'Advanced...'. 5. Click on the 'Next' ... then click on the 'Next' button. 11. Double click on the 'Next' button. 10. Click on the 'OK' button, select your monitor model and click on the 'Display' Icon. 4. Click on 'Driver' and then click on the 'Display' Icon. 4. Double click on 'Update Driver...'...

User's Manual_E2060SWD
Page 37
... verify its compatibility with Windows® XP' message, please click on the 'Next' button. 10. button, then click on the 'Next' button. - Select your monitor model and click on the 'Browse...' Click on the 'Have disk...' 8. Click on the 'Finish' button then the 'Close' button. 14. Click on the 'OK' button...
... verify its compatibility with Windows® XP' message, please click on the 'Next' button. 10. button, then click on the 'Next' button. - Select your monitor model and click on the 'Browse...' Click on the 'Have disk...' 8. Click on the 'Finish' button then the 'Close' button. 14. Click on the 'OK' button...

User's Manual_E2060SWD
Page 39
... as is displayed, as shown in the "Monitor" tab. in sequence. 39 Select your monitor is completed. Check the "Browse my computer for your monitor model and click on the 'Have disk...' Click "Update Driver..." button and then select the appropriate drive F:\Driver (CD-ROM Drive). 8. 4. If the message "Windows needs...
... as is displayed, as shown in the "Monitor" tab. in sequence. 39 Select your monitor is completed. Check the "Browse my computer for your monitor model and click on the 'Have disk...' Click "Update Driver..." button and then select the appropriate drive F:\Driver (CD-ROM Drive). 8. 4. If the message "Windows needs...

User's Manual_E2060SWD
Page 43
10. Select the "xxx.inf" file and click the "Open" button. Click the "OK" button. 12. The system will be copied from the CD to the following directory: X:\Driver\module name (where X is the drive letter designator for the CD-ROM drive). 11. Restart the system. The files will automatically select the maximum refresh rate and corresponding Color Matching Profiles. 43 Close all open windows and remove the CD. 14. Click on the "Browse" button and navigate to your monitor model and click the "Next" button. Select your hard disk drive. 13. Click the "Have Disk" button.
10. Select the "xxx.inf" file and click the "Open" button. Click the "OK" button. 12. The system will be copied from the CD to the following directory: X:\Driver\module name (where X is the drive letter designator for the CD-ROM drive). 11. Restart the system. The files will automatically select the maximum refresh rate and corresponding Color Matching Profiles. 43 Close all open windows and remove the CD. 14. Click on the "Browse" button and navigate to your monitor model and click the "Next" button. Select your hard disk drive. 13. Click the "Have Disk" button.

User's Manual_E2060SWD
Page 44
..." button. Restart the system. Start Windows® 8 2. Click the "Driver" tab. 9. Close all open windows and remove the CD. 15. Windows 8 1. Set the "View by AOC. Click on the monitor. Click the "Monitor" tab and then click the "Properties" button. 8. " and then click the "Browse my computer for the CD-ROM... Disk" button. Select your monitor display setting by clicking on the "Change display settings" button. 6. i-Menu Welcome to "i-Menu" software by " to adjust your monitor model and click the "Next" button. i-Menu makes it easy to "Large icons" or "Small icons". 4.
..." button. Restart the system. Start Windows® 8 2. Click the "Driver" tab. 9. Close all open windows and remove the CD. 15. Windows 8 1. Set the "View by AOC. Click on the monitor. Click the "Monitor" tab and then click the "Properties" button. 8. " and then click the "Browse my computer for the CD-ROM... Disk" button. Select your monitor display setting by clicking on the "Change display settings" button. 6. i-Menu Welcome to "i-Menu" software by " to adjust your monitor model and click the "Next" button. i-Menu makes it easy to "Large icons" or "Small icons". 4.

User's Manual_E2060SWD
Page 48
...) does not appear, contact the Service Center or your computer is not available on the screen Is the power cord connected properly? Make sure the AOC Monitor Drivers are using the DVI cable) Check the DVI cable connection. * DVI input is operational by hitting the CAPS LOCK key on the back... and frequency that the monitor can be snugly fitted in the ON position. Check the power cord connection and power supply. No images on every model. Is the cable connected correctly? (Connected using the D-sub cable) Check the DB-15 cable connection. (Connected using .
...) does not appear, contact the Service Center or your computer is not available on the screen Is the power cord connected properly? Make sure the AOC Monitor Drivers are using the DVI cable) Check the DVI cable connection. * DVI input is operational by hitting the CAPS LOCK key on the back... and frequency that the monitor can be snugly fitted in the ON position. Check the power cord connection and power supply. No images on every model. Is the cable connected correctly? (Connected using the D-sub cable) Check the DB-15 cable connection. (Connected using .

User's Manual_E2060SWD
Page 50
...-D Detachable 0° to 40° -25° to 55° 10% to 85% (non-condensing) 5% to 93% (non-condensing) 50 Specification General Specification Panel Resolution Model name Driving system Viewable Image Size Pixel pitch Video Separate Sync. DVI 24pin Input Video Signal Power Source Power Consumption Off timer Speakers(E960SRDA/ E960PRDA...
...-D Detachable 0° to 40° -25° to 55° 10% to 85% (non-condensing) 5% to 93% (non-condensing) 50 Specification General Specification Panel Resolution Model name Driving system Viewable Image Size Pixel pitch Video Separate Sync. DVI 24pin Input Video Signal Power Source Power Consumption Off timer Speakers(E960SRDA/ E960PRDA...

User's Manual_E2060SWD
Page 53
Model name E2460PWHU / E2460SWHU Driving system TFT Color LCD Viewable Image Size 59.8 cm diagonal Panel Pixel pitch Video 0. 2715 mm(H) x 0. 2715 mm(V) R, G, B Analog lnterface & Digital ...
Model name E2460PWHU / E2460SWHU Driving system TFT Color LCD Viewable Image Size 59.8 cm diagonal Panel Pixel pitch Video 0. 2715 mm(H) x 0. 2715 mm(V) R, G, B Analog lnterface & Digital ...

User's Manual_E2060SWD
Page 54
Model name E2460SHU / E2460PHU Driving system TFT Color LCD Viewable Image Size 61.0 cm diagonal Panel Pixel pitch Video 0. 27675 mm(H) x 0. 27675 mm(V) R, G, B Analog lnterface & Digital ...
Model name E2460SHU / E2460PHU Driving system TFT Color LCD Viewable Image Size 61.0 cm diagonal Panel Pixel pitch Video 0. 27675 mm(H) x 0. 27675 mm(V) R, G, B Analog lnterface & Digital ...

User's Manual_E2060SWD
Page 61
... and can be used in order to comply with the emission limits. Regulation FCC Notice FCC Class B Radio Frequency Interference Statement WARNING: (FOR FCC CERTIFIED MODELS) NOTE: This equipment has been tested and found to comply with the limits for a Class B digital device, pursuant to Part 15 of the following measures...
... and can be used in order to comply with the emission limits. Regulation FCC Notice FCC Class B Radio Frequency Interference Statement WARNING: (FOR FCC CERTIFIED MODELS) NOTE: This equipment has been tested and found to comply with the limits for a Class B digital device, pursuant to Part 15 of the following measures...

User's Manual_E2060SWD
Page 63
have determined that this product meets the ENERGY STAR® guidelines for energy efficiency. (FOR EPA CERTIFIED MODELS) 63 As an ENERGY STAR® Partner, AOC International (Europe) BV and Envision Peripherals, Inc. EPA Energy Star ENERGY STAR® is a U.S. registered mark.
have determined that this product meets the ENERGY STAR® guidelines for energy efficiency. (FOR EPA CERTIFIED MODELS) 63 As an ENERGY STAR® Partner, AOC International (Europe) BV and Envision Peripherals, Inc. EPA Energy Star ENERGY STAR® is a U.S. registered mark.

User's Manual_E2060SWD
Page 64
....br/2007/php/index.php?req=pagina&pgn_id=134 (FOR EPEAT GOLD CERTIFIED MODELS) 64 If a local recycling center is not available, AOC will only recycle AOC monitor packaging. Please refer to the following website address: Only for efforts to reduce the environmental impact of your ...monitor carton and filler materials properly. AOC believes in the public and private sectors evaluate, compare and select desktop computers, notebooks and monitors based on their environmental attributes. EPEAT...
....br/2007/php/index.php?req=pagina&pgn_id=134 (FOR EPEAT GOLD CERTIFIED MODELS) 64 If a local recycling center is not available, AOC will only recycle AOC monitor packaging. Please refer to the following website address: Only for efforts to reduce the environmental impact of your ...monitor carton and filler materials properly. AOC believes in the public and private sectors evaluate, compare and select desktop computers, notebooks and monitors based on their environmental attributes. EPEAT...
