2230Fm Manual
Page 1
...are as follows: NOTE: A NOTE indicates important information that helps you how to avoid the problem. Product Registration Please link www.aoc.com, select your computer system. The sections are used as follows: Safety Instructions: lists safety information. Setup...National Conventions The following subsections describe notational conventions used in Product Registration to change without notice. 2230Fm User's Manual About This Guide This guide describes the monitor's features, setup, and operation. Some warnings may appear in this document is mandated by ...
...are as follows: NOTE: A NOTE indicates important information that helps you how to avoid the problem. Product Registration Please link www.aoc.com, select your computer system. The sections are used as follows: Safety Instructions: lists safety information. Setup...National Conventions The following subsections describe notational conventions used in Product Registration to change without notice. 2230Fm User's Manual About This Guide This guide describes the monitor's features, setup, and operation. Some warnings may appear in this document is mandated by ...
2230Fm Manual
Page 2
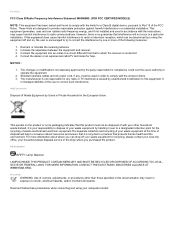
... on , the user is recycled in a manner that this equipment does cause harmful interference to radio or television reception, which the receiver is your computer monitor: FCC Notice FCC Class B Radio Frequency Interference Statement WARNING: (FOR FCC CERTIFIED MODELS) NOTE: This equipment has been tested and found to comply with the...
... on , the user is recycled in a manner that this equipment does cause harmful interference to radio or television reception, which the receiver is your computer monitor: FCC Notice FCC Class B Radio Frequency Interference Statement WARNING: (FOR FCC CERTIFIED MODELS) NOTE: This equipment has been tested and found to comply with the...
2230Fm Manual
Page 3
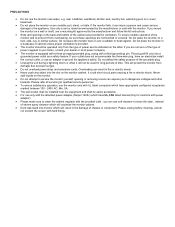
...the type of the cabinet are not blocked or covered. This plug will not be used for monitors with the monitor. Do not place the monitor on the monitor cabinet. Do not place the monitor near water, e.g. Use only a cart or stand recommended by the manufacturer and follow the kit ...ventilation is equipped with a three-pronged grounded plug, a plug with hard things. To ensure reliable operation of time. Overloading can use the monitor near or over a radiator or heat register. It could short circuit parts causing a fire or electric shock. Please unplug before cleaning ,...
...the type of the cabinet are not blocked or covered. This plug will not be used for monitors with the monitor. Do not place the monitor on the monitor cabinet. Do not place the monitor near water, e.g. Use only a cart or stand recommended by the manufacturer and follow the kit ...ventilation is equipped with a three-pronged grounded plug, a plug with hard things. To ensure reliable operation of time. Overloading can use the monitor near or over a radiator or heat register. It could short circuit parts causing a fire or electric shock. Please unplug before cleaning ,...
2230Fm Manual
Page 4
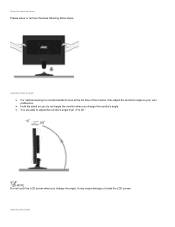
It may cause damage or break the LCD screen. NOTE: Do not touch the LCD screen when you change the angle. Setup the stand and base Please setup or remove the base following below steps. Adjusting Viewing Angle For optimal viewing it is recommended to look at the full face of the monitor, then adjust the monitor's angle to your own preference. Hold the stand so you do not topple the monitor when you change the monitor's angle. You are able to adjust the monitor's angle from -5°to 20 °. Attaching the Cables
It may cause damage or break the LCD screen. NOTE: Do not touch the LCD screen when you change the angle. Setup the stand and base Please setup or remove the base following below steps. Adjusting Viewing Angle For optimal viewing it is recommended to look at the full face of the monitor, then adjust the monitor's angle to your own preference. Hold the stand so you do not topple the monitor when you change the monitor's angle. You are able to adjust the monitor's angle from -5°to 20 °. Attaching the Cables

2230Fm Manual
Page 5
...Optional ¨C Requires a video card with DVI port) - Connect one end of the 24-pin DVI cable to the back of the monitor 6. Turn on the back of the monitor and connect the other end to the computer's D-Sub port. 3. (Optional ¨C Requires a video card with HDMI port) - Power... 2.HDMI 3. Connect one end of the 15-pin D-Sub cable to the back of the monitor. 2. Analog 5. If your monitor and computer. If it does not display an image, see Troubleshooting. DVI 4. Audio 6. USB Turn off your computer before performing the procedure...
...Optional ¨C Requires a video card with DVI port) - Connect one end of the 24-pin DVI cable to the back of the monitor 6. Turn on the back of the monitor and connect the other end to the computer's D-Sub port. 3. (Optional ¨C Requires a video card with HDMI port) - Power... 2.HDMI 3. Connect one end of the 15-pin D-Sub cable to the back of the monitor. 2. Analog 5. If your monitor and computer. If it does not display an image, see Troubleshooting. DVI 4. Audio 6. USB Turn off your computer before performing the procedure...
2230Fm Manual
Page 6
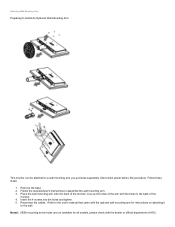
... holes are not available for instructions on attaching it to the wall. Attaching Wall Mounting Arm Preparing to Install An Optional Wall Mounting Arm This monitor can be attached to assemble the wall mounting arm. 3. Line up the holes of the arm with the dealer or official department of the... monitor. Reconnect the cables. Remove the base. 2. Refer to the user's manual that came with the optional wall mounting arm for all models, please check with ...
... holes are not available for instructions on attaching it to the wall. Attaching Wall Mounting Arm Preparing to Install An Optional Wall Mounting Arm This monitor can be attached to assemble the wall mounting arm. 3. Line up the holes of the arm with the dealer or official department of the... monitor. Reconnect the cables. Remove the base. 2. Refer to the user's manual that came with the optional wall mounting arm for all models, please check with ...
2230Fm Manual
Page 7
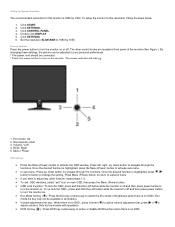
...1680 by 1050. Click START. 2. Click CONTROL PANEL. 4. External Controls Press the power button to turn the monitor on . Once the desired function is highlighted, press the Menu (Power) button to activate sub-menu . .... Set the resolution SLIDE-BAR to select the Eco mode of the monitor (See Figure ). press and hold the Left button while the monitor is off and then press power button to turn the monitor on or off and then press power button to turn on . &#... personal preferences. * The power cord should be connected. * Press the power button to turn the monitor on the...
...1680 by 1050. Click START. 2. Click CONTROL PANEL. 4. External Controls Press the power button to turn the monitor on . Once the desired function is highlighted, press the Menu (Power) button to activate sub-menu . .... Set the resolution SLIDE-BAR to select the Eco mode of the monitor (See Figure ). press and hold the Left button while the monitor is off and then press power button to turn the monitor on or off and then press power button to turn on . &#... personal preferences. * The power cord should be connected. * Press the power button to turn the monitor on the...
2230Fm Manual
Page 8
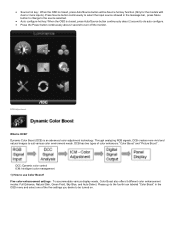
... is closed , press Auto/Source button continuously about 2 second to do auto configure. Press the Power button continuously about 2 second to turn off the monitor. DCB Adjustment What is an advanced color adjustment technology. DCB has two types of the five settings you desire to suit various color environment needs...
... is closed , press Auto/Source button continuously about 2 second to do auto configure. Press the Power button continuously about 2 second to turn off the monitor. DCB Adjustment What is an advanced color adjustment technology. DCB has two types of the five settings you desire to suit various color environment needs...

2230Fm Manual
Page 14
... resolution is wide format, the item of OSD button on or off 14-100 0-100 0-100 0-100 0-100 H. Please click here to adjust your monitor display setting by AOC. i-Menu makes it easy to setup the software. To complete installation , please follow the installation guide . LED Indicators Status Full Power Mode Active... two function is disalbe to use "i-Menu" software by menus on the screen instead of "Image Ratio" is turned off accordingly. position V.position on the monitor.
... resolution is wide format, the item of OSD button on or off 14-100 0-100 0-100 0-100 0-100 H. Please click here to adjust your monitor display setting by AOC. i-Menu makes it easy to setup the software. To complete installation , please follow the installation guide . LED Indicators Status Full Power Mode Active... two function is disalbe to use "i-Menu" software by menus on the screen instead of "Image Ratio" is turned off accordingly. position V.position on the monitor.
2230Fm Manual
Page 17
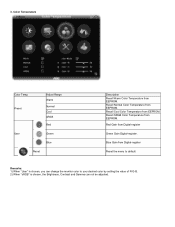
... Digital-register Green Gain Digital-register. Red Gain from Digital-register Reset the menu to default Remarks: 1) When "User" is chosen, you can change the monitor color to your desired color by setting the value of R-G-B. 2) When "sRGB" is chosen, the Brightness, Contrast and Gamma can not be adjusted. 3. Recall Cool...
... Digital-register Green Gain Digital-register. Red Gain from Digital-register Reset the menu to default Remarks: 1) When "User" is chosen, you can change the monitor color to your desired color by setting the value of R-G-B. 2) When "sRGB" is chosen, the Brightness, Contrast and Gamma can not be adjusted. 3. Recall Cool...
2230Fm Manual
Page 21
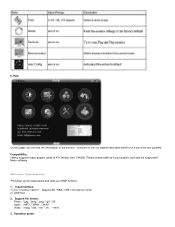
...) Pls follow up the steps below and start your graphic card was not supported iMenu software. Compatibility : i-Menu supports major graphic cards of the monitor . Help On this page, you have any problem.
...) Pls follow up the steps below and start your graphic card was not supported iMenu software. Compatibility : i-Menu supports major graphic cards of the monitor . Help On this page, you have any problem.

2230Fm Manual
Page 22
1) , Key button Introduction : : Sel - : Sel + : Exit : Enter / Source 2) Operation guide with key button Turn on the monitor . Incert one of the cards (SD/MS/MMC/XD) into the 4-in-1 slot or USB Host . press button to activate the OSD source ...
1) , Key button Introduction : : Sel - : Sel + : Exit : Enter / Source 2) Operation guide with key button Turn on the monitor . Incert one of the cards (SD/MS/MMC/XD) into the 4-in-1 slot or USB Host . press button to activate the OSD source ...
2230Fm Manual
Page 24
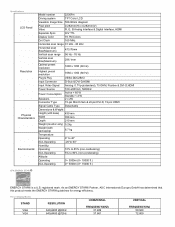
... DVI-D, 19 pin HDMI Signal Cable Type Detachable Dimensions & Weight: Height (with base) 439 mm Width 358 mm Depth 210 mm Weight (monitor only) 5.2kg Weight (with packaging) 6.7 kg Temperature: Operating 0° to 40° Non-Operating -20°to 60° Humidity...HORIZONTAL FREQUENCY(kHZ) 31.469 37.861 VERTICAL FREQUENCY(Hz) 59.940 72.809 Specifications LCD Panel Resolution Physical Characteristics Environmental Model number 2230Fm Driving system TFT Color LCD Viewable Image Size 558.68mm diagoanl Pixel pitch 0.282mm(H) x 0.282mm(V) Video R, G, B Analog lnterface ...
... DVI-D, 19 pin HDMI Signal Cable Type Detachable Dimensions & Weight: Height (with base) 439 mm Width 358 mm Depth 210 mm Weight (monitor only) 5.2kg Weight (with packaging) 6.7 kg Temperature: Operating 0° to 40° Non-Operating -20°to 60° Humidity...HORIZONTAL FREQUENCY(kHZ) 31.469 37.861 VERTICAL FREQUENCY(Hz) 59.940 72.809 Specifications LCD Panel Resolution Physical Characteristics Environmental Model number 2230Fm Driving system TFT Color LCD Viewable Image Size 558.68mm diagoanl Pixel pitch 0.282mm(H) x 0.282mm(V) Video R, G, B Analog lnterface ...

2230Fm Manual
Page 26
... 23 24 Signal Name TMDS Data 0TMDS Data 0+ TMDS Data 0/5 Shield TMDS Data 5TMDS Data 5+ TMDS Clock Shield TMDS Clock + TMDS Clock - It allows the monitor to the VESA DDC STANDARD. on the level of its display capabilities. Pin No. 1 2 3 4 5 6 7 8 Signal Name TMDS Data 2TMDS Data 2+ TMDS Data 2/4 Shield TMDS Data... SCL SDA Pin No. 17 18 19 Signal Name DDC/CEC Ground +5V Power Hot Plug Detect Plug and Play Plug & Play DDC2B Feature This monitor is a bi-directional data channel based on the I2C protocol.
... 23 24 Signal Name TMDS Data 0TMDS Data 0+ TMDS Data 0/5 Shield TMDS Data 5TMDS Data 5+ TMDS Clock Shield TMDS Clock + TMDS Clock - It allows the monitor to the VESA DDC STANDARD. on the level of its display capabilities. Pin No. 1 2 3 4 5 6 7 8 Signal Name TMDS Data 2TMDS Data 2+ TMDS Data 2/4 Shield TMDS Data... SCL SDA Pin No. 17 18 19 Signal Name DDC/CEC Ground +5V Power Hot Plug Detect Plug and Play Plug & Play DDC2B Feature This monitor is a bi-directional data channel based on the I2C protocol.
2230Fm Spec Sheet
Page 1
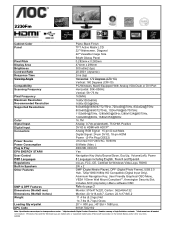
A06/08 2230Fm Cabinet Color Panel Piano Black Finish TFT Active Matrix LCD 22" Widescreen, Diagonal 22" Viewable Image Size Pixel Pitch Display Area Brightness Contrast Ratio Response ... (Digital Input Only), Aluminum Navigation Key, User Friendly Graphical OSD Menu, VESA 100mm Wall Mount Compliant**, Kensington Security Slot, includes AOC proprietory i-Menu software OSD Refer to page 2 Monitor: 510x417x220, Carton: 562x454x132 Monitor: 20.1x16.4x8.7, Carton: 22.1x17.9x5.2 11.4 lbs (5.2 kgs) Net 14.7 lbs (6.7 kgs) Gross 20' = 800 pcs.; 40' Std...
A06/08 2230Fm Cabinet Color Panel Piano Black Finish TFT Active Matrix LCD 22" Widescreen, Diagonal 22" Viewable Image Size Pixel Pitch Display Area Brightness Contrast Ratio Response ... (Digital Input Only), Aluminum Navigation Key, User Friendly Graphical OSD Menu, VESA 100mm Wall Mount Compliant**, Kensington Security Slot, includes AOC proprietory i-Menu software OSD Refer to page 2 Monitor: 510x417x220, Carton: 562x454x132 Monitor: 20.1x16.4x8.7, Carton: 22.1x17.9x5.2 11.4 lbs (5.2 kgs) Net 14.7 lbs (6.7 kgs) Gross 20' = 800 pcs.; 40' Std...


