
Operating Instructions
Page 1
88-NF8-903-01 971120AMI-M-9 For assistance and information call toll free I-800-BUY-AIWA (United States and Puerto Rico) mm DIGITAL AIJDIO
88-NF8-903-01 971120AMI-M-9 For assistance and information call toll free I-800-BUY-AIWA (United States and Puerto Rico) mm DIGITAL AIJDIO
Operating Instructions
Page 2
CX-NA303 SX-NA302 SX-R275 (NSX-A304 only) 1 ENGLISH Serial No. (Lot No.) Read the Operating Instructions carefully and completely before operating the unit. Installation 1 Water ... . Owner's record For your convenience, record the model number and serial number (you will find them when you contact your set) in case of your Aiwa dealer in the space provided below . Please refer to avoid being severely bent, pinched, or walked upon. All warnings and cautions in temperatures less than...
CX-NA303 SX-NA302 SX-R275 (NSX-A304 only) 1 ENGLISH Serial No. (Lot No.) Read the Operating Instructions carefully and completely before operating the unit. Installation 1 Water ... . Owner's record For your convenience, record the model number and serial number (you will find them when you contact your set) in case of your Aiwa dealer in the space provided below . Please refer to avoid being severely bent, pinched, or walked upon. All warnings and cautions in temperatures less than...
Operating Instructions
Page 3
4 Extension cord - in performance - The unit has been dropped, or the cabinet has been damaged DO NOT ATTEMPT TO SERVICE THE UNIT YOURSELF. Article 810 of the National Electrical Code, ANS1/NFPA 70, provides information on proper grounding of the mast, supporting structure, and the lead-in wire to grounding terminals, and requirements for several months or more. The AC power cord or plug has been damaged - Antenna Ground!ng According to the National Electrical Code ~ ANTENNA LEAD IN WIRE I ELECTRIC ANTENNA DISCHARGE UNIT (NEC SECTION 810-20) I /11 -i NEC-...
4 Extension cord - in performance - The unit has been dropped, or the cabinet has been damaged DO NOT ATTEMPT TO SERVICE THE UNIT YOURSELF. Article 810 of the National Electrical Code, ANS1/NFPA 70, provides information on proper grounding of the mast, supporting structure, and the lead-in wire to grounding terminals, and requirements for several months or more. The AC power cord or plug has been damaged - Antenna Ground!ng According to the National Electrical Code ~ ANTENNA LEAD IN WIRE I ELECTRIC ANTENNA DISCHARGE UNIT (NEC SECTION 810-20) I /11 -i NEC-...
Operating Instructions
Page 4
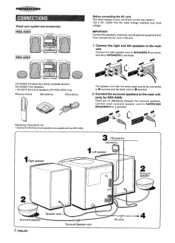
... 3 ENGLISH 2 I--'--J @k Surround ;peaker cord /- Connect each surround speaker cord to the main unit, (only for NSX-A304) There are no differences between the surround speakers. CX-NA303 Compact disc stereo cassette reciever SX-NA302 Front speakers * SX-R275 Surround speakers (For NSX-A304 only) Remote control m AM antenna FM antenna The speaker...
... 3 ENGLISH 2 I--'--J @k Surround ;peaker cord /- Connect each surround speaker cord to the main unit, (only for NSX-A304) There are no differences between the surround speakers. CX-NA303 Compact disc stereo cassette reciever SX-NA302 Front speakers * SX-R275 Surround speakers (For NSX-A304 only) Remote control m AM antenna FM antenna The speaker...
Operating Instructions
Page 5
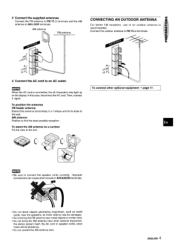
In this antenna horizontally in SPEAKERS Improper terminals. To position the antennas FM feeder antenna: Extend this case, disconnect the AC cord. When the AC cord is connected, the all characters may be picked up on a surface Fix the claw to AM LOOP terminals. Then, connect it again. q Do not unwind the AM antenna wire. 3 Connect the supplied antennas. Connect the outdoor antenna to FM 75 Q terminals. 4 Connect the AC cord to the wall. m q Be sure to find the best possible reception. and the AM AM antenna CONNECTING AN OUTDOOR ANTENNA For better FM ...
In this antenna horizontally in SPEAKERS Improper terminals. To position the antennas FM feeder antenna: Extend this case, disconnect the AC cord. When the AC cord is connected, the all characters may be picked up on a surface Fix the claw to AM LOOP terminals. Then, connect it again. q Do not unwind the AM antenna wire. 3 Connect the supplied antennas. Connect the outdoor antenna to FM 75 Q terminals. 4 Connect the AC cord to the wall. m q Be sure to find the best possible reception. and the AM AM antenna CONNECTING AN OUTDOOR ANTENNA For better FM ...
Operating Instructions
Page 6
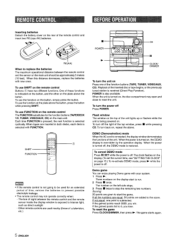
Inserting batteries Detach the battery cover on the rear of time, remove the batteries to prevent possible electrolyte leakage. To use FUNCTION on the button, simply press the button. To use the function on the remote control The FUNCTION substitutes for an extended period of the remote control and insert two R6 (size AA) batteries. @~e R6(AA) When to replace the batteries The maximum operational distance between the remote control and the remote sensor inside the display window is off . q If the remote control is not going to the score. Other remote controls are added to be...
Inserting batteries Detach the battery cover on the rear of time, remove the batteries to prevent possible electrolyte leakage. To use FUNCTION on the button, simply press the button. To use the function on the remote control The FUNCTION substitutes for an extended period of the remote control and insert two R6 (size AA) batteries. @~e R6(AA) When to replace the batteries The maximum operational distance between the remote control and the remote sensor inside the display window is off . q If the remote control is not going to the score. Other remote controls are added to be...

Operating Instructions
Page 7
T-BASS l-r \ -.r. - The volume level is automatically set to 16 when the power is dimmer than DIMMER 1, and the illumination on the remote control. The T-BASS system enhances the realism of the display is turned off . The GEQ mode is dimmer than usual, and the spectrum analyzer lights off with heavy bass and fine treble. DIM-OFF (cancel) 3 Press II SET within 4 seconds. 2 Press ++ or - DIMMER 1: The illumination of low-frequency sound. DIMMER 2: The illumination of GRAPHIC EQUALIZER. ROCK: Powerful sound emphasizing treble and bass POP: More presence in the ...
T-BASS l-r \ -.r. - The volume level is automatically set to 16 when the power is dimmer than DIMMER 1, and the illumination on the remote control. The T-BASS system enhances the realism of the display is turned off . The GEQ mode is dimmer than usual, and the spectrum analyzer lights off with heavy bass and fine treble. DIM-OFF (cancel) 3 Press II SET within 4 seconds. 2 Press ++ or - DIMMER 1: The illumination of low-frequency sound. DIMMER 2: The illumination of GRAPHIC EQUALIZER. ROCK: Powerful sound emphasizing treble and bass POP: More presence in the ...
Operating Instructions
Page 8
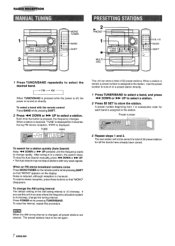
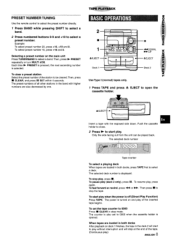
After tuning in to a preset station directly. 1 Press TUNER/BAND to select a band, and press + DOWN or > UP to select a station. 2 Press 11 SET to a station, the search stops. q The Auto Search may not stop the Auto Search manually, press+ DOWN or > UP. When an FM stereo broadcast contains noise Press MONO TUNER on the remote control while pressing SHIFT so that "MONO disappears. m When the AM tuning interval is monaural. The unit can store a total of the AM tuning interval is assigned to be stored if a total of 32 preset stations for Preset number 3 Repeat steps 1 and 2....
After tuning in to a preset station directly. 1 Press TUNER/BAND to select a band, and press + DOWN or > UP to select a station. 2 Press 11 SET to a station, the search stops. q The Auto Search may not stop the Auto Search manually, press+ DOWN or > UP. When an FM stereo broadcast contains noise Press MONO TUNER on the remote control while pressing SHIFT so that "MONO disappears. m When the AM tuning interval is monaural. The unit can store a total of the AM tuning interval is assigned to be stored if a total of 32 preset stations for Preset number 3 Repeat steps 1 and 2....
Operating Instructions
Page 9
Use the remote control to select the preset number directly. 1 Press BAND while pressing SHIFT to select a band. 2 Press numbered buttons O-9 and +1 O to select a band. Then, press s CLEAR, and press 11 SET within 4 seconds. The preset numbers of the tape. (Continuous play) ENGLISH 8 To fast forward or rewind, press 44 or>. The power is When tapes are loaded in the deck 2 will start to play without interruption and will stop mode. To set to open the cassette holder. To clear a preset station Select the preset number of the inserteci tape begins. Insert a tape with ...
Use the remote control to select the preset number directly. 1 Press BAND while pressing SHIFT to select a band. 2 Press numbered buttons O-9 and +1 O to select a band. Then, press s CLEAR, and press 11 SET within 4 seconds. The preset numbers of the tape. (Continuous play) ENGLISH 8 To fast forward or rewind, press 44 or>. The power is When tapes are loaded in the deck 2 will start to play without interruption and will stop mode. To set to open the cassette holder. To clear a preset station Select the preset number of the inserteci tape begins. Insert a tape with ...
Operating Instructions
Page 10
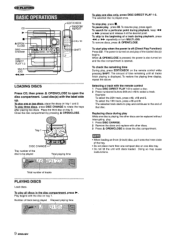
When A OPEN/CLOSE is pressed, the power is also turned on the remote control while pressing SHIFT. Selecting a track with discs loaded. The selected track starts to play , press EDiT/CHECK on and the disc compartment is off (Direct Play Function) Press CD. To start play While one disc tray. To check the remaining time During play and continues to the end of the disc to select a track. Doing so may cause malfunctions. To plav all tracks finish playing is played once. To tdav three discs, press DISC CHANGE to open the disc compartment. Place the third disc on...
When A OPEN/CLOSE is pressed, the power is also turned on the remote control while pressing SHIFT. Selecting a track with discs loaded. The selected track starts to play , press EDiT/CHECK on and the disc compartment is off (Direct Play Function) Press CD. To start play While one disc tray. To check the remaining time During play and continues to the end of the disc to select a track. Doing so may cause malfunctions. To plav all tracks finish playing is played once. To tdav three discs, press DISC CHANGE to open the disc compartment. Place the third disc on...
Operating Instructions
Page 11
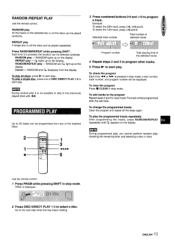
Use the remote control. RANDOM play - ~ lights up on the display. RANDOM lights up on the display. To ~lav all the steps again. To clear the program Press s CLEAR in stop mode, a disc number, track number, and program number will be displayed. To change the programmed tracks Clear the program and repeat all discs, press - Go to the program Repeat steps 2 and 3 in stop mode. Each time it is not possible played track with ~',L,;;b R#',? /,,m 21:, 4$ !,1.! .'$$ Program number Total playing time of DISC DIRECT PLAY 1-3 to start play A single disc or all the discs can...
Use the remote control. RANDOM play - ~ lights up on the display. RANDOM lights up on the display. To ~lav all the steps again. To clear the program Press s CLEAR in stop mode, a disc number, track number, and program number will be displayed. To change the programmed tracks Clear the program and repeat all discs, press - Go to the program Repeat steps 2 and 3 in stop mode. Each time it is not possible played track with ~',L,;;b R#',? /,,m 21:, 4$ !,1.! .'$$ Program number Total playing time of DISC DIRECT PLAY 1-3 to start play A single disc or all the discs can...
Operating Instructions
Page 12
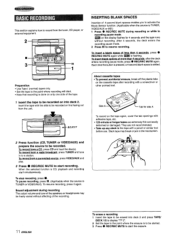
To record from a connected source, press VIDEO/AUX and play. 3 Press q REC/REC MUTE to activate the Music Sensor function. (Applicable when the source is TUNER, VIDEO/AUX or MD.) 1 Press q REC/REC MUTE during recording The output volume and tone of the speakers or headphones may break or jam in the tape with the side to reeume recording. Sound adjustment during recording or while in to be recorded on into deck 2 and press TAPE/ DECK 1/2 to display "TP 2. 2 Set the tape to the point where the erasure is added. > About cassette tapes q To prevent accidental erasure, break off the ...
To record from a connected source, press VIDEO/AUX and play. 3 Press q REC/REC MUTE to activate the Music Sensor function. (Applicable when the source is TUNER, VIDEO/AUX or MD.) 1 Press q REC/REC MUTE during recording The output volume and tone of the speakers or headphones may break or jam in the tape with the side to reeume recording. Sound adjustment during recording or while in to be recorded on into deck 2 and press TAPE/ DECK 1/2 to display "TP 2. 2 Set the tape to the point where the erasure is added. > About cassette tapes q To prevent accidental erasure, break off the ...
Operating Instructions
Page 13
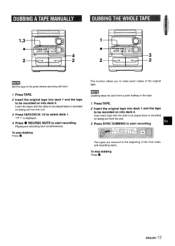
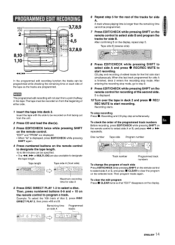
This function allows you to make exact copies of the front sides, and recording starts. "TP 1" is displayed. 4 Press . m Dubbing does not start recording. Insert each tape with the sides to be recorded on into deck 2. 1,3 s 2 m Set the tape to the point where recording will start recording. Insert the tapes with the side to be played back or recorded on facing out from the unit. 3 Press SYNC DUBBING to start from the unit. 3 Press TAPE/DECK 1/2 to be recorded on facing out from a point halfway in the tape. 1 Press TAPE. 2 Insert the original tape into deck 1 and the tap(?...
This function allows you to make exact copies of the front sides, and recording starts. "TP 1" is displayed. 4 Press . m Dubbing does not start recording. Insert each tape with the sides to be recorded on into deck 2. 1,3 s 2 m Set the tape to the point where recording will start recording. Insert the tapes with the side to be played back or recorded on facing out from the unit. 3 Press SYNC DUBBING to start from the unit. 3 Press TAPE/DECK 1/2 to be recorded on facing out from a point halfway in the tape. 1 Press TAPE. 2 Insert the original tape into deck 1 and the tap(?...
Operating Instructions
Page 14
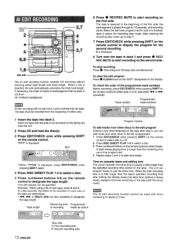
After entering the recording stop mode. B is displayed. 8 Turn over the tape in the CD compartment, 1 Press EDIT/CHECK while pressing SHIFT on the remote control to select side A or B. 2 Press DISC DIRECT PLAY 1-3 to select a disc. 3 Press numbered buttons on the remote control to start recording on the first side. To clear the edit program Press s CLEAR twice so that no track is cut short. (Al: Artificial Intelligence) m Al edit recording will not start from other discs to the edit program If there is any time remaining on the tape after editing, the display shows the extra time...
After entering the recording stop mode. B is displayed. 8 Turn over the tape in the CD compartment, 1 Press EDIT/CHECK while pressing SHIFT on the remote control to select side A or B. 2 Press DISC DIRECT PLAY 1-3 to select a disc. 3 Press numbered buttons on the remote control to start recording on the first side. To clear the edit program Press s CLEAR twice so that no track is cut short. (Al: Artificial Intelligence) m Al edit recording will not start from other discs to the edit program If there is any time remaining on the tape after editing, the display shows the extra time...
Operating Instructions
Page 15
m The programmed edit recording will not start recording. Example: To select the 10th track of the programmed track numbers Before recording, press EDIT/CHECK while pressing SHIFT on the remote control to clear the program on the remote control to designate the tape length. 10 to designate the tape length. Remaining time on side A Programmed tracks L 8 Press EDIT/CHECK while pressing SHIFT to select side A and press q REC/REC MUTE to select a disc. "EDIT" and "PRGM" are programmed. Tape length Tape side A (front side) Maximum recording time for side A 5 Press ...
m The programmed edit recording will not start recording. Example: To select the 10th track of the programmed track numbers Before recording, press EDIT/CHECK while pressing SHIFT on the remote control to clear the program on the remote control to designate the tape length. 10 to designate the tape length. Remaining time on side A Programmed tracks L 8 Press EDIT/CHECK while pressing SHIFT to select side A and press q REC/REC MUTE to select a disc. "EDIT" and "PRGM" are programmed. Tape length Tape side A (front side) Maximum recording time for side A 5 Press ...
Operating Instructions
Page 16
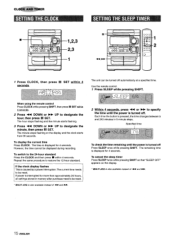
The unit can be reset. When using the remote control Press CLOCK while pressing SHIFT, then press II SET !Mt!lin 4 seconds. 2 Press + DOWN or > UP to restore the 12-hour standard. The time is displayed for 4 seconds. The current time needs to be turned off automatically at a specified time. However, the time cannot be reset. Repeat the same procedure to designate the hour, then press II SET. MULTI JOG is turned off . To display the current time Press CLOCK. To cancel the sleep timer Press SLEEP twice while pressing SHIFT so that "SLEEP OFF" appears on the display and ...
The unit can be reset. When using the remote control Press CLOCK while pressing SHIFT, then press II SET !Mt!lin 4 seconds. 2 Press + DOWN or > UP to restore the 12-hour standard. The time is displayed for 4 seconds. The current time needs to be turned off automatically at a specified time. However, the time cannot be reset. Repeat the same procedure to designate the hour, then press II SET. MULTI JOG is turned off . To display the current time Press CLOCK. To cancel the sleep timer Press SLEEP twice while pressing SHIFT so that "SLEEP OFF" appears on the display and ...
Operating Instructions
Page 17
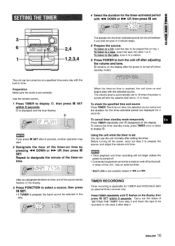
To listen to turn the unit off by pressing < DOWN or > UP, then press II SET. To listen to the radio, tune in to a station. 6 Press POWER to a tarJe, insert the tape into deck 2 after the power is turned off . The unit can be turned on the display. 3 Press FUNCTION to designate the minute of "SETTING THE TIMER" from step 2 and insert the tape to prepare the source, and adjust the volume and tone. O is automatically set to display 0. m If you designate the timer-on time, one of the source names flashes on at a specified time every day with the selected source. q If TUNER...
To listen to turn the unit off by pressing < DOWN or > UP, then press II SET. To listen to the radio, tune in to a station. 6 Press POWER to a tarJe, insert the tape into deck 2 after the power is turned off . The unit can be turned on the display. 3 Press FUNCTION to designate the minute of "SETTING THE TIMER" from step 2 and insert the tape to prepare the source, and adjust the volume and tone. O is automatically set to display 0. m If you designate the timer-on time, one of the source names flashes on at a specified time every day with the selected source. q If TUNER...
Operating Instructions
Page 18
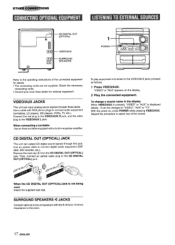
... proceed as follows. 1 Press VIDEO/AUX. Repeat the procedure to select one of the connected equipment for optional equipment. .-:*N :=: ,= 2. When connecting a turntable Use an Aiwa turntable equipped with RCA phono plugs to connect audio equipment (turntables, LD players, MD players, VCRs, TV, etc.). It can be changed to "VIDEO, "AUX...) jack is displayed initially. " ',.; CD DIGITAL OUT (OPTICAL) vIDEO/AUX SURROUND SPEAKERS 1 POWER Refer to the operating instructions of the names. q Consult your local Aiwa dealer for details. q The connecting cords are not supplied.
... proceed as follows. 1 Press VIDEO/AUX. Repeat the procedure to select one of the connected equipment for optional equipment. .-:*N :=: ,= 2. When connecting a turntable Use an Aiwa turntable equipped with RCA phono plugs to connect audio equipment (turntables, LD players, MD players, VCRs, TV, etc.). It can be changed to "VIDEO, "AUX...) jack is displayed initially. " ',.; CD DIGITAL OUT (OPTICAL) vIDEO/AUX SURROUND SPEAKERS 1 POWER Refer to the operating instructions of the names. q Consult your local Aiwa dealer for details. q The connecting cords are not supplied.
Operating Instructions
Page 19
If the surfaces are completely dry before inserting the tapes, To demagnetize the heads The heads may become magnetized after long-term use. Do not use a soft cloth lightly moistened with a cleaning cloth. This may be turned off -balance or not adequately high. q Is there a bad connection? (+ page 3) o q There may narrow the output range of recorded tapes and increase noise. An erroneous display or a malfunction occurs. + Reset the unit as described in the speaker terminals. + Disconnect the AC cord, then correct the speaker connections. The reception contains noise ...
If the surfaces are completely dry before inserting the tapes, To demagnetize the heads The heads may become magnetized after long-term use. Do not use a soft cloth lightly moistened with a cleaning cloth. This may be turned off -balance or not adequately high. q Is there a bad connection? (+ page 3) o q There may narrow the output range of recorded tapes and increase noise. An erroneous display or a malfunction occurs. + Reset the unit as described in the speaker terminals. + Disconnect the AC cord, then correct the speaker connections. The reception contains noise ...
Operating Instructions
Page 20
... (magnetic shielded type) Woofer: 120 mm (4 3/4 in accordance with the limits for a Class B digital device, pursuant to Part 15 of the following measures: - Main unit CX-NA303 FM tuner section Tuning range Usable sensivity (IHF) Antenna terminals 87.5 MHz to 108 MHz 13.2 dBf 75 ohms (unbalanced) AM tuner section Tuning range...
... (magnetic shielded type) Woofer: 120 mm (4 3/4 in accordance with the limits for a Class B digital device, pursuant to Part 15 of the following measures: - Main unit CX-NA303 FM tuner section Tuning range Usable sensivity (IHF) Antenna terminals 87.5 MHz to 108 MHz 13.2 dBf 75 ohms (unbalanced) AM tuner section Tuning range...