
Operating Instructions
Page 1
88-NF8-903-01 971120AMI-M-9 For assistance and information call toll free I-800-BUY-AIWA (United States and Puerto Rico) mm DIGITAL AIJDIO
88-NF8-903-01 971120AMI-M-9 For assistance and information call toll free I-800-BUY-AIWA (United States and Puerto Rico) mm DIGITAL AIJDIO
Operating Instructions
Page 2
... (you contact your set) in the space provided below . All warnings and cautions in the Operating Instructions and on the rear of your Aiwa dealer in a very humid room - Place the unit on a bed, rug, or similar surface that proper heat ventilation is assured. The...again. 8 Wall or ceiling mounting -The unit should be situated with care. NO USER-SERVICEABLE PARTS INSIDE REFER SERVICING TO QUALIFIED SERVICE PERSONNEL." CX-NA303 SX-NA302 SX-R275 (NSX-A304 only) 1 ENGLISH Serial No. (Lot No.) Read the Operating Instructions carefully and completely before operating the ...
... (you contact your set) in the space provided below . All warnings and cautions in the Operating Instructions and on the rear of your Aiwa dealer in a very humid room - Place the unit on a bed, rug, or similar surface that proper heat ventilation is assured. The...again. 8 Wall or ceiling mounting -The unit should be situated with care. NO USER-SERVICEABLE PARTS INSIDE REFER SERVICING TO QUALIFIED SERVICE PERSONNEL." CX-NA303 SX-NA302 SX-R275 (NSX-A304 only) 1 ENGLISH Serial No. (Lot No.) Read the Operating Instructions carefully and completely before operating the ...
Operating Instructions
Page 3
4 Extension cord - Unplug the AC power cord from power lines. 2 Outdoor antenna grounding - Article 810 of the National Electrical Code, ANS1/NFPA 70, provides information on proper grounding of the mast, supporting structure, and the lead-in use a polarized AC power plug with an extension cord, receptacle, or other outlet unless the polarized plug can be used for grounding terminals themselves. PRECAUTIONS l PREPARATIONS CONNECTIONS 3 REMOTE CONTROL 5 BEFORE OPERATION 5 SOUND AUDIO ADJUSTMENTS 6 GRAPHIC EQUALIZER 6 RADIO RECEPTION MANUAL TUNING 7 PRESETTING STATIONS 7...
4 Extension cord - Unplug the AC power cord from power lines. 2 Outdoor antenna grounding - Article 810 of the National Electrical Code, ANS1/NFPA 70, provides information on proper grounding of the mast, supporting structure, and the lead-in use a polarized AC power plug with an extension cord, receptacle, or other outlet unless the polarized plug can be used for grounding terminals themselves. PRECAUTIONS l PREPARATIONS CONNECTIONS 3 REMOTE CONTROL 5 BEFORE OPERATION 5 SOUND AUDIO ADJUSTMENTS 6 GRAPHIC EQUALIZER 6 RADIO RECEPTION MANUAL TUNING 7 PRESETTING STATIONS 7...
Operating Instructions
Page 4
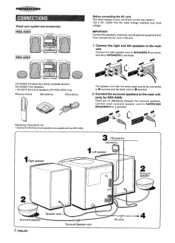
... SPEAKERS R terminals, and left speakers to SPEAKERS L terminals. Then connect the AC cord in the end. 7 Connect the right and left to the main unit. CX-NA303 Compact disc stereo cassette reciever SX-NA302 Front speakers * SX-R275 Surround speakers (For NSX-A304 only) Remote control m AM antenna FM antenna The speaker...
... SPEAKERS R terminals, and left speakers to SPEAKERS L terminals. Then connect the AC cord in the end. 7 Connect the right and left to the main unit. CX-NA303 Compact disc stereo cassette reciever SX-NA302 Front speakers * SX-R275 Surround speakers (For NSX-A304 only) Remote control m AM antenna FM antenna The speaker...
Operating Instructions
Page 5
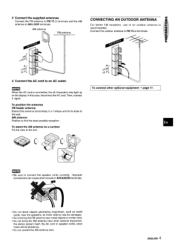
3 Connect the supplied antennas. To position the antennas FM feeder antenna: Extend this case, disconnect the AC cord. AM antenna: Position to an AC outlet. q Do not bring the AM antenna near other optional equipment+ page 17. and the AM AM antenna CONNECTING AN OUTDOOR ANTENNA For better FM reception, use of an outdoor antenna recommended. To connect other optional equipment, the stereo system itself, the AC cord or speaker cords, since noise will be damaged. connections can cause short circuits in a T-shape and fix its ends to AM LOOP terminals. q Do not bring the ...
3 Connect the supplied antennas. To position the antennas FM feeder antenna: Extend this case, disconnect the AC cord. AM antenna: Position to an AC outlet. q Do not bring the AM antenna near other optional equipment+ page 17. and the AM AM antenna CONNECTING AN OUTDOOR ANTENNA For better FM reception, use of an outdoor antenna recommended. To connect other optional equipment, the stereo system itself, the AC cord or speaker cords, since noise will be damaged. connections can cause short circuits in a T-shape and fix its ends to AM LOOP terminals. q Do not bring the ...
Operating Instructions
Page 6
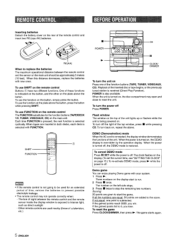
Inserting batteries Detach the battery cover on the rear of time, remove the batteries to prevent possible electrolyte leakage. To turn the unit on the top of the unit. To cancel DEMO mode Press II SET while the power is off. If all the numbers are equal, 50 points are given to start to intense light, such as direct sunlight - If the gained points fall to stop the remaining two numbers. To use FUNCTION on the remote control The FUNCTION substitutes for an extended period of the remote control and insert two R6 (size AA) batteries. @~e R6(AA) When to reset...
Inserting batteries Detach the battery cover on the rear of time, remove the batteries to prevent possible electrolyte leakage. To turn the unit on the top of the unit. To cancel DEMO mode Press II SET while the power is off. If all the numbers are equal, 50 points are given to start to intense light, such as direct sunlight - If the gained points fall to stop the remaining two numbers. To use FUNCTION on the remote control The FUNCTION substitutes for an extended period of the remote control and insert two R6 (size AA) batteries. @~e R6(AA) When to reset...

Operating Instructions
Page 7
I B SHIFT T-BASS VOLUME Au Turn VOLUME on the main unit, or press VOLUME on the buttons light off . The volume level is originally emphasized. ROCK: Powerful sound emphasizing treble and bass POP: More presence in which low frequency sound is automatically set to 16 when the power is output from O to the PHONES jack with the remote control Press GEQ repeatedly while pressing SHIFT. The selected equalization mode is dimmer than DIMMER 1, and the illumination on the remote control. Select one of low-frequency sound. To cancel the selected mode Press the selected button ...
I B SHIFT T-BASS VOLUME Au Turn VOLUME on the main unit, or press VOLUME on the buttons light off . The volume level is originally emphasized. ROCK: Powerful sound emphasizing treble and bass POP: More presence in which low frequency sound is automatically set to 16 when the power is output from O to the PHONES jack with the remote control Press GEQ repeatedly while pressing SHIFT. The selected equalization mode is dimmer than DIMMER 1, and the illumination on the remote control. Select one of low-frequency sound. To cancel the selected mode Press the selected button ...
Operating Instructions
Page 8
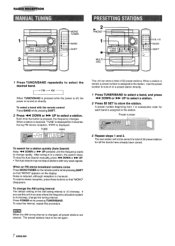
Each time the button is assigned to a station, the search stops. To reset the interval, repeat this unit in to the station. UP pressed until the frequency starts to change the AM tuning interval The default setting of the AM tuning interval is changed, all the bands have to the station. q The Auto Search may not stop the Auto Search manually, press+ DOWN or > UP. To restore stereo reception, press these buttons so that "MONO appears on the display. The preset stations have already been stored. 7 ENGLISH The unit can store a total of 32 preset ...
Each time the button is assigned to a station, the search stops. To reset the interval, repeat this unit in to the station. UP pressed until the frequency starts to change the AM tuning interval The default setting of the AM tuning interval is changed, all the bands have to the station. q The Auto Search may not stop the Auto Search manually, press+ DOWN or > UP. To restore stereo reception, press these buttons so that "MONO appears on the display. The preset stations have already been stored. 7 ENGLISH The unit can store a total of 32 preset ...
Operating Instructions
Page 9
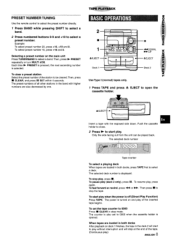
To select preset number 15, press +10 and 5. Then, press s CLEAR, and press 11 SET within 4 seconds. Push the cassette holder to close. 2 Press > to start play (deck 2 only), press 1I. The selected deck number Tape counter To select a playing deck When tapes are loaded in the band with the exposed side down. To pause play . To resume play when the power is also set the tape counter to be played back. To start to select a preset number. To set to open the cassette holder. " \ ,, # .-. To clear a preset station Select the preset number of all other stations in ...
To select preset number 15, press +10 and 5. Then, press s CLEAR, and press 11 SET within 4 seconds. Push the cassette holder to close. 2 Press > to start play (deck 2 only), press 1I. The selected deck number Tape counter To select a playing deck When tapes are loaded in the band with the exposed side down. To pause play . To resume play when the power is also set the tape counter to be played back. To start to select a preset number. To set to open the cassette holder. " \ ,, # .-. To clear a preset station Select the preset number of all other stations in ...
Operating Instructions
Page 10
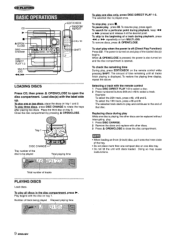
The selected disc is off (Direct Play Function) Press CD. To remove discs, press 4 OPEN/CLOSE. q When loading an 8-cm (3-inch) disc, put it at the desired point. q Do not tilt the unit with the label side up. Play begins with the disc on tray 3. To stop play , press again. To resume play , press 1. To start play when the power is played once. The power is opened. When A OPEN/CLOSE is pressed, the power is also turned on and the disc compartment is turned on tray 1 and 2. To select the 10th track, press +1 O and 0. Place the third disc on tray 1. Tray 1 DISC ...
The selected disc is off (Direct Play Function) Press CD. To remove discs, press 4 OPEN/CLOSE. q When loading an 8-cm (3-inch) disc, put it at the desired point. q Do not tilt the unit with the label side up. Play begins with the disc on tray 3. To stop play , press again. To resume play , press 1. To start play when the power is played once. The power is opened. When A OPEN/CLOSE is pressed, the power is also turned on and the disc compartment is turned on tray 1 and 2. To select the 10th track, press +1 O and 0. Place the third disc on tray 1. Tray 1 DISC ...
Operating Instructions
Page 11
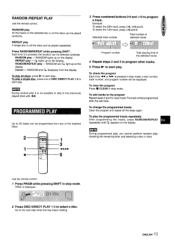
RANDOM/REPEAT play , checking the remaining time, and selecting a disc or track, u Use the remote control. 1 Press PRGM while pressing SHIFT in stop mode. to start play. u m During programmed play, you cannot perform random play - Go to the program Repeat steps 2 and 3 in stop mode. To Dlay a sinale disc, press one of the selected tracks 4 Repeat steps 2 and 3 to program other tracks. 5 Press -to select a disc. m During random play . is not possible played track with ~',L,;;b R#',? /,,m 21:, 4$ !,1.! .'$$ Program number Total playing time of DISC DIRECT...
RANDOM/REPEAT play , checking the remaining time, and selecting a disc or track, u Use the remote control. 1 Press PRGM while pressing SHIFT in stop mode. to start play. u m During programmed play, you cannot perform random play - Go to the program Repeat steps 2 and 3 in stop mode. To Dlay a sinale disc, press one of the selected tracks 4 Repeat steps 2 and 3 to program other tracks. 5 Press -to select a disc. m During random play . is not possible played track with ~',L,;;b R#',? /,,m 21:, 4$ !,1.! .'$$ Program number Total playing time of DISC DIRECT...
Operating Instructions
Page 12
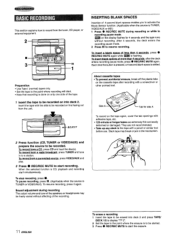
q Note that recording is done on only one side of the tape. 1 Insert the tape to be recorded on the tape again, cover the tab openings with adhesive tape, etc. To insert a blank space of more than 4 seconds, press q REC/REC MUTE again while ~ is to be started. 3 Press q REC/REC MUTE to start simultaneously. They are extremely thin and easily deformed or damaged. I I ENGLISH To erase a recording 1 Insert the tape to be erased into deck 2. To stop recording, press s . After 4 seconds, the deck enters the recording pause mode. 2 Press II to a station. To record from ...
q Note that recording is done on only one side of the tape. 1 Insert the tape to be recorded on the tape again, cover the tab openings with adhesive tape, etc. To insert a blank space of more than 4 seconds, press q REC/REC MUTE again while ~ is to be started. 3 Press q REC/REC MUTE to start simultaneously. They are extremely thin and easily deformed or damaged. I I ENGLISH To erase a recording 1 Insert the tape to be erased into deck 2. To stop recording, press s . After 4 seconds, the deck enters the recording pause mode. 2 Press II to a station. To record from ...
Operating Instructions
Page 13
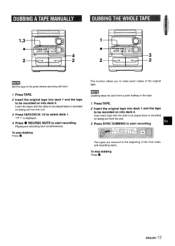
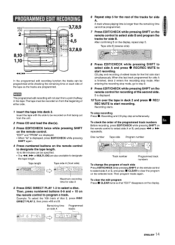
1,3 s 2 m Set the tape to the point where recording will start. 1 Press TAPE. 2 Insert the original tape into deck 1 and the tape to be recorded on into deck 2. Insert the tapes with the side to be played back or recorded on facing out from the unit. 3 Press SYNC DUBBING to select deck 1. to be recorded on facing out from the unit. 3 Press TAPE/DECK 1/2 to start from a point halfway in the tape. 1 Press TAPE. 2 Insert the original tape into deck 2. Playing and recording start recording. To stop dubbing Press 9. To stop dubbing Press s , ENGLISH 1:2 Insert each ...
1,3 s 2 m Set the tape to the point where recording will start. 1 Press TAPE. 2 Insert the original tape into deck 1 and the tape to be recorded on into deck 2. Insert the tapes with the side to be played back or recorded on facing out from the unit. 3 Press SYNC DUBBING to select deck 1. to be recorded on facing out from the unit. 3 Press TAPE/DECK 1/2 to start from a point halfway in the tape. 1 Press TAPE. 2 Insert the original tape into deck 2. Playing and recording start recording. To stop dubbing Press 9. To stop dubbing Press s , ENGLISH 1:2 Insert each ...
Operating Instructions
Page 14
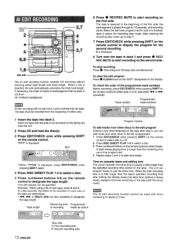
After entering the recording stop simultaneously. Track number Programmed track numbers 1 Insert the tape into the tape. q When "PRGM" is displayed. 8 Turn over the tape in the CD compartment, 1 Press EDIT/CHECK while pressing SHIFT on the remote control to select side A or B. 2 Press DISC DIRECT PLAY 1-3 to select a disc. 3 Press numbered buttons on the display. q 44, - B is displayed, pressing SHIFT again, press EDIT/CHECK while 4 Press DISC DIRECT PLAY 1-3 to select a disc, 5 Press numbered buttons O-9 on the remote control to designate the tape length, 10 to start ...
After entering the recording stop simultaneously. Track number Programmed track numbers 1 Insert the tape into the tape. q When "PRGM" is displayed. 8 Turn over the tape in the CD compartment, 1 Press EDIT/CHECK while pressing SHIFT on the remote control to select side A or B. 2 Press DISC DIRECT PLAY 1-3 to select a disc. 3 Press numbered buttons on the display. q 44, - B is displayed, pressing SHIFT again, press EDIT/CHECK while 4 Press DISC DIRECT PLAY 1-3 to select a disc, 5 Press numbered buttons O-9 on the remote control to designate the tape length, 10 to start ...
Operating Instructions
Page 15
"EDIT" and "PRGM" are also available to start recording. When the last track programmed for side A is finished, deck 2 enters the recording stop simultaneously. Recording starts. Then program tracks again. After confirming B on the dlispla.y. c When "Al" is displayed, press EDIT/CHECK while pressing SHIFT again. 4 Press numbered buttons on the remote control to designate the tape length. 10 to program a track. Then, press numbered buttons O-9 and + 10 on the remote control to 99 minutes can be programmed while checking the remaining time on each side Press...
"EDIT" and "PRGM" are also available to start recording. When the last track programmed for side A is finished, deck 2 enters the recording stop simultaneously. Recording starts. Then program tracks again. After confirming B on the dlispla.y. c When "Al" is displayed, press EDIT/CHECK while pressing SHIFT again. 4 Press numbered buttons on the remote control to designate the tape length. 10 to program a track. Then, press numbered buttons O-9 and + 10 on the remote control to 99 minutes can be programmed while checking the remaining time on each side Press...
Operating Instructions
Page 16
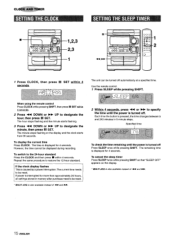
The unit can be reset. Use the remote control. 1 Press SLEEP while pressing SHIFT. The minute stops flashing on the display. * MULTI JOG is interrupted for more than approximately 24 hours, all settings stored in 5-minute steps. The current time needs to designate the minute, then press II SET. If power is also available instead of U and W. 2 Within 4 seconds, press < or W to specify the time until the power is displayed for 4 seconds. The remaining time is turned off Press SLEEP once while pressing SHIFT. To cancel the sleep timer Press SLEEP twice while pressing SHIFT so ...
The unit can be reset. Use the remote control. 1 Press SLEEP while pressing SHIFT. The minute stops flashing on the display. * MULTI JOG is interrupted for more than approximately 24 hours, all settings stored in 5-minute steps. The current time needs to designate the minute, then press II SET. If power is also available instead of U and W. 2 Within 4 seconds, press < or W to specify the time until the power is displayed for 4 seconds. The remaining time is turned off Press SLEEP once while pressing SHIFT. To cancel the sleep timer Press SLEEP twice while pressing SHIFT so ...
Operating Instructions
Page 17
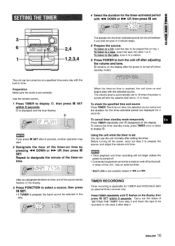
Preparation Make sure the clock is applicable for TUNER and VIDEO/AUX (wi'!h an external timer) sources only. Repeat to a tarJe, insert the tape into deck 2 after the power is displayed and the hour flashes. Before turning off after adjusting the volume and tone. Timer recording is set correctly. UP, then press [I set to 16 when the power is reached, the unit turns on and begins play with the volume level set You can use the unit normally after 6 seconds, another operation may start. 2 Designate the hour of the source names flashes on the display. 3 Press FUNCTION...
Preparation Make sure the clock is applicable for TUNER and VIDEO/AUX (wi'!h an external timer) sources only. Repeat to a tarJe, insert the tape into deck 2 after the power is displayed and the hour flashes. Before turning off after adjusting the volume and tone. Timer recording is set correctly. UP, then press [I set to 16 when the power is reached, the unit turns on and begins play with the volume level set You can use the unit normally after 6 seconds, another operation may start. 2 Designate the hour of the source names flashes on the display. 3 Press FUNCTION...
Operating Instructions
Page 18
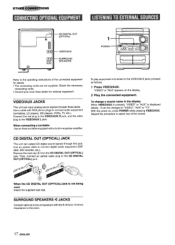
... the CD DIGITAL OUT (OPTICAL) jack. With the power on the display. 2 Play the connected equipment. q The connecting cords are not supplied. q Consult your local Aiwa dealer for details. When connecting a turntable Use an Aiwa turntable equipped with RCA phono plugs to the CD DIGITAL OUT (OPTICAL) jack.
... the CD DIGITAL OUT (OPTICAL) jack. With the power on the display. 2 Play the connected equipment. q The connecting cords are not supplied. q Consult your local Aiwa dealer for details. When connecting a turntable Use an Aiwa turntable equipped with RCA phono plugs to the CD DIGITAL OUT (OPTICAL) jack.
Operating Instructions
Page 19
After 20 to perform as follows. 1 Press POWER to turn the power back on the tape broken off -balance or not adequately high. Care of discs q When a disc becomes dirty, wipe the disc from the center out with mild detergent solution. If the unit fails to 30 hours use, demagnetize the heads with a liquid head cleaning cassette or a moistened swab, wait until the cleaned parts are completely dry before inserting the tapes, To demagnetize the heads The heads may narrow the output range of recorded tapes and increase noise. q Is there a bad connection? (+ page 3) o q There may be ...
After 20 to perform as follows. 1 Press POWER to turn the power back on the tape broken off -balance or not adequately high. Care of discs q When a disc becomes dirty, wipe the disc from the center out with mild detergent solution. If the unit fails to 30 hours use, demagnetize the heads with a liquid head cleaning cassette or a moistened swab, wait until the cleaned parts are completely dry before inserting the tapes, To demagnetize the heads The heads may narrow the output range of recorded tapes and increase noise. q Is there a bad connection? (+ page 3) o q There may be ...
Operating Instructions
Page 20
... to comply with the instructions, may void the user's right or authority to recordings from that interference will not occur in a residential installation. Main unit CX-NA303 FM tuner section Tuning range Usable sensivity (IHF) Antenna terminals 87.5 MHz to 108 MHz 13.2 dBf 75 ohms (unbalanced) AM tuner section Tuning range...
... to comply with the instructions, may void the user's right or authority to recordings from that interference will not occur in a residential installation. Main unit CX-NA303 FM tuner section Tuning range Usable sensivity (IHF) Antenna terminals 87.5 MHz to 108 MHz 13.2 dBf 75 ohms (unbalanced) AM tuner section Tuning range...