Product Manual
Page 18
... you can cause balance problems with cuts - Remove the hooks or put the items in the appliance. The door stays locked. - If this occurs, adjust manually the items in the tub and start the spin phase again. 10.2 Stubborn stains For some stains, water and detergent is water in the drum... in: white, coloured, synthetics, delicates and wool. • Obey the washing instructions that are available. The drum turns regularly to deactivate the appliance. 18 www.aeg.com • Press button 1 to prevent the creases in the laundry. -
... you can cause balance problems with cuts - Remove the hooks or put the items in the appliance. The door stays locked. - If this occurs, adjust manually the items in the tub and start the spin phase again. 10.2 Stubborn stains For some stains, water and detergent is water in the drum... in: white, coloured, synthetics, delicates and wool. • Obey the washing instructions that are available. The drum turns regularly to deactivate the appliance. 18 www.aeg.com • Press button 1 to prevent the creases in the laundry. -
Product Manual
Page 25
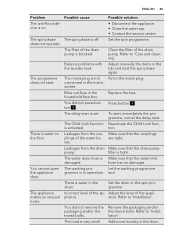
... the service centre. Press button 4 . To start immediately the programme, cancel the delay start . Make sure that the couplings are tight. There is blocked. Adjust manually the items in the drum. Make sure that the drain pump filter is set. The appliance makes an unusual noise. The delay start the spin...
... the service centre. Press button 4 . To start immediately the programme, cancel the delay start . Make sure that the couplings are tight. There is blocked. Adjust manually the items in the drum. Make sure that the drain pump filter is set. The appliance makes an unusual noise. The delay start the spin...

Product Manual
Page 28
Remove the three bolts. Pull up the appliance in the holes. Remove the polystyrene protection from the hose holders. 10. Put the plastic caps in vertical position. 2 9. Pull out the plastic spacers. 12. You can find these caps in the user manual bag. Remove the power supply cable and the drain hose from the bottom. 8. 28 www.aeg.com 1 7. Use the key supplied with the appliance. 11.
Remove the three bolts. Pull up the appliance in the holes. Remove the polystyrene protection from the hose holders. 10. Put the plastic caps in vertical position. 2 9. Pull out the plastic spacers. 12. You can find these caps in the user manual bag. Remove the power supply cable and the drain hose from the bottom. 8. 28 www.aeg.com 1 7. Use the key supplied with the appliance. 11.

