Quick Start Guide
Page 1
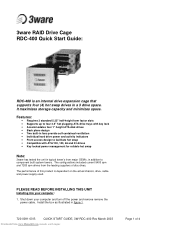
... hard drive power and activity indicators • Front access design to component built system towers. PLEASE READ BEFORE INSTALLING THIS UNIT Installing into your computer and turn off the power and remove remove the power cable. Features: • Requires 3 standard 5.25" half-height form factor slots • Supports up to four 3.5" hot plugging ATA drive trays...
... hard drive power and activity indicators • Front access design to component built system towers. PLEASE READ BEFORE INSTALLING THIS UNIT Installing into your computer and turn off the power and remove remove the power cable. Features: • Requires 3 standard 5.25" half-height form factor slots • Supports up to four 3.5" hot plugging ATA drive trays...

Quick Start Guide
Page 2
.... 3. Connect the cables as shown in the disk tray 1. Set the HDD to the manufacturer's documentation for the location of this jumper . Refer to "Master". To avoid ESD, ground yourself by touching any metal on the hard drive. Unpack the hard drive. Align the colored edge of 4 2. When connecting ...cables to the IDE bus make sure the numerical pins are lined up with pin 1 of the connector. 720-0091-00 B QUICK START GUIDE, 3W-RDC-400 Rev March 2003 Downloaded from...
.... 3. Connect the cables as shown in the disk tray 1. Set the HDD to the manufacturer's documentation for the location of this jumper . Refer to "Master". To avoid ESD, ground yourself by touching any metal on the hard drive. Unpack the hard drive. Align the colored edge of 4 2. When connecting ...cables to the IDE bus make sure the numerical pins are lined up with pin 1 of the connector. 720-0091-00 B QUICK START GUIDE, 3W-RDC-400 Rev March 2003 Downloaded from...
Quick Start Guide
Page 3
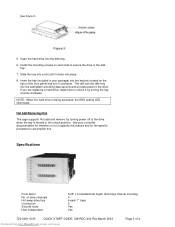
...RDC-400 Rev March 2003 Downloaded from www.Manualslib.com manuals search engine Page 3 of 4 of the front panel and turn it supports this feature and for the specific procedure to the unlock position. NOTE: When the hard drive is moved to accomplish this. This will lock the disk tray... into the disk tray. 6. Insert the hard drive into the subsystem providing data security and provide power to secure the drive in your controller documentation for whether or not it clockwise. Install the mounting screws on the right of drive channels Hot-swap drive tray Cooling ...
...RDC-400 Rev March 2003 Downloaded from www.Manualslib.com manuals search engine Page 3 of 4 of the front panel and turn it supports this feature and for the specific procedure to the unlock position. NOTE: When the hard drive is moved to accomplish this. This will lock the disk tray... into the disk tray. 6. Insert the hard drive into the subsystem providing data security and provide power to secure the drive in your controller documentation for whether or not it clockwise. Install the mounting screws on the right of drive channels Hot-swap drive tray Cooling ...

Quick Start Guide
Page 4
...Avenue, Sunnyvale CA 94085 Disclaimer 3ware, Inc. Warranty, Technial Support and Service Limited Warranty 1-year hardware warranty: 3ware, Inc. warrants this document, nor does 3ware make any means, electronic, mechanical, photocopying, recording or otherwise, without drives) Copyright ©2003 3ware, Inc. Exclusions THIS WARRANTY DOES...or consequential damages or allow limitation of 4 Maude Avenue, Sunnyvale CA 94085 720-0091-00 B QUICK START GUIDE, 3W-RDC-400 Rev March 2003 Downloaded from www.Manualslib.com manuals search engine Page 4 of implied warranties or their duration, so...
...Avenue, Sunnyvale CA 94085 Disclaimer 3ware, Inc. Warranty, Technial Support and Service Limited Warranty 1-year hardware warranty: 3ware, Inc. warrants this document, nor does 3ware make any means, electronic, mechanical, photocopying, recording or otherwise, without drives) Copyright ©2003 3ware, Inc. Exclusions THIS WARRANTY DOES...or consequential damages or allow limitation of 4 Maude Avenue, Sunnyvale CA 94085 720-0091-00 B QUICK START GUIDE, 3W-RDC-400 Rev March 2003 Downloaded from www.Manualslib.com manuals search engine Page 4 of implied warranties or their duration, so...