
Getting Started Guide
Page 3
... 1000BASE-SX Ports 16 GBIC Ports 16 LEDs 17 Switch - CONTENTS ABOUT THIS GUIDE Conventions 8 Related Documentation 9 Accessing Online Documentation 9 Documentation Comments 10 1 INTRODUCING THE SUPERSTACK 3 SWITCH 4900 FAMILY About the Switches 12 Summary of Each Other 24 Creating an XRN ...Distributed Fabric 24 How To Interconnect Units 25 Rules For Interconnecting Units 25 The Power-up Sequence 27 Rear View Detail 18 Unit Information Label 19 Power Socket 19 Redundant Power System Socket 19 Console...
... 1000BASE-SX Ports 16 GBIC Ports 16 LEDs 17 Switch - CONTENTS ABOUT THIS GUIDE Conventions 8 Related Documentation 9 Accessing Online Documentation 9 Documentation Comments 10 1 INTRODUCING THE SUPERSTACK 3 SWITCH 4900 FAMILY About the Switches 12 Summary of Each Other 24 Creating an XRN ...Distributed Fabric 24 How To Interconnect Units 25 Rules For Interconnecting Units 25 The Power-up Sequence 27 Rear View Detail 18 Unit Information Label 19 Power Socket 19 Redundant Power System Socket 19 Console...

Getting Started Guide
Page 4
... Problems Indicated by LEDs 54 Powering-up the Switch 27 Checking for Management 36 Manually Configuring IP Information 37 Connecting to a Front Panel Port 37 Connecting to the Console Port 40 Viewing Automatically Configured IP Information 43 Using 3Com Network Supervisor 43 Connecting to the Console Port 44 Methods of LEDs 27 Connecting a Redundant...
... Problems Indicated by LEDs 54 Powering-up the Switch 27 Checking for Management 36 Manually Configuring IP Information 37 Connecting to a Front Panel Port 37 Connecting to the Console Port 40 Viewing Automatically Configured IP Information 43 Using 3Com Network Supervisor 43 Connecting to the Console Port 44 Methods of LEDs 27 Connecting a Redundant...

Getting Started Guide
Page 11
... Information Label ■ Power Socket ■ Redundant Power System Socket ■ Console Port ■ Expansion Module Slot ■ Default Settings 1 INTRODUCING THE SUPERSTACK 3 SWITCH 4900 FAMILY This chapter contains introductory information about the hardware. It covers summary information about the Switch 4900, 4900 SX, 4924 and 4950 and how they can be used in the...
... Information Label ■ Power Socket ■ Redundant Power System Socket ■ Console Port ■ Expansion Module Slot ■ Default Settings 1 INTRODUCING THE SUPERSTACK 3 SWITCH 4900 FAMILY This chapter contains introductory information about the hardware. It covers summary information about the Switch 4900, 4900 SX, 4924 and 4950 and how they can be used in the...
Getting Started Guide
Page 20
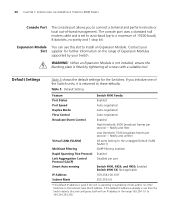
.... Notify and unfilter All ports belong to the untagged Default VLAN (VLAN 1) IGMP filtering enabled Enabled Disabled per port Switch 4900, 4924, and 4950: Enabled Switch 4900 SX: Not applicable 169.254.100.100* 255.255.0.0 * This default IP address is used if the unit...High threshold: 3000 broadcast frames per second - 20 CHAPTER 1: INTRODUCING THE SUPERSTACK 3 SWITCH 4900 FAMILY Console Port The console port allows you initialize one of the Switch units, it is returned to these defaults. Contact your Switch. The console port uses a standard null modem cable and is set to auto-baud ...
.... Notify and unfilter All ports belong to the untagged Default VLAN (VLAN 1) IGMP filtering enabled Enabled Disabled per port Switch 4900, 4924, and 4950: Enabled Switch 4900 SX: Not applicable 169.254.100.100* 255.255.0.0 * This default IP address is used if the unit...High threshold: 3000 broadcast frames per second - 20 CHAPTER 1: INTRODUCING THE SUPERSTACK 3 SWITCH 4900 FAMILY Console Port The console port allows you initialize one of the Switch units, it is returned to these defaults. Contact your Switch. The console port uses a standard null modem cable and is set to auto-baud ...

Getting Started Guide
Page 34
...43 Connect to view the automatically configured IP information? See page 48 Web Interface Connect over the network via the console port. See page 50 CAUTION: To protect your Switch from unauthorized access, you must change all three default passwords as soon as possible, even if you need to...panel port and use the Web Interface or Command Line Interface. Detailed procedural steps are contained in Figure 12. See page 37 Use 3Com Network Supervisor (3NS). For more information on default The whole setup process is summarised in the sections that follow. How do you want...
...43 Connect to view the automatically configured IP information? See page 48 Web Interface Connect over the network via the console port. See page 50 CAUTION: To protect your Switch from unauthorized access, you must change all three default passwords as soon as possible, even if you need to...panel port and use the Web Interface or Command Line Interface. Detailed procedural steps are contained in Figure 12. See page 37 Use 3Com Network Supervisor (3NS). For more information on default The whole setup process is summarised in the sections that follow. How do you want...

Getting Started Guide
Page 37
... Connect a workstation using the web interface or the command line interface (CLI). ■ Connecting to the console port of the Switch. The procedure described in this whilst the Switch is , before you can make a connection to a front Panel Port panel port. Manually Configuring IP Information... 37 Manually Configuring IP Information You can manually configure the Switch IP information in the following so that is offline, that you can manually set up the Switch with RJ-45 connectors. ■ A suitable Web browser - Pre-requisites ■...
... Connect a workstation using the web interface or the command line interface (CLI). ■ Connecting to the console port of the Switch. The procedure described in this whilst the Switch is , before you can make a connection to a front Panel Port panel port. Manually Configuring IP Information... 37 Manually Configuring IP Information You can manually configure the Switch IP information in the following so that is offline, that you can manually set up the Switch with RJ-45 connectors. ■ A suitable Web browser - Pre-requisites ■...
Getting Started Guide
Page 40
...summary of Managing a Switch" on page 46. The screen prompts you to enter IP information. 5 Enter the IP address, subnet mask, and gateway IP address for you to set up your Switch manually you can alternatively make a connection to the console port (this whilst the Switch is offline, that ...is, before you connect the Switch to a network, or whilst the Switch is online, that is ready for the Switch. See "Methods of the information entered...
...summary of Managing a Switch" on page 46. The screen prompts you to enter IP information. 5 Enter the IP address, subnet mask, and gateway IP address for you to set up your Switch manually you can alternatively make a connection to the console port (this whilst the Switch is offline, that ...is, before you connect the Switch to a network, or whilst the Switch is online, that is ready for the Switch. See "Methods of the information entered...

Getting Started Guide
Page 41
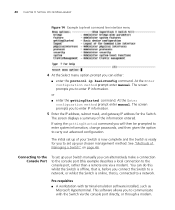
... the cable. You can manually set to which are: ■ 19,200 baud ■ 8 data bits if you can find pin-out diagrams for the Switch, which you are connecting directly to the console port using a standard null modem cable as a COM port) on the cable to one of the... Switch. c Connect the other end of the cable to prevent it from being loosened. if you have the following so that you are connecting to the console port, or ■ A standard modem cable - b Tighten the retaining screws on your...
... the cable. You can manually set to which are: ■ 19,200 baud ■ 8 data bits if you can find pin-out diagrams for the Switch, which you are connecting directly to the console port using a standard null modem cable as a COM port) on the cable to one of the... Switch. c Connect the other end of the cable to prevent it from being loosened. if you have the following so that you are connecting to the console port, or ■ A standard modem cable - b Tighten the retaining screws on your...
Getting Started Guide
Page 42
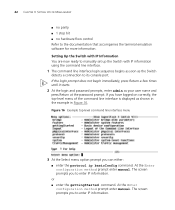
... no parity ■ 1 stop bit ■ no hardware flow control Refer to its console port. Setting Up the Switch with IP Information You are now ready to manually set up the Switch with IP information using the command line interface. 1 The command line interface login sequence begins ... does not begin immediately, press Return a few times until it starts. 2 At the login and password prompts, enter admin as the Switch detects a connection to the documentation that accompanies the terminal emulation software for more information. At the Enter configuration method prompt enter manual. At...
... no parity ■ 1 stop bit ■ no hardware flow control Refer to its console port. Setting Up the Switch with IP Information You are now ready to manually set up the Switch with IP information using the command line interface. 1 The command line interface login sequence begins ... does not begin immediately, press Return a few times until it starts. 2 At the login and password prompts, enter admin as the Switch detects a connection to the documentation that accompanies the terminal emulation software for more information. At the Enter configuration method prompt enter manual. At...
Getting Started Guide
Page 43
... interface via the console port to manage the Switch, you can use the 3Com Network Supervisor application provided on page 46. Using 3Com Network You can begin to manage the Switch. If using the gettingStarted command you will auto-discover the new Switch and display the ...or BootP server. This application will be configured so that you to the Switch using a console cable to the documentation that has been automatically allocated to carry out advanced configuration. Refer to the console port of your chosen management method. See "Methods of the information entered....
... interface via the console port to manage the Switch, you can use the 3Com Network Supervisor application provided on page 46. Using 3Com Network You can begin to manage the Switch. If using the gettingStarted command you will auto-discover the new Switch and display the ...or BootP server. This application will be configured so that you to the Switch using a console cable to the documentation that has been automatically allocated to carry out advanced configuration. Refer to the console port of your chosen management method. See "Methods of the information entered....
Getting Started Guide
Page 44
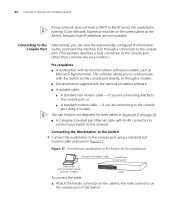
... a DHCP or BootP server, the workstation running 3Com Network Supervisor must be on page 69. ■ A Category 5 twisted pair Ethernet cable with RJ-45 connectors to connect your Switch to the network. if you are connecting directly to the male connector on the console port of the Switch. Figure 17 Connecting a workstation to the...
... a DHCP or BootP server, the workstation running 3Com Network Supervisor must be on page 69. ■ A Category 5 twisted pair Ethernet cable with RJ-45 connectors to connect your Switch to the network. if you are connecting directly to the male connector on the console port of the Switch. Figure 17 Connecting a workstation to the...
Getting Started Guide
Page 45
...cable to one minute. The settings should be set to match the default settings for the Switch, which you have connected the cable. If there is displayed as the Switch detects a connection to its console port. Viewing Automatically Configured IP Information 45 b Tighten the retaining screws on correctly, the top... cable to prevent it then allocates an IP address in the range of 169.254.x.y (where x is in Figure 18. Viewing IP Information via the Console Port You are : ■ 19,200 baud ■ 8 data bits ■ no parity ■ 1 stop bit ■ no response from being ...
...cable to one minute. The settings should be set to match the default settings for the Switch, which you have connected the cable. If there is displayed as the Switch detects a connection to its console port. Viewing Automatically Configured IP Information 45 b Tighten the retaining screws on correctly, the top... cable to prevent it then allocates an IP address in the range of 169.254.x.y (where x is in Figure 18. Viewing IP Information via the Console Port You are : ■ 19,200 baud ■ 8 data bits ■ no parity ■ 1 stop bit ■ no response from being ...
Getting Started Guide
Page 46
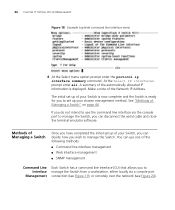
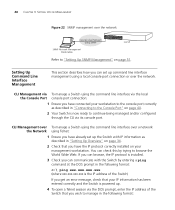
...you wish to Interface manage the Switch from a workstation, either locally via the console port to manage the Switch, you to manage the Switch. A summary of your Switch, you can decide how you to set up your Switch is now complete and the Switch is displayed. The initial set...Command line interface management ■ Web interface management ■ SNMP management Command Line Each Switch has a command line interface (CLI) that allows you can use the command line interface via a console port Management connection (see Figure 19), or remotely over the network (see Figure 20)....
...you wish to Interface manage the Switch from a workstation, either locally via the console port to manage the Switch, you to manage the Switch. A summary of your Switch, you can decide how you to set up your Switch is now complete and the Switch is displayed. The initial set...Command line interface management ■ Web interface management ■ SNMP management Command Line Each Switch has a command line interface (CLI) that allows you can use the command line interface via a console port Management connection (see Figure 19), or remotely over the network (see Figure 20)....
Getting Started Guide
Page 47
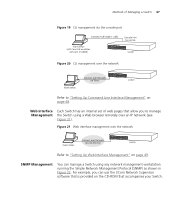
...Web browser remotely over the network Refer to manage Management the Switch using any network management workstation running the Simple Network Management Protocol (SNMP) as shown in Figure 22. SNMP Management You can use the 3Com Network Supervisor software that allow you to "Setting Up Command ...Line Interface Management" on page 48. Web Interface Each Switch has an internal set of Managing a Switch 47 Figure 19 CLI management via the console port Figure 20 CLI management over...
...Web browser remotely over the network Refer to manage Management the Switch using any network management workstation running the Simple Network Management Protocol (SNMP) as shown in Figure 22. SNMP Management You can use the 3Com Network Supervisor software that allow you to "Setting Up Command ...Line Interface Management" on page 48. Web Interface Each Switch has an internal set of Managing a Switch 47 Figure 19 CLI management via the console port Figure 20 CLI management over...
Getting Started Guide
Page 48
...IP information has been entered correctly and the Switch is now ready to manage in "Connecting to browse the World Wide Web. CLI Management over To manage a Switch using the command line interface over a network the Network using a local console port connection or over the network Refer to... "Setting Up SNMP Management" on page 40. 2 Your Switch is powered up. 4 To open a Telnet session via its console port. Setting Up Command Line Interface Management This section describes how you can set up command line interface management using ...
...IP information has been entered correctly and the Switch is now ready to manage in "Connecting to browse the World Wide Web. CLI Management over To manage a Switch using the command line interface over a network the Network using a local console port connection or over the network Refer to... "Setting Up SNMP Management" on page 40. 2 Your Switch is powered up. 4 To open a Telnet session via its console port. Setting Up Command Line Interface Management This section describes how you can set up command line interface management using ...

Getting Started Guide
Page 61
... a tray to these sockets. Only connect RJ-45 data connectors, network telephony systems, or network telephones to support the weight of the Switch, only use a modem which it is suitable for connection to the telecommunications system. WARNING: When an Expansion Module is not installed ensure...WARNING: France and Peru only: This unit cannot be powered from IT† supplies. only: If connecting a modem to the console port of the switch. Important Safety Information 61 WARNING: The socket outlet must be powered by 230V (2P+T) via an isolation transformer ratio 1:1, with the...
... a tray to these sockets. Only connect RJ-45 data connectors, network telephony systems, or network telephones to support the weight of the Switch, only use a modem which it is suitable for connection to the telecommunications system. WARNING: When an Expansion Module is not installed ensure...WARNING: France and Peru only: This unit cannot be powered from IT† supplies. only: If connecting a modem to the console port of the switch. Important Safety Information 61 WARNING: The socket outlet must be powered by 230V (2P+T) via an isolation transformer ratio 1:1, with the...

Getting Started Guide
Page 79
INDEX Numbers 3C number 19 A access levels of default users 51 approved GBIC transceivers 29 automatic setup 43 3Com Network Supervisor 43 console port 44 C cable 10/100/1000BASE-T 28 fiber 29 pin-outs 69 CD-ROM 9 command line interface management 46 conventions notice icons, About This Guide ... registered 57 IP configuration 35 L LEDs 17 logging in as a default user 51 M MAC address of the Switch 19 management methods 46 preparing for 36 setting up 33, 34 manual setup console port 40 front panel port 37 MDI configuration 28 MDIX configuration 28 P passwords of default users 51 pin assignments...
INDEX Numbers 3C number 19 A access levels of default users 51 approved GBIC transceivers 29 automatic setup 43 3Com Network Supervisor 43 console port 44 C cable 10/100/1000BASE-T 28 fiber 29 pin-outs 69 CD-ROM 9 command line interface management 46 conventions notice icons, About This Guide ... registered 57 IP configuration 35 L LEDs 17 logging in as a default user 51 M MAC address of the Switch 19 management methods 46 preparing for 36 setting up 33, 34 manual setup console port 40 front panel port 37 MDI configuration 28 MDIX configuration 28 P passwords of default users 51 pin assignments...
