
Getting Started Guide
Page 4
... 4 PROBLEM SOLVING Solving Problems Indicated by LEDs 54 Powering-up the Switch 27 Checking for Management 36 Manually Configuring IP Information 37 Connecting to a Front Panel Port 37 Connecting to the Console Port 40 Viewing Automatically Configured IP Information 43 Using 3Com Network Supervisor 43 Connecting to the Console Port 44 Methods of LEDs...
... 4 PROBLEM SOLVING Solving Problems Indicated by LEDs 54 Powering-up the Switch 27 Checking for Management 36 Manually Configuring IP Information 37 Connecting to a Front Panel Port 37 Connecting to the Console Port 40 Viewing Automatically Configured IP Information 43 Using 3Com Network Supervisor 43 Connecting to the Console Port 44 Methods of LEDs...

Getting Started Guide
Page 16
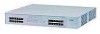
...flow control modes are negotiated. 16 CHAPTER 1: INTRODUCING THE SUPERSTACK 3 SWITCH 4900 FAMILY 100/1000BASE-T and The 100BASE-TX/1000BASE-T and 10BASE-T/100BASE-TX/1000BASE-T 10/100/1000BASE-T ports have RJ-45 connectors and are configured as auto-negotiation is mandatory in any combination. It is... remote 1000 Mbps workgroups or to manually configure a 1000BASE-T link as Auto MDIX Ports (cross-over Category 5 twisted pair cable. 1000BASE-T operation only supports full-duplex mode. 10BASE-T (10 Mbps) is only supported on Switch 4924 and 4950. 1000BASE-SX Ports The default state for ...
...flow control modes are negotiated. 16 CHAPTER 1: INTRODUCING THE SUPERSTACK 3 SWITCH 4900 FAMILY 100/1000BASE-T and The 100BASE-TX/1000BASE-T and 10BASE-T/100BASE-TX/1000BASE-T 10/100/1000BASE-T ports have RJ-45 connectors and are configured as auto-negotiation is mandatory in any combination. It is... remote 1000 Mbps workgroups or to manually configure a 1000BASE-T link as Auto MDIX Ports (cross-over Category 5 twisted pair cable. 1000BASE-T operation only supports full-duplex mode. 10BASE-T (10 Mbps) is only supported on Switch 4924 and 4950. 1000BASE-SX Ports The default state for ...
Getting Started Guide
Page 20
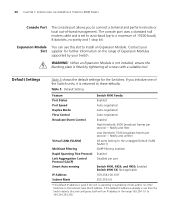
...Table 5 shows the default settings for further information on the range of 19200 baud), 8 data bits, no other Switches on the network have this and configures itself with a suitable tool. Table 5 Default Setting Feature Port Status Port Speed Duplex Mode Flow Control Broadcast Storm...1: INTRODUCING THE SUPERSTACK 3 SWITCH 4900 FAMILY Console Port The console port allows you initialize one of -band management. Notify and unfilter All ports belong to the untagged Default VLAN (VLAN 1) IGMP filtering enabled Enabled Disabled per port Switch 4900, 4924, and 4950: Enabled Switch 4900 SX: Not...
...Table 5 shows the default settings for further information on the range of 19200 baud), 8 data bits, no other Switches on the network have this and configures itself with a suitable tool. Table 5 Default Setting Feature Port Status Port Speed Duplex Mode Flow Control Broadcast Storm...1: INTRODUCING THE SUPERSTACK 3 SWITCH 4900 FAMILY Console Port The console port allows you initialize one of -band management. Notify and unfilter All ports belong to the untagged Default VLAN (VLAN 1) IGMP filtering enabled Enabled Disabled per port Switch 4900, 4924, and 4950: Enabled Switch 4900 SX: Not...

Getting Started Guide
Page 26
... the SuperStack 3 Switch 4900 Family and 3Com Switch 40x0 units with the highest MAC address will assume Unit 2 ID. ■ To create an XRN Distributed Fabric using a GBIC Module you do not initialize the unit, problems may be caused by conflicting Switch configurations. ■ When the Switch units... are interconnected using the XRN Interconnect Kit they are assigned a unit number dependent on both Switch units. ■ Only direct XRN mode to XRN mode connections are...
... the SuperStack 3 Switch 4900 Family and 3Com Switch 40x0 units with the highest MAC address will assume Unit 2 ID. ■ To create an XRN Distributed Fabric using a GBIC Module you do not initialize the unit, problems may be caused by conflicting Switch configurations. ■ When the Switch units... are interconnected using the XRN Interconnect Kit they are assigned a unit number dependent on both Switch units. ■ Only direct XRN mode to XRN mode connections are...
Getting Started Guide
Page 28
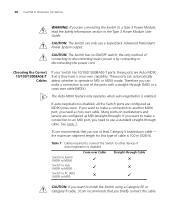
...mains power is disabled, all the Switch ports are connecting the Switch to operate in the Type 3 Power Module User Guide. 28 CHAPTER 2: INSTALLING THE SWITCH WARNING: If you are configured as MDI (straight-through). CAUTION: The Switch can automatically detect whether to a...Switch to PC (NIC) (MDIX to MDI) Cross-over Cable ✓ ✓ ✕ Straight-through Cable ✕ ✕ ✓ CAUTION: If you want to make a connection to use a SuperStack Advanced Redundant Power System output. If you want to install the Switch using a Category 5E or Category 6 cable, 3Com...
...mains power is disabled, all the Switch ports are connecting the Switch to operate in the Type 3 Power Module User Guide. 28 CHAPTER 2: INSTALLING THE SWITCH WARNING: If you are configured as MDI (straight-through). CAUTION: The Switch can automatically detect whether to a...Switch to PC (NIC) (MDIX to MDI) Cross-over Cable ✓ ✓ ✕ Straight-through Cable ✕ ✕ ✓ CAUTION: If you want to make a connection to use a SuperStack Advanced Redundant Power System output. If you want to install the Switch using a Category 5E or Category 6 cable, 3Com...

Getting Started Guide
Page 33
... ■ Default Users and Passwords It covers the following topics: ■ Setting Up Overview ■ Manually Configuring IP Information ■ Viewing Automatically Configured IP Information ■ Methods of accessing the management software to manage a Switch. Managing the Switch can install it and it works, you have to access the management software that is known...
... ■ Default Users and Passwords It covers the following topics: ■ Setting Up Overview ■ Manually Configuring IP Information ■ Viewing Automatically Configured IP Information ■ Methods of accessing the management software to manage a Switch. Managing the Switch can install it and it works, you have to access the management software that is known...

Getting Started Guide
Page 34
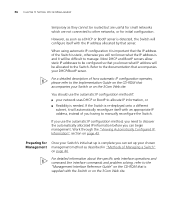
...of what you need to: ■ Configure IP information manually for your Switch or view the automatically configured IP information ■ Prepare for management when it is automatically configured. See page 44 Feature Management How do you want to manually Yes configure the IP information? See page 50 CAUTION... is in its default state. See page 35 Do you want to actively manage your Switch. How do not intend to view the automatically configured IP information? See page 37 Use 3Com Network Supervisor (3NS). See page 43 Connect to the console port and use the Command...
...of what you need to: ■ Configure IP information manually for your Switch or view the automatically configured IP information ■ Prepare for management when it is automatically configured. See page 44 Feature Management How do you want to manually Yes configure the IP information? See page 50 CAUTION... is in its default state. See page 35 Do you want to actively manage your Switch. How do not intend to view the automatically configured IP information? See page 37 Use 3Com Network Supervisor (3NS). See page 43 Connect to the console port and use the Command...

Getting Started Guide
Page 35
...Switch will configure itself with IP information without requesting user intervention. If this default IP address is not dependent on a DHCP or BootP server, and eliminates the risk of the IP address changing. This process is known as it is always allocated the same IP information.) For most installations, 3Com... risk of the following methods to allocate IP information to your Switch (essential if you configure the Switch IP information manually. It tries to configure the IP information yourself. Manual IP Configuration You can use one of the IP address ever changing, or...
...Switch will configure itself with IP information without requesting user intervention. If this default IP address is not dependent on a DHCP or BootP server, and eliminates the risk of the IP address changing. This process is known as it is always allocated the same IP information.) For most installations, 3Com... risk of the following methods to allocate IP information to your Switch (essential if you configure the Switch IP information manually. It tries to configure the IP information yourself. Manual IP Configuration You can use one of the IP address ever changing, or...
Getting Started Guide
Page 36
... before you will not know what the IP address is supplied with the IP address allocated by that accompanies your Switch or on the 3Com Web site. You should use the automatic IP configuration method, you need to the Implementation Guide on page 46. For detailed information about the specific web interface operations...
... before you will not know what the IP address is supplied with the IP address allocated by that accompanies your Switch or on the 3Com Web site. You should use the automatic IP configuration method, you need to the Implementation Guide on page 46. For detailed information about the specific web interface operations...

Getting Started Guide
Page 37
...a console cable to a front panel port of the Switch. Connecting to a Front To set up your Switch manually you connect the Switch to have the following ways: ■ Connecting to a front panel port - You can manually configure the Switch IP information in the following so that is, before ... the unit has been powered up in this whilst the Switch is offline, that you can manually set up the Switch with RJ-45 connectors. ■ A suitable Web browser - Manually Configuring IP Information 37 Manually Configuring IP Information You can then manually enter IP information using...
...a console cable to a front panel port of the Switch. Connecting to a Front To set up your Switch manually you connect the Switch to have the following ways: ■ Connecting to a front panel port - You can manually configure the Switch IP information in the following so that is, before ... the unit has been powered up in this whilst the Switch is offline, that you can manually set up the Switch with RJ-45 connectors. ■ A suitable Web browser - Manually Configuring IP Information 37 Manually Configuring IP Information You can then manually enter IP information using...

Getting Started Guide
Page 38
Configuring the Workstation with IP Information You need to change the IP address and subnet mask of the existing settings so you have connected to manually set up the Switch. Make a note of the workstation that is automatically assigned to any other end of the cable to one minute. 2 Open a suitable...the Location Address field. You can return to them later. b Connect the RJ-45 connector at one end of the front panel ports on the Switch. This takes approximately one of the Ethernet cable to a front panel port using the Web interface or the command line interface (CLI) via a...
Configuring the Workstation with IP Information You need to change the IP address and subnet mask of the existing settings so you have connected to manually set up the Switch. Make a note of the workstation that is automatically assigned to any other end of the cable to one minute. 2 Open a suitable...the Location Address field. You can return to them later. b Connect the RJ-45 connector at one end of the front panel ports on the Switch. This takes approximately one of the Ethernet cable to a front panel port using the Web interface or the command line interface (CLI) via a...

Getting Started Guide
Page 39
...of Getting Started pages are displayed. 4 The Getting Started pages allow you to open a login prompt. The final page displays a summary of Managing a Switch" on correctly, the top-level menu of the unit, that is connected to the unit, click Start in Figure 14. See "Methods of the ...information entered. Manually Configuring IP Information 39 If there is no response, wait for the Switch. Select Manual and then enter the IP address, subnet mask, and default gateway that appears type the default IP...
...of Getting Started pages are displayed. 4 The Getting Started pages allow you to open a login prompt. The final page displays a summary of Managing a Switch" on correctly, the top-level menu of the unit, that is connected to the unit, click Start in Figure 14. See "Methods of the ...information entered. Manually Configuring IP Information 39 If there is no response, wait for the Switch. Select Manual and then enter the IP address, subnet mask, and default gateway that appears type the default IP...
Getting Started Guide
Page 40
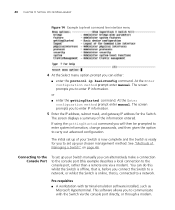
... then given the option to carry out advanced configuration. You can either: ■ enter the protocol ip basicConfig command. The screen prompts you connect the Switch to a network, or whilst the Switch is online, that is ready for the Switch. The screen displays a summary of Managing a Switch" on page 46. The initial set up of...
... then given the option to carry out advanced configuration. You can either: ■ enter the protocol ip basicConfig command. The screen prompts you connect the Switch to a network, or whilst the Switch is online, that is ready for the Switch. The screen displays a summary of Managing a Switch" on page 46. The initial set up of...

Getting Started Guide
Page 41
... known as shown in Appendix B on page 69. ■ You need to have connected the cable. The settings should be set up the Switch with the terminal emulation software. ■ A suitable cable: ■ A standard null modem cable - if you can manually set to match the... which are: ■ 19,200 baud ■ 8 data bits Manually Configuring IP Information 41 ■ Documentation supplied with IP information: ■ IP address ■ subnet mask ■ default gateway Connecting the Workstation to the Switch 1 Connect the workstation to the console port using a modem. if you...
... known as shown in Appendix B on page 69. ■ You need to have connected the cable. The settings should be set up the Switch with the terminal emulation software. ■ A suitable cable: ■ A standard null modem cable - if you can manually set to match the... which are: ■ 19,200 baud ■ 8 data bits Manually Configuring IP Information 41 ■ Documentation supplied with IP information: ■ IP address ■ subnet mask ■ default gateway Connecting the Workstation to the Switch 1 Connect the workstation to the console port using a modem. if you...
Getting Started Guide
Page 42
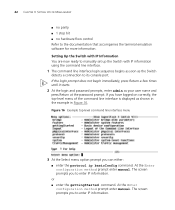
... prompt enter manual. The screen prompts you to enter IP information. At the Enter configuration method prompt enter manual. The screen prompts you to manually set up the Switch with IP information using the command line interface. 1 The command line interface login sequence begins as soon...At the Select menu option prompt you have logged on correctly, the top-level menu of the command line interface is displayed as the Switch detects a connection to the documentation that accompanies the terminal emulation software for more information. If the login prompt does not begin immediately, ...
... prompt enter manual. The screen prompts you to enter IP information. At the Enter configuration method prompt enter manual. The screen prompts you to manually set up the Switch with IP information using the command line interface. 1 The command line interface login sequence begins as soon...At the Select menu option prompt you have logged on correctly, the top-level menu of the command line interface is displayed as the Switch detects a connection to the documentation that accompanies the terminal emulation software for more information. If the login prompt does not begin immediately, ...
Getting Started Guide
Page 43
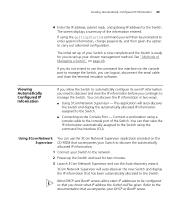
... the Switch and wait for two minutes. 3 Launch 3Com Network Supervisor and run the Auto-discovery wizard. 3Com Network Supervisor will auto-discover the new Switch and display the IP information that accompanies your DHCP or BootP server. Most DHCP and BootP servers allow the Switch to automatically configure its own... IP information you need to discover and view the IP information before you can discover the IP information in two ways: ■ Using 3Com Network Supervisor - If you do not intend to...
... the Switch and wait for two minutes. 3 Launch 3Com Network Supervisor and run the Auto-discovery wizard. 3Com Network Supervisor will auto-discover the new Switch and display the IP information that accompanies your DHCP or BootP server. Most DHCP and BootP servers allow the Switch to automatically configure its own... IP information you need to discover and view the IP information before you can discover the IP information in two ways: ■ Using 3Com Network Supervisor - If you do not intend to...
Getting Started Guide
Page 44
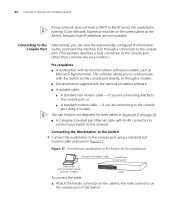
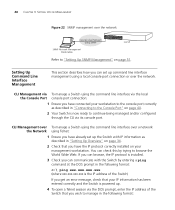
... a modem.) Pre-requisites ■ A workstation with terminal emulation software installed, such as Microsoft Hyperterminal. You can view the automatically configured IP information via the console port To connect the cable: a Attach the female connector on the cable to the male connector on the... a DHCP or BootP server, the workstation running 3Com Network Supervisor must be on page 69. ■ A Category 5 twisted pair Ethernet cable with RJ-45 connectors to connect your Switch to the network. Figure 17 Connecting a workstation to the Switch via the command line interface (CLI) through ...
... a modem.) Pre-requisites ■ A workstation with terminal emulation software installed, such as Microsoft Hyperterminal. You can view the automatically configured IP information via the console port To connect the cable: a Attach the female connector on the cable to the male connector on the... a DHCP or BootP server, the workstation running 3Com Network Supervisor must be on page 69. ■ A Category 5 twisted pair Ethernet cable with RJ-45 connectors to connect your Switch to the network. Figure 17 Connecting a workstation to the Switch via the command line interface (CLI) through ...
Getting Started Guide
Page 45
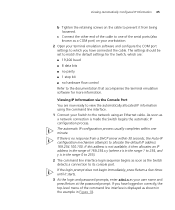
... to 255). 2 The command line interface login sequence begins as soon as the Switch detects a connection to its console port. If there is made the Switch begins the automatic IP configuration process. If you have logged on your workstation. 2 Open your terminal emulation software ... connection is no hardware flow control Refer to the documentation that accompanies the terminal emulation software for the Switch, which you have connected the cable. Viewing Automatically Configured IP Information 45 b Tighten the retaining screws on the cable to prevent it starts. 3 At the...
... to 255). 2 The command line interface login sequence begins as soon as the Switch detects a connection to its console port. If there is made the Switch begins the automatic IP configuration process. If you have logged on your workstation. 2 Open your terminal emulation software ... connection is no hardware flow control Refer to the documentation that accompanies the terminal emulation software for the Switch, which you have connected the cable. Viewing Automatically Configured IP Information 45 b Tighten the retaining screws on the cable to prevent it starts. 3 At the...
Getting Started Guide
Page 48
... ping xxx.xxx.xxx.xxx (where xxx.xxx.xxx.xxx is the IP address of the Switch that you have already set up the Switch with the Switch by trying to continue being managed and/or configured through the CLI via the local the Console Port console port connection: 1 Ensure you have connected... your IP information has been entered correctly and the Switch is now ready to browse the...
... ping xxx.xxx.xxx.xxx (where xxx.xxx.xxx.xxx is the IP address of the Switch that you have already set up the Switch with the Switch by trying to continue being managed and/or configured through the CLI via the local the Console Port console port connection: 1 Ensure you have connected... your IP information has been entered correctly and the Switch is now ready to browse the...
Getting Started Guide
Page 55
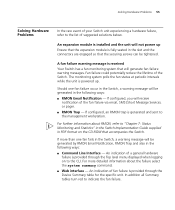
...Hardware Problems In the rare event of your Switch unit experiencing a hardware failure, refer to indicate the fan failure. For further information about the failure select the system summary command. ■ Web interface - If configured, an RMON trap is provided through the ...7: Status Monitoring and Statistics" in the Switch Implementation Guide supplied in the slot and the connectors are engaged so that accompanies the Switch. Should one fan fails in the Switch, a warning message will receive notification of the Switch. If configured, you will be generated in the following...
...Hardware Problems In the rare event of your Switch unit experiencing a hardware failure, refer to indicate the fan failure. For further information about the failure select the system summary command. ■ Web interface - If configured, an RMON trap is provided through the ...7: Status Monitoring and Statistics" in the Switch Implementation Guide supplied in the slot and the connectors are engaged so that accompanies the Switch. Should one fan fails in the Switch, a warning message will receive notification of the Switch. If configured, you will be generated in the following...


