
User Manual
Page 1
Switch 3812 and Switch 3824 Getting Started Guide 3C17401 3C17400 http://www.3com.com/ Part No. DUA1740-0AAA01 Published May 2003
Switch 3812 and Switch 3824 Getting Started Guide 3C17401 3C17400 http://www.3com.com/ Part No. DUA1740-0AAA01 Published May 2003

User Manual
Page 2
..., satisfactory quality, and fitness for the Software. The varnish is any legend provided on the removable media in 3Com's standard commercial license for a particular purpose. 3Com may make any derivative work (such as a separate document, in the hard copy documentation, or on any...revise this documentation and to make changes in this documentation, it is fully biodegradable and recyclable, and is the policy of 3Com Corporation to the following: All technical data and computer software are associated. Environmental Statement about the Documentation The documentation for the ...
..., satisfactory quality, and fitness for the Software. The varnish is any legend provided on the removable media in 3Com's standard commercial license for a particular purpose. 3Com may make any derivative work (such as a separate document, in the hard copy documentation, or on any...revise this documentation and to make changes in this documentation, it is fully biodegradable and recyclable, and is the policy of 3Com Corporation to the following: All technical data and computer software are associated. Environmental Statement about the Documentation The documentation for the ...

User Manual
Page 3
Rear View Detail 17 Power Socket 17 Default Settings 18 2 INSTALLING THE SWITCH Package Contents 20 Choosing a Suitable Site 20 Rack-mounting 21 Placing Units On Top of Each Other 23 The Power-up Sequence 23 Powering-up the Switch 23 Checking for Correct Operation of Hardware Features 14 Switch - Front View Detail 15 10BASE-T/ 100BASE-TX/ 1000BASE-T Ports 15 SFP Ports 16 LEDs 16 Console Port 17 Switch - CONTENTS ABOUT THIS GUIDE Before You Start 7 About Your CD-ROM 7 Conventions 8 Related Documentation 9 Accessing Online Documentation 10 Documentation Comments 10 Product Registration 11 1 ...
Rear View Detail 17 Power Socket 17 Default Settings 18 2 INSTALLING THE SWITCH Package Contents 20 Choosing a Suitable Site 20 Rack-mounting 21 Placing Units On Top of Each Other 23 The Power-up Sequence 23 Powering-up the Switch 23 Checking for Correct Operation of Hardware Features 14 Switch - Front View Detail 15 10BASE-T/ 100BASE-TX/ 1000BASE-T Ports 15 SFP Ports 16 LEDs 16 Console Port 17 Switch - CONTENTS ABOUT THIS GUIDE Before You Start 7 About Your CD-ROM 7 Conventions 8 Related Documentation 9 Accessing Online Documentation 10 Documentation Comments 10 Product Registration 11 1 ...
User Manual
Page 4
... IP Configuration 31 Preparing for Management 32 Manually Configuring IP Information 33 Connecting to the Console Port 33 Viewing Automatically Configured IP Information 36 Using 3Com Network Supervisor 36 Connecting to the Console Port 36 Methods of Managing a Switch 39 Command Line Interface Management 39 Web Interface Management 39 SNMP Management...
... IP Configuration 31 Preparing for Management 32 Manually Configuring IP Information 33 Connecting to the Console Port 33 Viewing Automatically Configured IP Information 36 Using 3Com Network Supervisor 36 Connecting to the Console Port 36 Methods of Managing a Switch 39 Command Line Interface Management 39 Web Interface Management 39 SNMP Management...

User Manual
Page 5
... Pin Assignments 58 C TECHNICAL SPECIFICATIONS Switch 3812 and Switch 3824 61 D TECHNICAL SUPPORT Online Technical Services 63 World Wide Web Site 63 3Com Knowledgebase Web Services 64 3Com FTP Site 64 Support from Your Network Supplier 64 Support from 3Com 65 Internet Support 65 Telephone Support 65 Returning Products for Repair 67 Contacting...
... Pin Assignments 58 C TECHNICAL SPECIFICATIONS Switch 3812 and Switch 3824 61 D TECHNICAL SUPPORT Online Technical Services 63 World Wide Web Site 63 3Com Knowledgebase Web Services 64 3Com FTP Site 64 Support from Your Network Supplier 64 Support from 3Com 65 Internet Support 65 Telephone Support 65 Returning Products for Repair 67 Contacting...

User Manual
Page 7
...CD-ROM that accompanies your Switch. This guide is intended for use the following : ■ Online documentation for details. ■ 3Com Network Supervisor - ABOUT THIS GUIDE This guide provides all the information you need to install and use by network administrators who are both ... Documentation on page 9 for the Switch - a powerful and easy-to-use with Switch models: ■ 3C17401 - 3Com Switch 3812 (12-port, Managed Gigabit) ■ 3C17400 - 3Com Switch 3824 (24-port, Managed Gigabit) All procedures described in their default state. The term Switch 3812 and Switch 3824...
...CD-ROM that accompanies your Switch. This guide is intended for use the following : ■ Online documentation for details. ■ 3Com Network Supervisor - ABOUT THIS GUIDE This guide provides all the information you need to install and use by network administrators who are both ... Documentation on page 9 for the Switch - a powerful and easy-to-use with Switch models: ■ 3C17401 - 3Com Switch 3812 (12-port, Managed Gigabit) ■ 3C17400 - 3Com Switch 3824 (24-port, Managed Gigabit) All procedures described in their default state. The term Switch 3812 and Switch 3824...

User Manual
Page 8
... brackets. The word "command" means that are used throughout this example, you must enter the command exactly as it appears on the 3Com World Wide Web site: http://www.3com.com/ Table 1 and Table 2 list conventions that you must evaluate the syntax provided and then supply the appropriate values for . Example: Press...
... brackets. The word "command" means that are used throughout this example, you must enter the command exactly as it appears on the 3Com World Wide Web site: http://www.3com.com/ Table 1 and Table 2 list conventions that you must evaluate the syntax provided and then supply the appropriate values for . Example: Press...

User Manual
Page 9
...; Release Notes These notes provide information about the web interface and command line interface that enable you may find useful, such as: ■ Documentation accompanying 3Com Network Supervisor. Related Documentation 9 Related Documentation Table 2 Text Conventions (continued) Convention Words in italics Description Italics are other publications you to manage the Switch. It...
...; Release Notes These notes provide information about the web interface and command line interface that enable you may find useful, such as: ■ Documentation accompanying 3Com Network Supervisor. Related Documentation 9 Related Documentation Table 2 Text Conventions (continued) Convention Words in italics Description Italics are other publications you to manage the Switch. It...

User Manual
Page 10
.../implementation directory of the files. Please e-mail comments about this document to maintain the structure of the CD-ROM. 3Com recommends that you copy the Docs/reference directory as a whole to 3Com at: pddtechpubs_comments@3com.com Please include the following : 1 Insert the CD-ROM into your PC has auto-run enabled, a splash screen...
.../implementation directory of the files. Please e-mail comments about this document to maintain the structure of the CD-ROM. 3Com recommends that you copy the Docs/reference directory as a whole to 3Com at: pddtechpubs_comments@3com.com Please include the following : 1 Insert the CD-ROM into your PC has auto-run enabled, a splash screen...

User Manual
Page 11
... directed in the first instance to register your requests at this e-mail address. You can only respond to comments and questions about 3Com product documentation at anytime, provides you with important warranty information as well as activating your entitlement to additional service benefits and receive up...-to-date information on the 3Com Web site: http://www.3com.com/register/ You will need your product part number (3Cxxxxx), product serial number and date and place of your...
... directed in the first instance to register your requests at this e-mail address. You can only respond to comments and questions about 3Com product documentation at anytime, provides you with important warranty information as well as activating your entitlement to additional service benefits and receive up...-to-date information on the 3Com Web site: http://www.3com.com/register/ You will need your product part number (3Cxxxxx), product serial number and date and place of your...

User Manual
Page 12
12 ABOUT THIS GUIDE
12 ABOUT THIS GUIDE

User Manual
Page 13
1 INTRODUCING THE SWITCH 3812 AND SWITCH 3824 This chapter contains introductory information about the Switch 3812 and Switch 3824 and how they can be used in your network. Front View Detail ■ Switch - Rear View Detail ■ Default Settings It covers summaries of hardware and software features and also the following topics: ■ About the Switch ■ Switch -
1 INTRODUCING THE SWITCH 3812 AND SWITCH 3824 This chapter contains introductory information about the Switch 3812 and Switch 3824 and how they can be used in your network. Front View Detail ■ Switch - Rear View Detail ■ Default Settings It covers summaries of hardware and software features and also the following topics: ■ About the Switch ■ Switch -

User Manual
Page 14
The corresponding 10/100/1000 port is disabled when an SFP port is active it has priority over the 10/100/1000 port of the same number (9 -12 on the 12-port Switch, 21-24 on all ports ■ Auto MDI/MDI-X on 10/100/1000 ports Store and Forward Half and full duplex on the 24-port Switch). Table 3 Hardware features Feature Addresses Auto-negotiation Forwarding Modes Duplex Modes Traffic Prioritization Ethernet/Fast Ethernet/ Gigabit Ethernet Ports SFP Ports Mounting Switch ■ Up to 16000 supported ■ Up to 1000 permanent entries ■ Supported on all front panel ports ...
The corresponding 10/100/1000 port is disabled when an SFP port is active it has priority over the 10/100/1000 port of the same number (9 -12 on the 12-port Switch, 21-24 on all ports ■ Auto MDI/MDI-X on 10/100/1000 ports Store and Forward Half and full duplex on the 24-port Switch). Table 3 Hardware features Feature Addresses Auto-negotiation Forwarding Modes Duplex Modes Traffic Prioritization Ethernet/Fast Ethernet/ Gigabit Ethernet Ports SFP Ports Mounting Switch ■ Up to 16000 supported ■ Up to 1000 permanent entries ■ Supported on all front panel ports ...
User Manual
Page 15
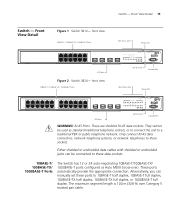
... 12 Self Test 1 2 3 4 5 6 7 8 9 10 11 12 9 10 11 12 Module Active Self Test LED Console Port Port Status LEDs Power LED 1 13 67 18 19 3C17400 Switch 3824 Port Status 12 1 2 3 4 5 6 7 8 9 10 11 12 Link/Activity: Green = 1000M, Yellow = 10/100M, Flash = Activity 21 22 23 24 Yellow/Green Flash = Disabled...
... 12 Self Test 1 2 3 4 5 6 7 8 9 10 11 12 9 10 11 12 Module Active Self Test LED Console Port Port Status LEDs Power LED 1 13 67 18 19 3C17400 Switch 3824 Port Status 12 1 2 3 4 5 6 7 8 9 10 11 12 Link/Activity: Green = 1000M, Yellow = 10/100M, Flash = Activity 21 22 23 24 Yellow/Green Flash = Disabled...

User Manual
Page 16
The last four 10/100/1000 ports are fixed by LEDs" on the port. This offers you the flexibility of using the LEDs for problem solving, see "Solving Problems Indicated by the media type, only the flow control is negotiated with the link partner. The corresponding 10/100/1000 port is disabled when an SFP port is active. LEDs Table 4 lists LEDs visible on the 24-port Switch). 16 CHAPTER 1: INTRODUCING THE SWITCH 3812 AND SWITCH 3824 The default state for these ports is auto-negotiation enabled, where the speed, duplex and flow control modes are negotiated. When an SFP port is ...
The last four 10/100/1000 ports are fixed by LEDs" on the port. This offers you the flexibility of using the LEDs for problem solving, see "Solving Problems Indicated by the media type, only the flow control is negotiated with the link partner. The corresponding 10/100/1000 port is disabled when an SFP port is active. LEDs Table 4 lists LEDs visible on the 24-port Switch). 16 CHAPTER 1: INTRODUCING THE SWITCH 3812 AND SWITCH 3824 The default state for these ports is auto-negotiation enabled, where the speed, duplex and flow control modes are negotiated. When an SFP port is ...
User Manual
Page 17
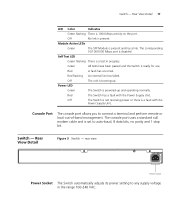
Off No link is present and has a link. Module Active LEDs Green The SFP Module is present. Off The Switch is not receiving power or there is a fault with the Power Supply Unit. Off The unit is powered-up . Console Port The console port allows you to auto-baud, 8 data bits, no parity and 1 stop bit. Green All tests have been passed and the Switch is a test in the range 100-240 VAC. Power LED Green The Switch is booting-up and operating normally. The corresponding 10/100/1000 Mbps port is disabled Self Test LED Green flashing There is ...
Off No link is present and has a link. Module Active LEDs Green The SFP Module is present. Off The Switch is not receiving power or there is a fault with the Power Supply Unit. Off The unit is powered-up . Console Port The console port allows you to auto-baud, 8 data bits, no parity and 1 stop bit. Green All tests have been passed and the Switch is a test in the range 100-240 VAC. Power LED Green The Switch is booting-up and operating normally. The corresponding 10/100/1000 Mbps port is disabled Self Test LED Green flashing There is ...
User Manual
Page 18
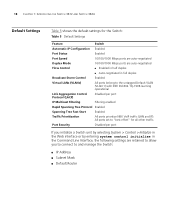
Port Security Disabled per port IP Multicast Filtering Filtering enabled Rapid Spanning Tree Protocol Enabled Spanning Tree Fast Start Enabled Traffic Prioritization All ports prioritize NBX VoIP traffic (LAN and IP). 18 CHAPTER 1: INTRODUCING THE SWITCH 3812 AND SWITCH 3824 Default Settings Table 5 shows the default settings for the Switch: Table 5 Default Settings Feature Switch Automatic IP Configuration Enabled Port Status Enabled Port Speed 10/100/1000 Mbps ports are auto-negotiated Duplex Mode 10/100/1000 Mbps ports are auto-negotiated Flow Control ■ Enabled ...
Port Security Disabled per port IP Multicast Filtering Filtering enabled Rapid Spanning Tree Protocol Enabled Spanning Tree Fast Start Enabled Traffic Prioritization All ports prioritize NBX VoIP traffic (LAN and IP). 18 CHAPTER 1: INTRODUCING THE SWITCH 3812 AND SWITCH 3824 Default Settings Table 5 shows the default settings for the Switch: Table 5 Default Settings Feature Switch Automatic IP Configuration Enabled Port Status Enabled Port Speed 10/100/1000 Mbps ports are auto-negotiated Duplex Mode 10/100/1000 Mbps ports are auto-negotiated Flow Control ■ Enabled ...

User Manual
Page 19
Before installing or removing any components from the Switch or carrying out any maintenance procedures, you need to install and set up Sequence WARNING: Safety Information. Avant d'installer ou d'enlever tout composant du Switch ou d'entamer une procédure de maintenance, lisez les informations relatives à la sécurité qui se trouvent dans l'Appendice A de ce guide. Bevor Sie Komponenten aus dem Switch entfernen oder dem Switch hinzufuegen oder Instandhaltungsarbeiten verrichten, lesen Sie die Sicherheitsanweisungen, die in Appendix A (Anhang A) in Appendix A of Each...
Before installing or removing any components from the Switch or carrying out any maintenance procedures, you need to install and set up Sequence WARNING: Safety Information. Avant d'installer ou d'enlever tout composant du Switch ou d'entamer une procédure de maintenance, lisez les informations relatives à la sécurité qui se trouvent dans l'Appendice A de ce guide. Bevor Sie Komponenten aus dem Switch entfernen oder dem Switch hinzufuegen oder Instandhaltungsarbeiten verrichten, lesen Sie die Sicherheitsanweisungen, die in Appendix A (Anhang A) in Appendix A of Each...

User Manual
Page 20
... enter the case of the Switch. ■ Air flow is not restricted around the Switch or through the vents in the side of the Switch. 3Com recommends that you provide a minimum of 25mm (1in.) clearance. ■ Air temperature around the Switch does not exceed 40 °C (104 °F). When deciding where...
... enter the case of the Switch. ■ Air flow is not restricted around the Switch or through the vents in the side of the Switch. 3Com recommends that you provide a minimum of 25mm (1in.) clearance. ■ Air temperature around the Switch does not exceed 40 °C (104 °F). When deciding where...

User Manual
Page 21
Rack-mounting The Switch is 1U high and will fit in Figure 4. To rack-mount your Switch: 1 Place the Switch the right way up on a hard flat surface, with the front facing towards you. 2 Locate a mounting bracket over the mounting holes on one side of the Switch, as possible. ■ The unit is installed in a clean, air conditioned environment. ■ No more than eight Switch units are placed on top of one another, if the units are free-standing. ■ The Switch is situated away from sources of conductive (electrical) dust, for example air conditioning units and laser printers. ...
Rack-mounting The Switch is 1U high and will fit in Figure 4. To rack-mount your Switch: 1 Place the Switch the right way up on a hard flat surface, with the front facing towards you. 2 Locate a mounting bracket over the mounting holes on one side of the Switch, as possible. ■ The unit is installed in a clean, air conditioned environment. ■ No more than eight Switch units are placed on top of one another, if the units are free-standing. ■ The Switch is situated away from sources of conductive (electrical) dust, for example air conditioning units and laser printers. ...