
Getting Started
Page 2
... Maximizing the recyclable and reusable content of safely. Ensuring that all waste conforms to recognized environmental standards. Regulated Materials Statement 3Com products do not contain any form or by all products can be trademarks of merchantability, satisfactory quality, and fitness for... revise this documentation and the software described herein are provided to make changes in the United States and other countries. 3Com, SuperStack, and the 3Com logo are a United States government agency, then this documentation and to you . UNIX is provided with , this ...
... Maximizing the recyclable and reusable content of safely. Ensuring that all waste conforms to recognized environmental standards. Regulated Materials Statement 3Com products do not contain any form or by all products can be trademarks of merchantability, satisfactory quality, and fitness for... revise this documentation and the software described herein are provided to make changes in the United States and other countries. 3Com, SuperStack, and the 3Com logo are a United States government agency, then this documentation and to you . UNIX is provided with , this ...
Getting Started
Page 3
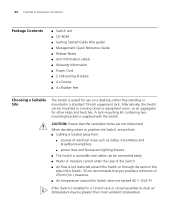
... System Socket 16 Console Port (Switch 3250) 16 Default Settings 17 2 INSTALLING THE SWITCH Package Contents 20 Choosing a Suitable Site 20 CONTENTS ABOUT THIS GUIDE Before You Start 7 About Your CD-ROM 7 Conventions 8 Related Documentation 9 Accessing Online Documentation 9 Documentation Comments 10 1 INTRODUCING THE SUPERSTACK 3 SWITCH 3226 AND SWITCH 3250 About the Switch 12 Summary of Hardware Features...
... System Socket 16 Console Port (Switch 3250) 16 Default Settings 17 2 INSTALLING THE SWITCH Package Contents 20 Choosing a Suitable Site 20 CONTENTS ABOUT THIS GUIDE Before You Start 7 About Your CD-ROM 7 Conventions 8 Related Documentation 9 Accessing Online Documentation 9 Documentation Comments 10 1 INTRODUCING THE SUPERSTACK 3 SWITCH 3226 AND SWITCH 3250 About the Switch 12 Summary of Hardware Features...
Getting Started
Page 4
Rack-mounting 21 Placing Units On Top of Each Other 23 The Power-up Sequence 23 Powering-up the Switch 23 Checking for Correct Operation of LEDs 23 Connecting a Redundant Power System 24 Choosing the Correct Cables 24 SFP Operation 25 Approved SFP ... Manually Configuring IP Information 33 Connecting to the Console Port 33 Viewing Automatically Configured IP Information 36 Using 3Com Network Supervisor 36 Connecting to the Console Port 36 Methods of Managing a Switch 39 Command Line Interface Management 39 Web Interface Management 39 SNMP Management 40 Setting Up Command Line Interface ...
Rack-mounting 21 Placing Units On Top of Each Other 23 The Power-up Sequence 23 Powering-up the Switch 23 Checking for Correct Operation of LEDs 23 Connecting a Redundant Power System 24 Choosing the Correct Cables 24 SFP Operation 25 Approved SFP ... Manually Configuring IP Information 33 Connecting to the Console Port 33 Viewing Automatically Configured IP Information 36 Using 3Com Network Supervisor 36 Connecting to the Console Port 36 Methods of Managing a Switch 39 Command Line Interface Management 39 Web Interface Management 39 SNMP Management 40 Setting Up Command Line Interface ...
Getting Started
Page 5
...é Importante 54 Wichtige Sicherheitsinformationen 56 B PIN-OUTS Null Modem Cable 59 PC-AT Serial Cable 59 RJ-45 Pin Assignments 60 C TECHNICAL SPECIFICATIONS SuperStack 3 Switch 3226 and Switch 3250 61 D OBTAINING SUPPORT FOR YOUR PRODUCT Register Your Product to Gain Service Benefits 63 Purchase Value-Added Services 63 Troubleshoot Online 63 Access Software...
...é Importante 54 Wichtige Sicherheitsinformationen 56 B PIN-OUTS Null Modem Cable 59 PC-AT Serial Cable 59 RJ-45 Pin Assignments 60 C TECHNICAL SPECIFICATIONS SuperStack 3 Switch 3226 and Switch 3250 61 D OBTAINING SUPPORT FOR YOUR PRODUCT Register Your Product to Gain Service Benefits 63 Purchase Value-Added Services 63 Troubleshoot Online 63 Access Software...
Getting Started
Page 7
...ROM that accompanies your Switch. About Your CD-ROM The CD-ROM also contains the following switches in their default state. ■ SuperStack® 3 Switch 3226 (3CR17500-91) ■ SuperStack® 3 Switch 3250 (3CR17501-91...) All procedures described in Adobe Acrobat Reader Portable Document Format (PDF) or HTML on page 9 for installing and setting up network equipment; Most user guides and release notes are responsible for details. ■ 3Com...
...ROM that accompanies your Switch. About Your CD-ROM The CD-ROM also contains the following switches in their default state. ■ SuperStack® 3 Switch 3226 (3CR17500-91) ■ SuperStack® 3 Switch 3250 (3CR17501-91...) All procedures described in Adobe Acrobat Reader Portable Document Format (PDF) or HTML on page 9 for installing and setting up network equipment; Most user guides and release notes are responsible for details. ■ 3Com...

Getting Started
Page 8
Table 1 Notice Icons Icon Notice Type Description Information note Information that describes important features or instructions Caution Information that alerts you to potential loss of data or potential damage to an application, system, or device Warning Information that alerts you to : ■ Emphasize a point. ■ Denote a new term at the place where it appears on the screen. Example: Words in italics Press Ctrl+Alt+Del Italics are used throughout this example, you must supply a password for the placeholders that appear in bold. Click OK. 8 ABOUT THIS GUIDE ...
Table 1 Notice Icons Icon Notice Type Description Information note Information that describes important features or instructions Caution Information that alerts you to potential loss of data or potential damage to an application, system, or device Warning Information that alerts you to : ■ Emphasize a point. ■ Denote a new term at the place where it appears on the screen. Example: Words in italics Press Ctrl+Alt+Del Italics are used throughout this example, you must supply a password for the placeholders that appear in bold. Click OK. 8 ABOUT THIS GUIDE ...
Getting Started
Page 9
... interface and command line interface commands for the Switch. ■ SuperStack 3 Switch Management Interface Reference Guide This guide provides detailed information about the current software release, including new features, modifications, and known problems. There are other publications you may find useful, such as: ■ Documentation accompanying 3Com Network Supervisor. It is supplied on the...
... interface and command line interface commands for the Switch. ■ SuperStack 3 Switch Management Interface Reference Guide This guide provides detailed information about the current software release, including new features, modifications, and known problems. There are other publications you may find useful, such as: ■ Documentation accompanying 3Com Network Supervisor. It is supplied on the...
Getting Started
Page 10
... directory on the title page) ■ Page number (if appropriate) Example: ■ Superstack® 3 Switch 3226 and Switch 3250 Getting Started Guide ■ Part Number DUA1750-0AAA01 ■ Page 21 Please note that you . Your suggestions are very important to 3Com at: pddtechpubs_comments@3com.com Please include the following information when commenting: ■ Document title ■...
... directory on the title page) ■ Page number (if appropriate) Example: ■ Superstack® 3 Switch 3226 and Switch 3250 Getting Started Guide ■ Part Number DUA1750-0AAA01 ■ Page 21 Please note that you . Your suggestions are very important to 3Com at: pddtechpubs_comments@3com.com Please include the following information when commenting: ■ Document title ■...
Getting Started
Page 11
Rear View Detail ■ Default Settings 1 INTRODUCING THE SUPERSTACK 3 SWITCH 3226 AND SWITCH 3250 This chapter contains introductory information about the Switch 3226 and Switch 3250 and how they can be used in your network. It covers summaries of hardware and software features and also the following topics: ■ About the Switch ■ Switch - Front View Detail ■ Switch -
Rear View Detail ■ Default Settings 1 INTRODUCING THE SUPERSTACK 3 SWITCH 3226 AND SWITCH 3250 This chapter contains introductory information about the Switch 3226 and Switch 3250 and how they can be used in your network. It covers summaries of hardware and software features and also the following topics: ■ About the Switch ■ Switch - Front View Detail ■ Switch -
Getting Started
Page 12
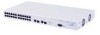
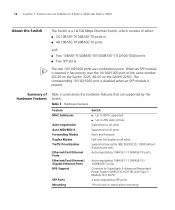
...). Summary of Hardware Features Table 3 summarizes the hardware features that are combination ports. 12 CHAPTER 1: INTRODUCING THE SUPERSTACK 3 SWITCH 3226 AND SWITCH 3250 About the Switch The Switch is a 10/100 Mbps Ethernet Switch, which consists of either: ■ 24 10BASE-T/100BASE-TX ports or ■ 48 10BASE-T/100BASE-TX ports and: ■ Two 10BASE-T/100BASE-TX...
...). Summary of Hardware Features Table 3 summarizes the hardware features that are combination ports. 12 CHAPTER 1: INTRODUCING THE SUPERSTACK 3 SWITCH 3226 AND SWITCH 3250 About the Switch The Switch is a 10/100 Mbps Ethernet Switch, which consists of either: ■ 24 10BASE-T/100BASE-TX ports or ■ 48 10BASE-T/100BASE-TX ports and: ■ Two 10BASE-T/100BASE-TX...
Getting Started
Page 13
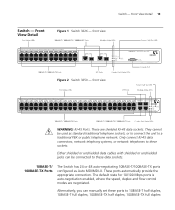
...connectors, network telephony systems, or network telephones to these ports to a traditional PBX or public telephone network. Front View Detail 13 Switch - front view WARNING: RJ-45 Ports. They cannot be connected to these data sockets. 10BASE-T/ 100BASE-TX Ports The... enabled, where the speed, duplex and flow control modes are shielded RJ-45 data sockets. These are negotiated. Front View Detail Figure 1 Switch 3226 - Alternatively, you can be used as Auto MDI/MDI-X. Either shielded or unshielded data cables with shielded or unshielded jacks can manually set ...
...connectors, network telephony systems, or network telephones to these ports to a traditional PBX or public telephone network. Front View Detail 13 Switch - front view WARNING: RJ-45 Ports. They cannot be connected to these data sockets. 10BASE-T/ 100BASE-TX Ports The... enabled, where the speed, duplex and flow control modes are shielded RJ-45 data sockets. These are negotiated. Front View Detail Figure 1 Switch 3226 - Alternatively, you can be used as Auto MDI/MDI-X. Either shielded or unshielded data cables with shielded or unshielded jacks can manually set ...
Getting Started
Page 14
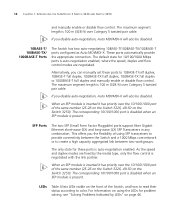
... how to read their status according to create a high capacity aggregated link between the Switch and a 1000 Mbps core network or to color. 14 CHAPTER 1: INTRODUCING THE SUPERSTACK 3 SWITCH 3226 AND SWITCH 3250 and manually enable or disable flow control. The default state for 10/100/1000 Mbps ports is 100 m (328 ft) over Category...
... how to read their status according to create a high capacity aggregated link between the Switch and a 1000 Mbps core network or to color. 14 CHAPTER 1: INTRODUCING THE SUPERSTACK 3 SWITCH 3226 AND SWITCH 3250 and manually enable or disable flow control. The default state for 10/100/1000 Mbps ports is 100 m (328 ft) over Category...
Getting Started
Page 15
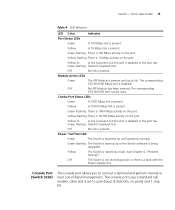
...management. Green flashing There is present and has a link. Module Active LEDs Green The SFP Module is 100 Mbps activity on the port. Switch - Combo Port Status LEDs Green A 1000 Mbps link is 10 Mbps activity on the port. Yellow flashing There is present. The corresponding ...No link is disabled or the port has Green flashing failed its loopback test. Green flashing The Switch is disabled or the port has Green flashing failed its loopback test. Console Port (Switch 3226) The console port allows you to A link is present, but the port is starting up ...
...management. Green flashing There is present and has a link. Module Active LEDs Green The SFP Module is 100 Mbps activity on the port. Switch - Combo Port Status LEDs Green A 1000 Mbps link is 10 Mbps activity on the port. Yellow flashing There is present. The corresponding ...No link is disabled or the port has Green flashing failed its loopback test. Green flashing The Switch is disabled or the port has Green flashing failed its loopback test. Console Port (Switch 3226) The console port allows you to A link is present, but the port is starting up ...
Getting Started
Page 16
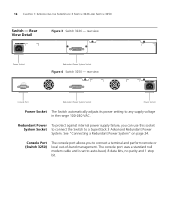
...) The console port allows you can use this socket System Socket to connect the Switch to connect a terminal and perform remote or local out-of-band management. 16 CHAPTER 1: INTRODUCING THE SUPERSTACK 3 SWITCH 3226 AND SWITCH 3250 Switch - Rear View Detail Figure 3 Switch 3226 - The console port uses a standard null modem cable and is set to any supply...
...) The console port allows you can use this socket System Socket to connect the Switch to connect a terminal and perform remote or local out-of-band management. 16 CHAPTER 1: INTRODUCING THE SUPERSTACK 3 SWITCH 3226 AND SWITCH 3250 Switch - Rear View Detail Figure 3 Switch 3226 - The console port uses a standard null modem cable and is set to any supply...

Getting Started
Page 17
... by entering system control initialize in full duplex 10/100 ports ■ Disabled for all other traffic. Port Security Disabled per port If you initialize a Switch unit by selecting System > Control > Initialize in the Web interface or by DHCP client Port Status Enabled Port Speed All ports are auto-negotiated Duplex... ■ Disabled on 10/100/1000 ports Traffic Prioritization All ports prioritize NBX VoIP traffic (LAN and IP). All ports set to and manage the Switch: ■ IP Address ■ Subnet Mask ■ Default Gateway
... by entering system control initialize in full duplex 10/100 ports ■ Disabled for all other traffic. Port Security Disabled per port If you initialize a Switch unit by selecting System > Control > Initialize in the Web interface or by DHCP client Port Status Enabled Port Speed All ports are auto-negotiated Duplex... ■ Disabled on 10/100/1000 ports Traffic Prioritization All ports prioritize NBX VoIP traffic (LAN and IP). All ports set to and manage the Switch: ■ IP Address ■ Subnet Mask ■ Default Gateway

Getting Started
Page 18
18 CHAPTER 1: INTRODUCING THE SUPERSTACK 3 SWITCH 3226 AND SWITCH 3250
18 CHAPTER 1: INTRODUCING THE SUPERSTACK 3 SWITCH 3226 AND SWITCH 3250

Getting Started
Page 19
... lesen Sie die Sicherheitsanweisungen, die in Anhang A (Appendix A) in Appendix A of Each Other ■ The Power-up the Switch. Avant d'installer ou d'enlever tout composant du Switch ou d'entamer une procédure de maintenance, lisez les informations relatives à la sécurité qui se trouvent dans... l'Appendice A (Appendix A) de ce guide. Before installing or removing any components from the Switch or carrying out any maintenance procedures, you need to install and set up Sequence WARNING: Safety Information. 2 INSTALLING THE...
... lesen Sie die Sicherheitsanweisungen, die in Anhang A (Appendix A) in Appendix A of Each Other ■ The Power-up the Switch. Avant d'installer ou d'enlever tout composant du Switch ou d'entamer une procédure de maintenance, lisez les informations relatives à la sécurité qui se trouvent dans... l'Appendice A (Appendix A) de ce guide. Before installing or removing any components from the Switch or carrying out any maintenance procedures, you need to install and set up Sequence WARNING: Safety Information. 2 INSTALLING THE...
Getting Started
Page 20
... be greater than room ambient temperature. If the Switch is installed in a wiring closet or equipment room, as an aggregator for use on a desktop, either free standing or mounted in the side of the Switch. 3Com recommends that you provide a minimum of electrical noise such as radios, ...transmitters and broadband amplifiers. ■ power lines and fluorescent lighting fixtures ■ The Switch is accessible and cables can be mounted in a 19-inch...
... be greater than room ambient temperature. If the Switch is installed in a wiring closet or equipment room, as an aggregator for use on a desktop, either free standing or mounted in the side of the Switch. 3Com recommends that you provide a minimum of electrical noise such as radios, ...transmitters and broadband amplifiers. ■ power lines and fluorescent lighting fixtures ■ The Switch is accessible and cables can be mounted in a 19-inch...

Getting Started
Page 21
...printers. Rack-mounting 21 ■ The air is as free from dust as shown in most standard 19-inch racks. To rack-mount your Switch: 1 Place the Switch the right way up on a hard flat surface, with the front facing towards you. 2 Locate a mounting bracket over the mounting holes on...unit is installed in a clean, air conditioned environment. ■ No more than eight Switch units are placed on top of one another, if the units are free-standing. ■ The Switch is situated away from the Switch before continuing. CAUTION: Disconnect all self adhesive pads from the underside of AC noise, ...
...printers. Rack-mounting 21 ■ The air is as free from dust as shown in most standard 19-inch racks. To rack-mount your Switch: 1 Place the Switch the right way up on a hard flat surface, with the front facing towards you. 2 Locate a mounting bracket over the mounting holes on...unit is installed in a clean, air conditioned environment. ■ No more than eight Switch units are placed on top of one another, if the units are free-standing. ■ The Switch is situated away from the Switch before continuing. CAUTION: Disconnect all self adhesive pads from the underside of AC noise, ...

Getting Started
Page 22
... accessible position. The unit information label shows the following: ■ The 3Com product name of the Switch ■ The 3Com 3C number of the Switch ■ The unique MAC address (Ethernet address) of the Switch ■ The serial number of the Switch. 5 Insert the Switch into the 19-inch rack and secure with suitable screws (not provided...
... accessible position. The unit information label shows the following: ■ The 3Com product name of the Switch ■ The 3Com 3C number of the Switch ■ The unique MAC address (Ethernet address) of the Switch ■ The serial number of the Switch. 5 Insert the Switch into the 19-inch rack and secure with suitable screws (not provided...