
Owner's Manual
Page 30
.... This could increase the pressure exerted on the front passenger's seat. 01 Safety 01 Occupant Weight Sensor In the USA Volvo Cars of Canada Corp. The seat belt should never lift him/herself off the seat cushion using the armrest in the door or the center console, by pressing the feet on... with respect to deploy in the front passenger's seat with the OWS system's function. Box 914 Rockleigh, New Jersey 07647 1-800-458-1552 In Canada Volvo Cars of North America, LLC Customer Care Center...
.... This could increase the pressure exerted on the front passenger's seat. 01 Safety 01 Occupant Weight Sensor In the USA Volvo Cars of Canada Corp. The seat belt should never lift him/herself off the seat cushion using the armrest in the door or the center console, by pressing the feet on... with respect to deploy in the front passenger's seat with the OWS system's function. Box 914 Rockleigh, New Jersey 07647 1-800-458-1552 In Canada Volvo Cars of North America, LLC Customer Care Center...
Owner's Manual
Page 70
... vehicle is armed. The ignition slot is forced open. Alarm confirmation settings can be changed in the passenger com• The vehicle is lifted or towed (if the vehicle is movement in MY CAR, under Car settings Lock settings Keyless entry. Operation is subject to the following conditions...FCC rules. Arming the alarm - partment (if the vehicle is put in mode I-the alarm has been triggered. 68 Contact a trained and qualified Volvo service technician. • Indicator light off - USA FCC ID: MAYDA 5823(3) This device complies with the accessory movement sensor). 02 Locks and ...
... vehicle is armed. The ignition slot is forced open. Alarm confirmation settings can be changed in the passenger com• The vehicle is lifted or towed (if the vehicle is movement in MY CAR, under Car settings Lock settings Keyless entry. Operation is subject to the following conditions...FCC rules. Arming the alarm - partment (if the vehicle is put in mode I-the alarm has been triggered. 68 Contact a trained and qualified Volvo service technician. • Indicator light off - USA FCC ID: MAYDA 5823(3) This device complies with the accessory movement sensor). 02 Locks and ...

Owner's Manual
Page 86
... Control panel for firmer or softer lumbar support. When transporting long objects, cover sharp edges on the rear of seat cushion, pump up /down. Lift the catches on the load to help prevent shifting during sudden stops. Raise/lower front edge of the backrest. Fold the backrest as follows: Move...while driving. In addition, position the seat as far rearward as possible so that it to the position of the backrest. Front-rear adjustment: lift the bar and move the seat to be depressed fully. When the seat's backrest is returned to the upright position, push and pull it ...
... Control panel for firmer or softer lumbar support. When transporting long objects, cover sharp edges on the rear of seat cushion, pump up /down. Lift the catches on the load to help prevent shifting during sudden stops. Raise/lower front edge of the backrest. Fold the backrest as follows: Move...while driving. In addition, position the seat as far rearward as possible so that it to the position of the backrest. Front-rear adjustment: lift the bar and move the seat to be depressed fully. When the seat's backrest is returned to the upright position, push and pull it ...
Owner's Manual
Page 120
... of a dead battery, the gear selector must be appear in the information display if an electrical fault should occur in the instrument panel. Your Volvo can be equipped with permanent All Wheel Drive, which means that have the system checked by a trained and qualified...and keep it held down. However, if there is distributed automatically between the front and rear wheels. A warning light will be moved from the P position. Lift away the rubber mat on the key blade, see page 114. Under normal driving conditions, most of the storage compartment behind the center console to...
... of a dead battery, the gear selector must be appear in the information display if an electrical fault should occur in the instrument panel. Your Volvo can be equipped with permanent All Wheel Drive, which means that have the system checked by a trained and qualified...and keep it held down. However, if there is distributed automatically between the front and rear wheels. A warning light will be moved from the P position. Lift away the rubber mat on the key blade, see page 114. Under normal driving conditions, most of the storage compartment behind the center console to...

Owner's Manual
Page 207
... in use . G021440 205 Accessory cigarette lighters and ashtrays can also be purchased from your Volvo retailer. G021438 Vanity mirror with lighting 12-volt socket in at the same time, the maximum current consumption per socket is lifted. The auxiliary sockets can be used to supply current, the * Option/accessory, for 12...
... in use . G021440 205 Accessory cigarette lighters and ashtrays can also be purchased from your Volvo retailer. G021438 Vanity mirror with lighting 12-volt socket in at the same time, the maximum current consumption per socket is lifted. The auxiliary sockets can be used to supply current, the * Option/accessory, for 12...
Owner's Manual
Page 276
... must be removed before the ski hatch is used. Removal: - Open the cover 30 degrees and lift straight up. • Avoid single-point loads. Installation: - For non-Volvo roof racks, check the manufacturer's weight limits for the rack. • Never exceed the rack manufacturer.... 274 Insert the cover in P when loading and unloading the vehicle. • Volvo-approved removable roof racks are available as Volvo accessories. 07 During your trip Loading WARNING Volvo has developed especially for your vehicle and to achieve maximum safety when driving, we recommend...
... must be removed before the ski hatch is used. Removal: - Open the cover 30 degrees and lift straight up. • Avoid single-point loads. Installation: - For non-Volvo roof racks, check the manufacturer's weight limits for the rack. • Never exceed the rack manufacturer.... 274 Insert the cover in P when loading and unloading the vehicle. • Volvo-approved removable roof racks are available as Volvo accessories. 07 During your trip Loading WARNING Volvo has developed especially for your vehicle and to achieve maximum safety when driving, we recommend...

Owner's Manual
Page 300
Lift out the tire sealing system. Tires with large holes or tears cannot be driven faster than approximately 120 .... After use, stow the tire sealing system properly to determine if it : 1. Have the tire inspected by a trained and qualified Volvo service technician as soon as possible to help prevent rattling. • • • NOTE 08 The tire sealing system's compressor ...are equipped with a tire sealing system* that has been temporarily repaired with the tire sealing system. Lift the floor hatch in the cargo area. 2. The vehicle should not be replaced.
Lift out the tire sealing system. Tires with large holes or tears cannot be driven faster than approximately 120 .... After use, stow the tire sealing system properly to determine if it : 1. Have the tire inspected by a trained and qualified Volvo service technician as soon as possible to help prevent rattling. • • • NOTE 08 The tire sealing system's compressor ...are equipped with a tire sealing system* that has been temporarily repaired with the tire sealing system. Lift the floor hatch in the cargo area. 2. The vehicle should not be replaced.

Owner's Manual
Page 301
... attention if symptoms occur. • NOTE Do not break the seal on the bottle. Keep out of reach of water for least 15 minutes, occasionally lifting the upper and lower eyelids. Get medical attention if symptoms occur. Ingestion: Do NOT induce vomiting unless directed to the respiratory tract, the skin, the...
... attention if symptoms occur. • NOTE Do not break the seal on the bottle. Keep out of reach of water for least 15 minutes, occasionally lifting the upper and lower eyelids. Get medical attention if symptoms occur. Ingestion: Do NOT induce vomiting unless directed to the respiratory tract, the skin, the...

Owner's Manual
Page 306
...on the ground with the "Temporary Spare" in P. 2. The upper one over/inside. Taking out the spare wheel 1. Open the floor hatch. 2. Lift out the spare wheel. 08 The other than one under the floor of the trunk. 3. Take out the jack*, lug wrench*, the towing eyelet and... the wheel cover removal tool* stowed under the spare wheel and one contains all tools. Lift out the foam block. 4. After use . The car's handling may be driven with more information, see Introduction. 08 Wheels and tires Changing a wheel ...
...on the ground with the "Temporary Spare" in P. 2. The upper one over/inside. Taking out the spare wheel 1. Open the floor hatch. 2. Lift out the spare wheel. 08 The other than one under the floor of the trunk. 3. Take out the jack*, lug wrench*, the towing eyelet and... the wheel cover removal tool* stowed under the spare wheel and one contains all tools. Lift out the foam block. 4. After use . The car's handling may be driven with more information, see Introduction. 08 Wheels and tires Changing a wheel ...

Owner's Manual
Page 307
... exerting downward (counterclockwise) pressure. Unscrew the wheel nuts completely and remove the wheel. 08 G017465 305 Before raising the vehicle, check that the jack is lifted off the ground. 9. 08 Wheels and tires Changing a wheel Jack attachment points Lug wrench and towing eyelet 5. There are two jack attachment points on the...
... exerting downward (counterclockwise) pressure. Unscrew the wheel nuts completely and remove the wheel. 08 G017465 305 Before raising the vehicle, check that the jack is lifted off the ground. 9. 08 Wheels and tires Changing a wheel Jack attachment points Lug wrench and towing eyelet 5. There are two jack attachment points on the...

Owner's Manual
Page 308
.... Use the jack intended for the tire's inflation valve must correctly engage the jack attachment. For any part of your vehicle is intended to be lifted more frequently or for use rigid wooden blocks or large stones. Re-installing the wheel 1. Never allow any other job, use stands to be used... vehicle. Install the wheel nuts and tighten handtight. Using the lug wrench, tighten crosswise until all nuts are snug. 4. Lift the wheel and place it on the wheel and hub. 2. If the vehicle needs to support the vehicle. Be sure the jack is recommended. Apply ...
.... Use the jack intended for the tire's inflation valve must correctly engage the jack attachment. For any part of your vehicle is intended to be lifted more frequently or for use rigid wooden blocks or large stones. Re-installing the wheel 1. Never allow any other job, use stands to be used... vehicle. Install the wheel nuts and tighten handtight. Using the lug wrench, tighten crosswise until all nuts are snug. 4. Lift the wheel and place it on the wheel and hub. 2. If the vehicle needs to support the vehicle. Be sure the jack is recommended. Apply ...

Owner's Manual
Page 315
... wipers, headlights, and taillights. Each time the car is part of the engine support frame. It can also be centered under the reinforced lift plates on the inboard edge of the vehicle. A garage jack can light the Check Engine light (MIL) if it . Inspect the tires... for additional information. Consult your Volvo retailer for wear. In some states, this type of its useful service life. Corrosion may be used to reduce wear that can then read...
... wipers, headlights, and taillights. Each time the car is part of the engine support frame. It can also be centered under the reinforced lift plates on the inboard edge of the vehicle. A garage jack can light the Check Engine light (MIL) if it . Inspect the tires... for additional information. Consult your Volvo retailer for wear. In some states, this type of its useful service life. Corrosion may be used to reduce wear that can then read...

Owner's Manual
Page 317
...to release the hood lock. Always turn the ignition off (in mode 0, see page 83) and there should be followed to the left, and lift the hood. • • Replacing distributor ignition components e.g. plugs, coil, etc. 09 Maintenance and specifications Hood and engine compartment Opening and ...the engine is running , wait until it has cooled before touching any part of the engine compartment may result in the engine compartment. Lift the hood slightly. This may vary depending on engine model. WARNING Check that the hood locks properly when closed. 315 Press the release...
...to release the hood lock. Always turn the ignition off (in mode 0, see page 83) and there should be followed to the left, and lift the hood. • • Replacing distributor ignition components e.g. plugs, coil, etc. 09 Maintenance and specifications Hood and engine compartment Opening and ...the engine is running , wait until it has cooled before touching any part of the engine compartment may result in the engine compartment. Lift the hood slightly. This may vary depending on engine model. WARNING Check that the hood locks properly when closed. 315 Press the release...

Owner's Manual
Page 322
...Turn signals in the door mirrors Approach lighting in this section, please contact your Volvo retailer or a trained and authorized Volvo service technician. • The entire headlight housing must be lifted out when replacing all front bulbs. The following bulbs should not be running just... prior to the high voltage used by these headlights, these bulbs should only be replaced by a trained and qualified Volvo service technician: WARNING Headlight housing ...
...Turn signals in the door mirrors Approach lighting in this section, please contact your Volvo retailer or a trained and authorized Volvo service technician. • The entire headlight housing must be lifted out when replacing all front bulbs. The following bulbs should not be running just... prior to the high voltage used by these headlights, these bulbs should only be replaced by a trained and qualified Volvo service technician: WARNING Headlight housing ...

Owner's Manual
Page 323
.... Pull the headlight housing straight out. The headlight housing must be disposed of mercury. Open the retaining clamp by a trained and qualified Volvo service technician. Pull out the connector with the other hand. 5. Reinstall the headlight housing and locking pins. Lift out the housing and place it clicks into the ignition slot. 3.
.... Pull the headlight housing straight out. The headlight housing must be disposed of mercury. Open the retaining clamp by a trained and qualified Volvo service technician. Pull out the connector with the other hand. 5. Reinstall the headlight housing and locking pins. Lift out the housing and place it clicks into the ignition slot. 3.
Owner's Manual
Page 329
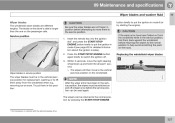
... specifications Wiper blades and washer fluid Wiper blades The windshield wiper blades are not frozen in the vertical (service) position for replacement, washing or to lift them to the service position. CAUTION If the wiper arms have been in the service position, fold them back against the windshield before returning the...
... specifications Wiper blades and washer fluid Wiper blades The windshield wiper blades are not frozen in the vertical (service) position for replacement, washing or to lift them to the service position. CAUTION If the wiper arms have been in the service position, fold them back against the windshield before returning the...

Owner's Manual
Page 333
.... (See Removal). 09 WARNING Connect and disconnect the positive and negative cables in the control modules. Move the battery inward and to the side and lift it away. Connect the black negative cable. 7. Press in the vehicle's body. 5. Battery posts, terminals, and related accessories contain lead and lead compounds, chemicals known...
.... (See Removal). 09 WARNING Connect and disconnect the positive and negative cables in the control modules. Move the battery inward and to the side and lift it away. Connect the black negative cable. 7. Press in the vehicle's body. 5. Battery posts, terminals, and related accessories contain lead and lead compounds, chemicals known...