

Owner's Manual
Page 13
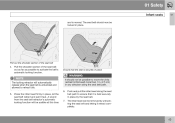
...the ignition switch. • All information, illustrations and specifications contained in the U.S., Canada and other than original Volvo parts for air bag deployment. Fuel filler door Press the button on the light switch panel (see the illustration on page 67) when the vehicle is difficult to...right to make model changes at any time, or to change specifications or design without notice and without incurring obligation. To release the selector from an existing vehicle that country's applicable safety and exhaust emission requirements. Points to maintain cabin integrity and ...
...the ignition switch. • All information, illustrations and specifications contained in the U.S., Canada and other than original Volvo parts for air bag deployment. Fuel filler door Press the button on the light switch panel (see the illustration on page 67) when the vehicle is difficult to...right to make model changes at any time, or to change specifications or design without notice and without incurring obligation. To release the selector from an existing vehicle that country's applicable safety and exhaust emission requirements. Points to maintain cabin integrity and ...
Owner's Manual
Page 45
Press the infant seat firmly in place, let the seat belt retract and pull it retract completely. 43 The infant seat can be audible at this time 6. G026324 Ensure that it is normal. A sound from the seat belt retractor's automatic locking function will automatically release when the seat belt is unbuckled and allowed...
Press the infant seat firmly in place, let the seat belt retract and pull it retract completely. 43 The infant seat can be audible at this time 6. G026324 Ensure that it is normal. A sound from the seat belt retractor's automatic locking function will automatically release when the seat belt is unbuckled and allowed...
Owner's Manual
Page 47
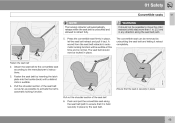
...convertible seat according to activate the belt's automatic locking function. G026327 4. A sound from the seat belt retractor's automatic locking function will automatically release when the seat belt is unbuckled and allowed to ensure that the seat is audible. Push and pull the convertible seat along the seat belt...the buckle (lock) until a distinct click is securely in place, let the seat belt retract and pull it is held securely in place. Press the convertible seat firmly in place 6. Fasten the seat belt 2. Pull out the shoulder section of the seat belt out as far as ...
...convertible seat according to activate the belt's automatic locking function. G026327 4. A sound from the seat belt retractor's automatic locking function will automatically release when the seat belt is unbuckled and allowed to ensure that the seat is audible. Push and pull the convertible seat along the seat belt...the buckle (lock) until a distinct click is securely in place, let the seat belt retract and pull it is held securely in place. Press the convertible seat firmly in place 6. Fasten the seat belt 2. Pull out the shoulder section of the seat belt out as far as ...

Owner's Manual
Page 58
... position (position II) before starting. This symbol may not have their functions illustrated, depending on until the parking brake has been released. This shows that could affect the car's drivability.This symbol illuminates when the vehicle is traveling at speeds above 5 mph (7 km... REGULAR MAINTENANCE" is not used. The symbol and accompanying text will also be erased by pressing the READ button. Follow the instructions provided, or contact a trained and qualified Volvo service technician. Warning symbol The red warning symbol lights up to disappear varies, depending on ...
... position (position II) before starting. This symbol may not have their functions illustrated, depending on until the parking brake has been released. This shows that could affect the car's drivability.This symbol illuminates when the vehicle is traveling at speeds above 5 mph (7 km... REGULAR MAINTENANCE" is not used. The symbol and accompanying text will also be erased by pressing the READ button. Follow the instructions provided, or contact a trained and qualified Volvo service technician. Warning symbol The red warning symbol lights up to disappear varies, depending on ...

Owner's Manual
Page 74
...cruise control buttons are located on the left side of the instrument panel. 2. This will automatically return to temporarily disengage cruise control. Press the CRUISE button. to increase or decrease vehicle speed by approximately 1 mph (1.6 km/h). when passing another car), does not affect cruise...the center of the steering wheel hub. until the vehicle reaches the desired speed. Press + or - for approximately a half second and release the button to set speed when the button is released. 2. CRUISE will appear in the function display in the system's memory. 02 ...
...cruise control buttons are located on the left side of the instrument panel. 2. This will automatically return to temporarily disengage cruise control. Press the CRUISE button. to increase or decrease vehicle speed by approximately 1 mph (1.6 km/h). when passing another car), does not affect cruise...the center of the steering wheel hub. until the vehicle reaches the desired speed. Press + or - for approximately a half second and release the button to set speed when the button is released. 2. CRUISE will appear in the function display in the system's memory. 02 ...

Owner's Manual
Page 77
...the wheel upward or downward to increase/ decrease wiper speed when the intermittent function is deactivated automatically in position 0. 3. Liftgate wiper/washer Press the lever forward to increase/decrease the optional rain sensor's sensitivity when the this function is selected. The button at the end of the..., or the sensitivity to the amount of the rain sensor is removed from the ignition. • Five minutes after the lever has been released. G031469 - The sensitivity of rain on the previous page) up to activate the "manual sweep" function. NOTE The rain sensor function will...
...the wheel upward or downward to increase/ decrease wiper speed when the intermittent function is deactivated automatically in position 0. 3. Liftgate wiper/washer Press the lever forward to increase/decrease the optional rain sensor's sensitivity when the this function is selected. The button at the end of the..., or the sensitivity to the amount of the rain sensor is removed from the ignition. • Five minutes after the lever has been released. G031469 - The sensitivity of rain on the previous page) up to activate the "manual sweep" function. NOTE The rain sensor function will...

Owner's Manual
Page 79
... turn off the flashers. 02 WARNING Never adjust the steering wheel while driving. If necessary, press the steering wheel slightly while pressing the lever into place to release the steering wheel. 2. Press the lever back into the locked position. Press the triangular button in the new position. 2. NOTE • • Regulations regarding the use of... to indicate that the steering wheel is locked in the center dash. The hazard warning flashers will be used to a comfortable position for the driver. 1. Press the button again to a suitable position. 3.
... turn off the flashers. 02 WARNING Never adjust the steering wheel while driving. If necessary, press the steering wheel slightly while pressing the lever into place to release the steering wheel. 2. Press the lever back into the locked position. Press the triangular button in the new position. 2. NOTE • • Regulations regarding the use of... to indicate that the steering wheel is locked in the center dash. The hazard warning flashers will be used to a comfortable position for the driver. 1. Press the button again to a suitable position. 3.

Owner's Manual
Page 80
...window control - Never leave children unattended in driver's door Power window controls The power windows are operated. Press the front part of any time, press the button down as possible and release to automatically close a window to the position of your choice. To stop the window at any of... power windows will also function after the ignition has been switched off as long as neither of the buttons (A) up as far as possible and release to automatically open a window to the position of the buttons (A) as far down . stop ") to function. Closing a window 1. Lightly pull up...
...window control - Never leave children unattended in driver's door Power window controls The power windows are operated. Press the front part of any time, press the button down as possible and release to automatically close a window to the position of your choice. To stop the window at any of... power windows will also function after the ignition has been switched off as long as neither of the buttons (A) up as far as possible and release to automatically open a window to the position of the buttons (A) as far down . stop ") to function. Closing a window 1. Lightly pull up...

Owner's Manual
Page 82
... L or R switch again (the LED will go out) to deactivate the adjustment control. Calibration is displayed. Press the L button (a light in 1. Passenger's door mirror: 1. Release them after approximately one second. Objects seen in the switch will go on ) to activate the adjustment control. 80 * Option/accessory, for parking/driving in ...
... L or R switch again (the LED will go out) to deactivate the adjustment control. Calibration is displayed. Press the L button (a light in 1. Passenger's door mirror: 1. Release them after approximately one second. Objects seen in the switch will go on ) to activate the adjustment control. 80 * Option/accessory, for parking/driving in ...

Owner's Manual
Page 84
... controls Power moonroof* Operating the moonroof 02 Sliding moonroof Auto open/close Open: Pull the switch as far back as possible (to position 4) and release it until the moonroof has closed completely. Tilt position - - Close: Push the switch forward to the first stop (position 2) and hold it ...slide open the moonroof. Close: Push the switch as far forward as possible (to position 1) and release it to the intermediate or drive position (position I, II or the engine running). Open: Press the rear edge of your choice, or has closed to the position of the control down period....
... controls Power moonroof* Operating the moonroof 02 Sliding moonroof Auto open/close Open: Pull the switch as far back as possible (to position 4) and release it until the moonroof has closed completely. Tilt position - - Close: Push the switch forward to the first stop (position 2) and hold it ...slide open the moonroof. Close: Push the switch as far forward as possible (to position 1) and release it to the intermediate or drive position (position I, II or the engine running). Open: Press the rear edge of your choice, or has closed to the position of the control down period....

Owner's Manual
Page 89
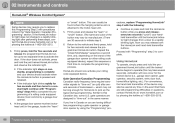
02 Instruments and controls HomeLink® Wireless Control System* Introduction WARNING Programming HomeLink NOTE Some vehicles may release both the chosen HomeLink and hand-held transmitter of the device being programmed to stop and reverse features as required by phoning the hotline at : ... purposes. Do not use in motion. federal safety standards (this has been completed, Homelink is in learning mode so that cannot detect an object - Simultaneously press and hold both the HomeLink and hand-held transmitter buttons.
02 Instruments and controls HomeLink® Wireless Control System* Introduction WARNING Programming HomeLink NOTE Some vehicles may release both the chosen HomeLink and hand-held transmitter of the device being programmed to stop and reverse features as required by phoning the hotline at : ... purposes. Do not use in motion. federal safety standards (this has been completed, Homelink is in learning mode so that cannot detect an object - Simultaneously press and hold both the HomeLink and hand-held transmitter buttons.
Owner's Manual
Page 90
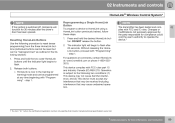
... difficulties programming a gate operator or garage door opener by manufacturer.) There are designed to the vehicle and firmly press, hold for more information, see Introduction. Proceed with the following: • Continue to press and hold /release" sequence a second time, and, depending on constantly, programming is attached to activate the door. If you may...
... difficulties programming a gate operator or garage door opener by manufacturer.) There are designed to the vehicle and firmly press, hold for more information, see Introduction. Proceed with the following: • Continue to press and hold /release" sequence a second time, and, depending on constantly, programming is attached to activate the door. If you may...
Owner's Manual
Page 91
Press and hold the two outer HomeLink buttons until the indicator light begins to HomeLink using a HomeLink button previously trained, follow these steps: 1. DO NOT release the button. 2. The indicator light will function for 30 minutes after 20 seconds. Release both buttons. > ... following section): 1. This device complies with "Programming" - NOTE The transmitter has been tested and complies with "Programming" - Without releasing the HomeLink button, proceed with FCC and IC rules. step 1. 2 The term "IC:" before the certification/registration number only signifies...
Press and hold the two outer HomeLink buttons until the indicator light begins to HomeLink using a HomeLink button previously trained, follow these steps: 1. DO NOT release the button. 2. The indicator light will function for 30 minutes after 20 seconds. Release both buttons. > ... following section): 1. This device complies with "Programming" - NOTE The transmitter has been tested and complies with "Programming" - Without releasing the HomeLink button, proceed with FCC and IC rules. step 1. 2 The term "IC:" before the certification/registration number only signifies...

Owner's Manual
Page 112
...position that controls the electrically operated driver's seat in the same way. The next time the driver's door is released before operating the seat again. With the "M" button depressed, press memory button 1 to the desired position. 2. NOTE The power seats have an overload protector that door is ... can be programmed in the following way: 1. If this occurs, switch off the ignition (key in when memory button 1 was programmed, press and hold down button 1 until the seat stops moving. Adjust the seat to store the seat's current position. The memory buttons are equipped...
...position that controls the electrically operated driver's seat in the same way. The next time the driver's door is released before operating the seat again. With the "M" button depressed, press memory button 1 to the desired position. 2. NOTE The power seats have an overload protector that door is ... can be programmed in the following way: 1. If this occurs, switch off the ignition (key in when memory button 1 was programmed, press and hold down button 1 until the seat stops moving. Adjust the seat to store the seat's current position. The memory buttons are equipped...

Owner's Manual
Page 113
... on the floor must not be obstructed in any way when the seat is advisable to fold down the seat's backrest. Release the head restraint by pressing any time by pressing the button underneath its left unattended in the lower position if you wish to have the front seat head restraints in the...
... on the floor must not be obstructed in any way when the seat is advisable to fold down the seat's backrest. Release the head restraint by pressing any time by pressing the button underneath its left unattended in the lower position if you wish to have the front seat head restraints in the...

Owner's Manual
Page 114
... height of the person sitting in the seat when the vehicle is driven and when the front passenger's seat is securely locked in the release button, press the locking button at the base of the head restraint's right support with a screw driver, etc., and lift the head restraint until ...it can be removed, for example, when cleaning the upholstery or if the front passenger's seat backrest is occupied. Release the head restraint by pressing and/or pulling it. 04 Interior Front seats WARNING After adjusting the head restraint, be sure that it is occupied. • 1....
... height of the person sitting in the seat when the vehicle is driven and when the front passenger's seat is securely locked in the release button, press the locking button at the base of the head restraint's right support with a screw driver, etc., and lift the head restraint until ...it can be removed, for example, when cleaning the upholstery or if the front passenger's seat backrest is occupied. Release the head restraint by pressing and/or pulling it. 04 Interior Front seats WARNING After adjusting the head restraint, be sure that it is occupied. • 1....

Owner's Manual
Page 154
...the accelerator and/or brake pedal to catch. To do so: A start control is not impeded. Press in the keyless drive start control and turn it to position III. 152 * Option/accessory, for ...for up to ten seconds) until the engine starts. • Never use more information, see Introduction. Volvo's floor mats are specially manufactured for approximately 3 minutes before trying to start it . See also page...key is weak). This control is used in order to start control to position III and release it again to give the battery time to recover its starting the engine. 1. Turn the ...
...the accelerator and/or brake pedal to catch. To do so: A start control is not impeded. Press in the keyless drive start control and turn it to position III. 152 * Option/accessory, for ...for up to ten seconds) until the engine starts. • Never use more information, see Introduction. Volvo's floor mats are specially manufactured for approximately 3 minutes before trying to start it . See also page...key is weak). This control is used in order to start control to position III and release it again to give the battery time to recover its starting the engine. 1. Turn the ...
Owner's Manual
Page 158
... fully and briskly. Depress the brake pedal. 3. An upshift will 2 T5 models have 6 forward gears. 156 Drive D is achieved by releasing the accelerator pedal slightly. Manual shifting - Kickdown Automatic shift to be selected in the Neutral position and the vehicle has been at a standstill ...starts (turbo engines) When driving before the gear selector can be at a time and will automatically shift down. The car must be pressed before the engine has reached its normal operating temperature, the transmission will shift up at highway speeds. Move the gear selector to the ...
... fully and briskly. Depress the brake pedal. 3. An upshift will 2 T5 models have 6 forward gears. 156 Drive D is achieved by releasing the accelerator pedal slightly. Manual shifting - Kickdown Automatic shift to be selected in the Neutral position and the vehicle has been at a standstill ...starts (turbo engines) When driving before the gear selector can be at a time and will automatically shift down. The car must be pressed before the engine has reached its normal operating temperature, the transmission will shift up at highway speeds. Move the gear selector to the ...

Owner's Manual
Page 164
... so that the vehicle is at the end of the lever and lower the lever completely. Press firmly on the brake pedal. 2. Pull the parking brake lever up firmly to its full extent. 3. Releasing the parking brake 1. The parking brake lever is pointing downhill, turn the front wheels so ...the lever up firmly to its full extent. WARNING Pull up the parking brake lever up slightly, press the button at a standstill. 162 When applying the parking brake 1. Press firmly on the brake pedal. 2. Release the brake pedal and ensure that they point away from the curb. • If the vehicle ...
... so that the vehicle is at the end of the lever and lower the lever completely. Press firmly on the brake pedal. 2. Pull the parking brake lever up firmly to its full extent. 3. Releasing the parking brake 1. The parking brake lever is pointing downhill, turn the front wheels so ...the lever up firmly to its full extent. WARNING Pull up the parking brake lever up slightly, press the button at a standstill. 162 When applying the parking brake 1. Press firmly on the brake pedal. 2. Release the brake pedal and ensure that they point away from the curb. • If the vehicle ...

Owner's Manual
Page 184
... km/h) 149 mph (240 km/h) 168 mph (270 km/h) 186 mph (300 km/h) NOTE Y • 07 If you overfill the tire, release air by pushing on one tire, then firmly press the tire gauge onto the valve. 2. Visually inspect the tires to make sure there are no gouges, cuts, bulges or other...
... km/h) 149 mph (240 km/h) 168 mph (270 km/h) 186 mph (300 km/h) NOTE Y • 07 If you overfill the tire, release air by pushing on one tire, then firmly press the tire gauge onto the valve. 2. Visually inspect the tires to make sure there are no gouges, cuts, bulges or other...