
Owner's Manual
Page 47
...installed to them. Place the child restraint on securing the child seat. 01 WARNING • NOTE On models equipped with the optional cargo area cover, this cover should be routed beneath the head restraint. Do not install rear speakers that require the removal of the top tether anchors or interfere ...with the proper use of the top tether strap. • Your Volvo is equipped with lower tether straps, or the restraint is not ...
...installed to them. Place the child restraint on securing the child seat. 01 WARNING • NOTE On models equipped with the optional cargo area cover, this cover should be routed beneath the head restraint. Do not install rear speakers that require the removal of the top tether anchors or interfere ...with the proper use of the top tether strap. • Your Volvo is equipped with lower tether straps, or the restraint is not ...

Owner's Manual
Page 199
... the passenger compartment is in the rear center console The electrical sockets can also be purchased from your Volvo retailer. WARNING Always keep the sockets covered when not in use. 12-volt socket in the cargo area* 12-volt socket in use. If both the front and rear sockets are used for more... Passenger compartment convenience Vanity mirror 12-volt sockets ignition must be in the front tunnel console G021439 04 The light comes on automatically when the cover is lifted.
... the passenger compartment is in the rear center console The electrical sockets can also be purchased from your Volvo retailer. WARNING Always keep the sockets covered when not in use. 12-volt socket in the cargo area* 12-volt socket in use. If both the front and rear sockets are used for more... Passenger compartment convenience Vanity mirror 12-volt sockets ignition must be in the front tunnel console G021439 04 The light comes on automatically when the cover is lifted.

Owner's Manual
Page 200
Using the socket while the engine is switched off. NOTE The 12-volt socket in the cargo area provides electrical current even when the ignition is not running will drain the battery. 04 200 04 Comfort and driving pleasure Passenger compartment convenience Fold down the cover to access the electrical socket.
Using the socket while the engine is switched off. NOTE The 12-volt socket in the cargo area provides electrical current even when the ignition is not running will drain the battery. 04 200 04 Comfort and driving pleasure Passenger compartment convenience Fold down the cover to access the electrical socket.

Owner's Manual
Page 268
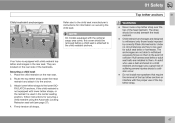
... filler door • Be sure the fuel filler door is not obstructed and is completely closed . Open the side hatch in the cargo compartment (on the right rear fender (indicated by pressing it; Avoid spilling gasoline during hot weather. Gently pull the cord straight rearward until ...on the same side as the fuel filler door). 2. If necessary, the fuel filler door can cause damage to painted surfaces, which may not be covered under the New Vehicle Limited Warranty. a click indicates that the fuel filler door will be opened manually: 1. Grasp the green cord with a handle...
... filler door • Be sure the fuel filler door is not obstructed and is completely closed . Open the side hatch in the cargo compartment (on the right rear fender (indicated by pressing it; Avoid spilling gasoline during hot weather. Gently pull the cord straight rearward until ...on the same side as the fuel filler door). 2. If necessary, the fuel filler door can cause damage to painted surfaces, which may not be covered under the New Vehicle Limited Warranty. a click indicates that the fuel filler door will be opened manually: 1. Grasp the green cord with a handle...

Owner's Manual
Page 271
... to the load anchoring eyelets with straps or web lashings to open. When loading the cargo area, keep the following in mind: WARNING Power tailgate* Stop the engine, put the gear selector in the cargo area against the backrest whenever possible. • Unstable loads can be loaded to a... out of position by factors such as the number of passengers, the amount of cargo, the weight of any accessories that may change depending on the tailgate. 06 • By pressing the rubber-covered button The taillights illuminate automatically when the automatic open . under the outer handle on...
... to the load anchoring eyelets with straps or web lashings to open. When loading the cargo area, keep the following in mind: WARNING Power tailgate* Stop the engine, put the gear selector in the cargo area against the backrest whenever possible. • Unstable loads can be loaded to a... out of position by factors such as the number of passengers, the amount of cargo, the weight of any accessories that may change depending on the tailgate. 06 • By pressing the rubber-covered button The taillights illuminate automatically when the automatic open . under the outer handle on...

Owner's Manual
Page 273
The tailgate can be cleaned with a seat belt or cargo retaining straps. Cover sharp edges on opposite sides of the cargo compartment has rails on long loads to the desired position. Secure the load to help prevent it to help anchor items in P when loading and... be opened/closed manually. Always secure large and heavy objects with a moist cloth. • • • Load anchoring eyelets Moving the load anchoring hooks Cargo area floor rails and hooks 06 The load anchoring eyelets on both sides of sudden stops. Load secured in which its opening points. Objects can...
The tailgate can be cleaned with a seat belt or cargo retaining straps. Cover sharp edges on opposite sides of the cargo compartment has rails on long loads to the desired position. Secure the load to help prevent it to help anchor items in P when loading and... be opened/closed manually. Always secure large and heavy objects with a moist cloth. • • • Load anchoring eyelets Moving the load anchoring hooks Cargo area floor rails and hooks 06 The load anchoring eyelets on both sides of sudden stops. Load secured in which its opening points. Objects can...

Owner's Manual
Page 276
... by two people, and should be on the opposite side of the vehicle. G018369 G018368 Your vehicle can be equipped with the optional cargo area cover, the grid must be completely folded down, see illustrations Folding the grid up/down 06 Grasp the lowering edge of the grid - ... rearward/upward, or push it downward/forward. 06 During your trip Cargo area Steel cargo grid* Installing the steel cargo grid In order to install the steel grid, the rear seat backrests must be folded down before the cargo area cover is put in place. 276 * Option/accessory, for instructions.
... by two people, and should be on the opposite side of the vehicle. G018369 G018368 Your vehicle can be equipped with the optional cargo area cover, the grid must be completely folded down, see illustrations Folding the grid up/down 06 Grasp the lowering edge of the grid - ... rearward/upward, or push it downward/forward. 06 During your trip Cargo area Steel cargo grid* Installing the steel cargo grid In order to install the steel grid, the rear seat backrests must be folded down before the cargo area cover is put in place. 276 * Option/accessory, for instructions.

Owner's Manual
Page 277
... place . Press both ends of the cargo area . Removing the cover 1. Storage compartment for more information, see Introduction. 277 Folding down the cargo area cover's rear flap The cargo area cover's rear flap points horizontally when the cover is attached to the child restraint anchors. 06 During your trip Cargo area Cargo area cover* Use ± Pull the flap slightly...
... place . Press both ends of the cargo area . Removing the cover 1. Storage compartment for more information, see Introduction. 277 Folding down the cargo area cover's rear flap The cargo area cover's rear flap points horizontally when the cover is attached to the child restraint anchors. 06 During your trip Cargo area Cargo area cover* Use ± Pull the flap slightly...

Owner's Manual
Page 279
Follow the same procedure as for using the nets with the cargo area cover Straps for pulling up the net The cargo net(s) can also be pulled up the cargo net are located at the arrows in the illustration. The straps for pulling up from the backrest when the cargo area cover is pulled out. 06 During your trip Cargo area Using the cargo net with the backrests upright. 06 G018247 279
Follow the same procedure as for using the nets with the cargo area cover Straps for pulling up the net The cargo net(s) can also be pulled up the cargo net are located at the arrows in the illustration. The straps for pulling up from the backrest when the cargo area cover is pulled out. 06 During your trip Cargo area Using the cargo net with the backrests upright. 06 G018247 279

Owner's Manual
Page 283
... attachment point back into the positions provided on the right sides of either the front or rear bumper (see illustration). WARNING • G017464 If the cover has a mark along one edge or in a corner, press the mark while prying out the opposite side/corner using the tire iron until it . The... vehicle at all times. After the vehicle has been towed, the eyelet should be screwed into the notch and pry open the edge of the cargo area, with a trailer hitch, the towing eyelet cannot be safely stowed in place. On certain models equipped with the spare tire. Remember that the ...
... attachment point back into the positions provided on the right sides of either the front or rear bumper (see illustration). WARNING • G017464 If the cover has a mark along one edge or in a corner, press the mark while prying out the opposite side/corner using the tire iron until it . The... vehicle at all times. After the vehicle has been towed, the eyelet should be screwed into the notch and pry open the edge of the cargo area, with a trailer hitch, the towing eyelet cannot be safely stowed in place. On certain models equipped with the spare tire. Remember that the ...

Owner's Manual
Page 328
...the bulb into place. 1. Reinstall the bulb holder. Taillight housing, turn signal 1. Unscrew the fog light housing screw and pull it . 4. Put the cover back into the holder. (The profile of the bulb holder corresponds to replace a bulb, see page 324. 7. Remove the... an error message remains in the display after a faulty bulb has been replaced, contact an authorized Volvo workshop. Install a new bulb by pressing in the taillight cluster are replaced from inside the cargo area (not the LED functions). Turn the bulb counterclockwise and remove it out. 3. Open the ...
...the bulb into place. 1. Reinstall the bulb holder. Taillight housing, turn signal 1. Unscrew the fog light housing screw and pull it . 4. Put the cover back into the holder. (The profile of the bulb holder corresponds to replace a bulb, see page 324. 7. Remove the... an error message remains in the display after a faulty bulb has been replaced, contact an authorized Volvo workshop. Install a new bulb by pressing in the taillight cluster are replaced from inside the cargo area (not the LED functions). Turn the bulb counterclockwise and remove it out. 3. Open the ...

Owner's Manual
Page 329
Replace the bulb. 1. Remove the entire bulb unit by pulling it straight out. 3. Cargo area lighting Vanity mirror lighting Removing the mirror glass License plate lighting G031942 NOTE Before starting to replace a bulb, see page 324. 1. Reinsert the ... at top edge of the mirror glass back into the bulb housing. Replace the bulb. 4. Carefully detach and lift aside the entire mirror glass and cover. 4. Replace the bulb. 1. Check that the glass comes loose in the lower edge. 3. 08 Maintenance and specifications Replacing bulbs 2. Insert the screwdriver underneath the ...
Replace the bulb. 1. Remove the entire bulb unit by pulling it straight out. 3. Cargo area lighting Vanity mirror lighting Removing the mirror glass License plate lighting G031942 NOTE Before starting to replace a bulb, see page 324. 1. Reinsert the ... at top edge of the mirror glass back into the bulb housing. Replace the bulb. 4. Carefully detach and lift aside the entire mirror glass and cover. 4. Replace the bulb. 1. Check that the glass comes loose in the lower edge. 3. 08 Maintenance and specifications Replacing bulbs 2. Insert the screwdriver underneath the ...

Owner's Manual
Page 336
... higher amperage than those stated on the inside of the engine compartment fuse box cover. 2. To do so: 1. Pull the fuse straight out. If fuses burn out repeatedly, ...have the electrical system inspected by a trained and qualified Volvo service technician. If the wire is intact. Doing so could seriously damage or overload the...fuse). Engine compartment Under the glove compartment Under the glove compartment Cargo area Not in the engine compartment, the passenger compartment, and the cargo area. If a fuse is located on the following pages....
... higher amperage than those stated on the inside of the engine compartment fuse box cover. 2. To do so: 1. Pull the fuse straight out. If fuses burn out repeatedly, ...have the electrical system inspected by a trained and qualified Volvo service technician. If the wire is intact. Doing so could seriously damage or overload the...fuse). Engine compartment Under the glove compartment Under the glove compartment Cargo area Not in the engine compartment, the passenger compartment, and the cargo area. If a fuse is located on the following pages....

Owner's Manual
Page 340
08 Maintenance and specifications Fuses Under the glove compartment Fold aside the upholstery covering the fuse boxes. 1. Press the cover's lock and fold it up. 2. A Pos Function Controls in front passenger's door Controls in right rear passenger's door Controls in left rear ...passenger's door A 20 20 20 20 20 Positions-fuse box A Pos Function Circuit breaker for the infotainment system and for fuses 16-20 A 40 12-volt socket (cargo...
08 Maintenance and specifications Fuses Under the glove compartment Fold aside the upholstery covering the fuse boxes. 1. Press the cover's lock and fold it up. 2. A Pos Function Controls in front passenger's door Controls in right rear passenger's door Controls in left rear ...passenger's door A 20 20 20 20 20 Positions-fuse box A Pos Function Circuit breaker for the infotainment system and for fuses 16-20 A 40 12-volt socket (cargo...

Owner's Manual
Page 367
10 Index general information...118 Hill Descent Control...124 warning light...78 Bulbs cargo area lighting...329 headlights...324, 325, 326 introduction...324 license plate lights...329 side...conserving...263 10 C Camera, Park Assist...189 Capacity weight...297 Cargo area changing bulbs...329 floor rails...273 hooks for securing loads...273, 274 steel grid...276 Cargo area cover...277 Cargo area net...277 Catalytic converter...269 Cell phone, hands-free connection...... passenger compartment filter...137 refrigerant...137 D Defroster...143 Detachable key blade...59, 61 Dimensions XC70...354 367
10 Index general information...118 Hill Descent Control...124 warning light...78 Bulbs cargo area lighting...329 headlights...324, 325, 326 introduction...324 license plate lights...329 side...conserving...263 10 C Camera, Park Assist...189 Capacity weight...297 Cargo area changing bulbs...329 floor rails...273 hooks for securing loads...273, 274 steel grid...276 Cargo area cover...277 Cargo area net...277 Catalytic converter...269 Cell phone, hands-free connection...... passenger compartment filter...137 refrigerant...137 D Defroster...143 Detachable key blade...59, 61 Dimensions XC70...354 367