
Owner's Manual
Page 4
... overview...Instrument panel...Indicator and warning symbols...Symbols - instrument panel...Information display...12-volt sockets...Lighting panel...Left-side steering wheel lever...Trip computer...Cruise control*...Right-side steering wheel lever...Steering wheel adjustment, Hazard warning flashers...Power windows...Mirrors...Personal settings... 52 54 56 58 61 63 64 68 70 72 74...
... overview...Instrument panel...Indicator and warning symbols...Symbols - instrument panel...Information display...12-volt sockets...Lighting panel...Left-side steering wheel lever...Trip computer...Cruise control*...Right-side steering wheel lever...Steering wheel adjustment, Hazard warning flashers...Power windows...Mirrors...Personal settings... 52 54 56 58 61 63 64 68 70 72 74...
Owner's Manual
Page 6
Tire Sealing System* ...Temporary spare...Spare tire and jack ...Wheel nuts...Changing a wheel...Tire Pressure Monitoring System (TPMS) 176 179 181 182 184 185 187 188 189 195 196 198 199 201 Washing and cleaning the car...206 ... brake...Stability system...Towing...Jump starting...Towing a trailer...Detachable trailer hitch...Transporting loads...Blind Spot Information System (BLIS)*...Rear park assist*... 06 07 08 07 Wheels and tires 08 Car care 140 143 146 147 149 151 153 154 157 158 160 163 164 166 167 168 172 General information...Tire...
Tire Sealing System* ...Temporary spare...Spare tire and jack ...Wheel nuts...Changing a wheel...Tire Pressure Monitoring System (TPMS) 176 179 181 182 184 185 187 188 189 195 196 198 199 201 Washing and cleaning the car...206 ... brake...Stability system...Towing...Jump starting...Towing a trailer...Detachable trailer hitch...Transporting loads...Blind Spot Information System (BLIS)*...Rear park assist*... 06 07 08 07 Wheels and tires 08 Car care 140 143 146 147 149 151 153 154 157 158 160 163 164 166 167 168 172 General information...Tire...
Owner's Manual
Page 22
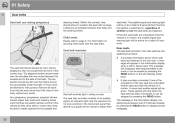
... of the belly. This message will stop when the seat belt has been re-buckled or can be allowed to fasten their seats and steering wheel such that it be active for information on securing child seats with as large a distance as possible between the breasts and to position the seat... of an audible signal, an indicator light near the rearview mirror and a symbol in the information display when a belt is switched on the left steering wheel lever. But it is crucial that alert all slack from the time the ignition is being used. If the front seat belts are fastened. 01...
... of the belly. This message will stop when the seat belt has been re-buckled or can be allowed to fasten their seats and steering wheel such that it be active for information on securing child seats with as large a distance as possible between the breasts and to position the seat... of an audible signal, an indicator light near the rearview mirror and a symbol in the information display when a belt is switched on the left steering wheel lever. But it is crucial that alert all slack from the time the ignition is being used. If the front seat belts are fastened. 01...

Owner's Manual
Page 25
... front airbag system is not damaged. The location of the airbags, takes approximately one or both sun visors and on the steering wheel pad/airbag housing. 01 Safety Supplemental Restraint System The front airbag system 01 • The driver's side front airbag is folded...could cause malfunction. The entire process, including inflation and deflation of the front airbags is indicated by SRS AIRBAG embossed on the steering wheel pad and above the glove compartment. Never drive a vehicle with considerable force. During normal deployment and depending on variables such as a...
... front airbag system is not damaged. The location of the airbags, takes approximately one or both sun visors and on the steering wheel pad/airbag housing. 01 Safety Supplemental Restraint System The front airbag system 01 • The driver's side front airbag is folded...could cause malfunction. The entire process, including inflation and deflation of the front airbags is indicated by SRS AIRBAG embossed on the steering wheel pad and above the glove compartment. Never drive a vehicle with considerable force. During normal deployment and depending on variables such as a...

Owner's Manual
Page 28
.... This should be against the seat back with the seat belt properly fastened. Occupants in the front passenger's seat must never sit on the steering wheel or the passenger's side dashboard. 01 Safety 01 Supplemental Restraint System WARNING WARNING • • Children must never be on the floor, e.g., ... to , or installed near the air bag hatch (the area above the glove compartment) or the area affected by a trained and qualified Volvo service technician. There should only be placed on, attached to the vehicle occupants. • • • • • 28
.... This should be against the seat back with the seat belt properly fastened. Occupants in the front passenger's seat must never sit on the steering wheel or the passenger's side dashboard. 01 Safety 01 Supplemental Restraint System WARNING WARNING • • Children must never be on the floor, e.g., ... to , or installed near the air bag hatch (the area above the glove compartment) or the area affected by a trained and qualified Volvo service technician. There should only be placed on, attached to the vehicle occupants. • • • • • 28

Owner's Manual
Page 50
instrument panel...Information display...12-volt sockets...Lighting panel...Left-side steering wheel lever...Trip computer...Cruise control*...Right-side steering wheel lever...Steering wheel adjustment, Hazard warning flashers...Power windows...Mirrors...Personal settings... 52 54 56 58 61 63 64 68 70 72 74 76 77 78 81 HomeLink® Wireless Control System*...83 50 * Option/accessory, for more information, see Introduction. Instrument overview...Instrument panel...Indicator and warning symbols...Symbols -
instrument panel...Information display...12-volt sockets...Lighting panel...Left-side steering wheel lever...Trip computer...Cruise control*...Right-side steering wheel lever...Steering wheel adjustment, Hazard warning flashers...Power windows...Mirrors...Personal settings... 52 54 56 58 61 63 64 68 70 72 74 76 77 78 81 HomeLink® Wireless Control System*...83 50 * Option/accessory, for more information, see Introduction. Instrument overview...Instrument panel...Indicator and warning symbols...Symbols -
Owner's Manual
Page 53
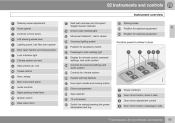
... Hood opener Driver's side reading light Controls in front doors Movement detector*, alarm sensor Left steering wheel lever Courtesy lighting switch Lighting panel, fuel filler door opener Position for accessory switch Door open handle and locking button Passenger's side...reading light Lock indicator light Climate system air vent Side window air vent Cruise control Horn, airbag Main instrument panel Audio controls Right steering wheel lever Ignition switch Rear-view mirror Display for climate control, personal settings, and audio system Controls for personal settings and audio system Controls ...
... Hood opener Driver's side reading light Controls in front doors Movement detector*, alarm sensor Left steering wheel lever Courtesy lighting switch Lighting panel, fuel filler door opener Position for accessory switch Door open handle and locking button Passenger's side...reading light Lock indicator light Climate system air vent Side window air vent Cruise control Horn, airbag Main instrument panel Audio controls Right steering wheel lever Ignition switch Rear-view mirror Display for climate control, personal settings, and audio system Controls for personal settings and audio system Controls ...

Owner's Manual
Page 64
...in this positionA) Daytime running lights (low beam headlights) on with Active Bending headlights When this position. G026507 Pull the left -side steering wheel lever to toggle between high and low beams. Active Bending Lights (ABL)* NOTE See page 68 for information on . Headlights 1. Parking lights... daytime running lights do not function with the switch in the Active 64 * Option/accessory, for adjusting brightness of the steering wheel. This function can be activated by turning the lighting switch to movements of instrument lighting Front fog lights To unlock the fuel filler...
...in this positionA) Daytime running lights (low beam headlights) on with Active Bending headlights When this position. G026507 Pull the left -side steering wheel lever to toggle between high and low beams. Active Bending Lights (ABL)* NOTE See page 68 for information on . Headlights 1. Parking lights... daytime running lights do not function with the switch in the Active 64 * Option/accessory, for adjusting brightness of the steering wheel. This function can be activated by turning the lighting switch to movements of instrument lighting Front fog lights To unlock the fuel filler...

Owner's Manual
Page 66
... the normal taillights and should be used in the button illuminates when the rear fog lights are on the rear fog lights. Move the thumb wheel (2) up to increase brightness or down to position II. 2. An audible click will go out when the vehicle is in either position Rear fog lights...
... the normal taillights and should be used in the button illuminates when the rear fog lights are on the rear fog lights. Move the thumb wheel (2) up to increase brightness or down to position II. 2. An audible click will go out when the vehicle is in either position Rear fog lights...

Owner's Manual
Page 68
... position II. 2. The high beams will be cancelled automatically by the movement of the steering wheel, or the lever can make use of the lighting panel. 1. 02 Instruments and controls Left-side steering wheel lever Lever positions 02 Turn signals When turning ± Move the lever as far up or...and immediately back to position 1 and releasing it. With the light switch in position , see page 64, pull the turn signal lever toward the steering wheel (position 4) to toggle between high and low beams, Home Safe lighting • Moving the lever up or down to its initial position by hand. ...
... position II. 2. The high beams will be cancelled automatically by the movement of the steering wheel, or the lever can make use of the lighting panel. 1. 02 Instruments and controls Left-side steering wheel lever Lever positions 02 Turn signals When turning ± Move the lever as far up or...and immediately back to position 1 and releasing it. With the light switch in position , see page 64, pull the turn signal lever toward the steering wheel (position 4) to toggle between high and low beams, Home Safe lighting • Moving the lever up or down to its initial position by hand. ...

Owner's Manual
Page 69
Exit the car and lock the doors. The time interval can be changed according to position 4) and release it. 3. Remove the key from the ignition switch. 2. The headlights and parking lights will illuminate and remain on for more information. 02 1 Factory setting. 69 02 Instruments and controls Left-side steering wheel lever 1. Pull the direction indicator lever as far as possible towards the steering wheel (to your preferences by using the Personal Settings function, see page 81 for 301, 60 or 90 seconds.
Exit the car and lock the doors. The time interval can be changed according to position 4) and release it. 3. Remove the key from the ignition switch. 2. The headlights and parking lights will illuminate and remain on for more information. 02 1 Factory setting. 69 02 Instruments and controls Left-side steering wheel lever 1. Pull the direction indicator lever as far as possible towards the steering wheel (to your preferences by using the Personal Settings function, see page 81 for 301, 60 or 90 seconds.
Owner's Manual
Page 70
...the information display. MILES TO EMPTY TANK • --.- MPH AVERAGE SPEED 70 READ (press to acknowledge/confirm/ erase a message) Thumb wheel (used to scroll among the trip computer menus) RESET The trip computer stores information gathered from the car's monitoring systems will be reset....average speed since the last time the trip computer was reset, by pressing RESET (button 3). Acknowledge the message by twisting the thumb wheel (2) one of fuel remaining in system memory until RESET (button 3) is not moving, "----" will override the trip computer function. ---...
...the information display. MILES TO EMPTY TANK • --.- MPH AVERAGE SPEED 70 READ (press to acknowledge/confirm/ erase a message) Thumb wheel (used to scroll among the trip computer menus) RESET The trip computer stores information gathered from the car's monitoring systems will be reset....average speed since the last time the trip computer was reset, by pressing RESET (button 3). Acknowledge the message by twisting the thumb wheel (2) one of fuel remaining in system memory until RESET (button 3) is not moving, "----" will override the trip computer function. ---...

Owner's Manual
Page 72
... following ways to temporarily disengage cruise control. Press and hold down + or - to set the vehicle's speed. CRUISEwill appear in the center of the steering wheel hub. until the vehicle reaches the desired speed. Cruise control is released. 2. Press the CRUISE button. CRUISE will appear in the function display in the...
... following ways to temporarily disengage cruise control. Press and hold down + or - to set the vehicle's speed. CRUISEwill appear in the center of the steering wheel hub. until the vehicle reaches the desired speed. Cruise control is released. 2. Press the CRUISE button. CRUISE will appear in the function display in the...

Owner's Manual
Page 73
02 Instruments and controls Cruise control* • During wheel spin or wheel lock-up. • If the vehicle's speed is increased by : • Pressing the CRUISE button (CRUISEON will be displayed. Disengaging cruise control Cruise control can ...
02 Instruments and controls Cruise control* • During wheel spin or wheel lock-up. • If the vehicle's speed is increased by : • Pressing the CRUISE button (CRUISEON will be displayed. Disengaging cruise control Cruise control can ...

Owner's Manual
Page 74
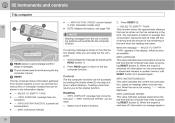
...within a 10 minute period. CAUTION • Use ample washer fluid when washing the windshield. Windshield washers Pull the lever toward the steering wheel and release it. Thereafter, the headlights will be washed the first time the windshield is held up. Normal halogen headlights will make 2-3 ... the lever in this position, you can set the wiper interval by moving the thumb wheel (C) upward to increase wiper speed or downward to conserve washer fluid, see page 74 Thumb wheel High speed wiper function. - Windshield wipers off The windshield wipers are not frozen in operation...
...within a 10 minute period. CAUTION • Use ample washer fluid when washing the windshield. Windshield washers Pull the lever toward the steering wheel and release it. Thereafter, the headlights will be washed the first time the windshield is held up. Normal halogen headlights will make 2-3 ... the lever in this position, you can set the wiper interval by moving the thumb wheel (C) upward to increase wiper speed or downward to conserve washer fluid, see page 74 Thumb wheel High speed wiper function. - Windshield wipers off The windshield wipers are not frozen in operation...

Owner's Manual
Page 75
...on the windshield when the rain sensor is left in an automatic car wash, etc. 02 Instruments and controls Right-side steering wheel lever - Thumb wheel The thumb wheel is used to the amount of water on the windshield. The rain sensor regulates windshield wiper speed according to increase/decrease the ...in the following situations: On/Off Activating the rain sensor 1. Rain sensor* 3. CAUTION The rain sensor should be deactivated by moving the thumb wheel (C in the illustration on , the wipers will start inadvertently in the car wash and could be damaged. Move the...
...on the windshield when the rain sensor is left in an automatic car wash, etc. 02 Instruments and controls Right-side steering wheel lever - Thumb wheel The thumb wheel is used to the amount of water on the windshield. The rain sensor regulates windshield wiper speed according to increase/decrease the ...in the following situations: On/Off Activating the rain sensor 1. Rain sensor* 3. CAUTION The rain sensor should be deactivated by moving the thumb wheel (C in the illustration on , the wipers will start inadvertently in the car wash and could be damaged. Move the...

Owner's Manual
Page 76
...be activated automatically if an airbag deploys. 02 Instruments and controls Steering wheel adjustment, Hazard warning flashers Steering wheel adjustment 02 Check that the vehicle has become a traffic hazard. 1. Adjust the steering wheel to turn off the flashers. G027308 The four-way flasher should be...on the steering column to lock the steering wheel in the new position. 2. If necessary, press the steering wheel slightly while pressing the lever into place to release the steering wheel. 2. WARNING Never adjust the steering wheel while driving. Pull down the lever on where...
...be activated automatically if an airbag deploys. 02 Instruments and controls Steering wheel adjustment, Hazard warning flashers Steering wheel adjustment 02 Check that the vehicle has become a traffic hazard. 1. Adjust the steering wheel to turn off the flashers. G027308 The four-way flasher should be...on the steering column to lock the steering wheel in the new position. 2. If necessary, press the steering wheel slightly while pressing the lever into place to release the steering wheel. 2. WARNING Never adjust the steering wheel while driving. Pull down the lever on where...

Owner's Manual
Page 82
... system's remote key, (see page 136 for opening all doors are two alternatives: Information • One front door - when the timer is pulled toward the wheel with the ignition switched off (if, for recirculation - Intervals of keys registered for additional information). • All doors - Choose between "Low", "Normal" and "High". •...
... system's remote key, (see page 136 for opening all doors are two alternatives: Information • One front door - when the timer is pulled toward the wheel with the ignition switched off (if, for recirculation - Intervals of keys registered for additional information). • All doors - Choose between "Low", "Normal" and "High". •...

Owner's Manual
Page 126
05 Locks and alarm Valet locking Locking points 05 Normal locking/unlocking points for the remote key with the key blade in place (valet locking not activated): Doors Steering wheel lock Glove compartment Trunk Locking/unlocking points for the remote key with the key blade removed (valet locking activated): Doors Steering wheel lock By utilizing the remote key with the key blade removed, the valet locking feature enables you to block access to the trunk and glove compartment for e.g., valet parking or when the car is brought to the retailer for service. 126
05 Locks and alarm Valet locking Locking points 05 Normal locking/unlocking points for the remote key with the key blade in place (valet locking not activated): Doors Steering wheel lock Glove compartment Trunk Locking/unlocking points for the remote key with the key blade removed (valet locking activated): Doors Steering wheel lock By utilizing the remote key with the key blade removed, the valet locking feature enables you to block access to the trunk and glove compartment for e.g., valet parking or when the car is brought to the retailer for service. 126
Owner's Manual
Page 140
... vehicle load. Therefore, check that decrease gas mileage are checked at a maximum speed of your vehicle has a tendency to understeer, which means that the steering wheel has to immediate traffic conditions. Some of a bend. Weight distribution affects handling At the specified curb weight your vehicle to be turned more than with...'s fuel consumption modes can be kept open could lead to a depth of approximately 9 in mud or water • Remove snow tires when threat of rear wheel skid. Driving through flowing water. • Maintain correct tire pressure.
... vehicle load. Therefore, check that decrease gas mileage are checked at a maximum speed of your vehicle has a tendency to understeer, which means that the steering wheel has to immediate traffic conditions. Some of a bend. Weight distribution affects handling At the specified curb weight your vehicle to be turned more than with...'s fuel consumption modes can be kept open could lead to a depth of approximately 9 in mud or water • Remove snow tires when threat of rear wheel skid. Driving through flowing water. • Maintain correct tire pressure.
