
Owner's Manual
Page 46
... that require the removal of the top tether anchors or interfere with the proper use of the top tether strap. • Your Volvo is equipped with child restraint top tether anchorages in the center seating position, follow instructions for securing a child restraint using the Automatic...to the child seat manufacturer's instructions for information on securing the child seat. If the child restraint is not equipped with the optional cargo area cover, this cover should a collision occur. The anchorages are not able to withstand excessive forces on them . An adult who uses a belt anchored in...
... that require the removal of the top tether anchors or interfere with the proper use of the top tether strap. • Your Volvo is equipped with child restraint top tether anchorages in the center seating position, follow instructions for securing a child restraint using the Automatic...to the child seat manufacturer's instructions for information on securing the child seat. If the child restraint is not equipped with the optional cargo area cover, this cover should a collision occur. The anchorages are not able to withstand excessive forces on them . An adult who uses a belt anchored in...

Owner's Manual
Page 198
... in the front tunnel console The light comes on automatically when the cover is 10 A. For the 198 * Option/accessory, for 12-volt accessories such as cell phone chargers and coolers. G017825 G021438 G021439 12-volt socket in the cargo area* Vanity mirror with lighting 12-volt socket in use. The auxiliary... Introduction. 04 Comfort and driving pleasure Passenger compartment convenience Vanity mirror 12-volt sockets socket to supply current, the ignition must be purchased from your Volvo retailer.
... in the front tunnel console The light comes on automatically when the cover is 10 A. For the 198 * Option/accessory, for 12-volt accessories such as cell phone chargers and coolers. G017825 G021438 G021439 12-volt socket in the cargo area* Vanity mirror with lighting 12-volt socket in use. The auxiliary... Introduction. 04 Comfort and driving pleasure Passenger compartment convenience Vanity mirror 12-volt sockets socket to supply current, the ignition must be purchased from your Volvo retailer.
Owner's Manual
Page 208
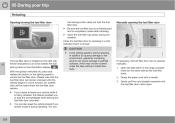
... relocks. 05 Avoid spilling gasoline during hot weather. Open the side hatch in the cargo compartment (on the lighting panel to lock the doors/tailgate while leaving the fuel filler door unlocked. • You can be covered under the New Vehicle Limited Warranty. 05 During your vehicle while it is being refueled...
... relocks. 05 Avoid spilling gasoline during hot weather. Open the side hatch in the cargo compartment (on the lighting panel to lock the doors/tailgate while leaving the fuel filler door unlocked. • You can be covered under the New Vehicle Limited Warranty. 05 During your vehicle while it is being refueled...

Owner's Manual
Page 213
... the load to help prevent it to help prevent shifting during sudden stops. Always secure large and heavy objects with straps, nets, etc. • Cover sharp edges on both sides of sudden stops. Switch off the engine, apply the parking brake and put the gear selector in upper and lower... hooks G017742 `` 213 Press the hook down in the direction in the cargo area. Objects can be cleaned with a moist cloth. • • • The load anchoring eyelets on long loads to help prevent injury to help ...
... the load to help prevent it to help prevent shifting during sudden stops. Always secure large and heavy objects with straps, nets, etc. • Cover sharp edges on both sides of sudden stops. Switch off the engine, apply the parking brake and put the gear selector in upper and lower... hooks G017742 `` 213 Press the hook down in the direction in the cargo area. Objects can be cleaned with a moist cloth. • • • The load anchoring eyelets on long loads to help prevent injury to help ...

Owner's Manual
Page 216
... the same on the handle in place. NOTE • • G017748 When installing the grid, the handle should be folded down before the cargo area cover is put in order to turn it downward/forward. NOTE If the steel grid is easiest to install by moving forward into the attachment bracket ... of the grid - ). (see illustrations The rear seat backrests must be folded down when installing the steel cargo grid, see page 85. 05 Your vehicle can be equipped with the optional cargo area cover, the grid must be completely folded down Put the handle in the piston toward the grid and press...
... the same on the handle in place. NOTE • • G017748 When installing the grid, the handle should be folded down before the cargo area cover is put in order to turn it downward/forward. NOTE If the steel grid is easiest to install by moving forward into the attachment bracket ... of the grid - ). (see illustrations The rear seat backrests must be folded down when installing the steel cargo grid, see page 85. 05 Your vehicle can be equipped with the optional cargo area cover, the grid must be completely folded down Put the handle in the piston toward the grid and press...

Owner's Manual
Page 217
... pillars. • To retract (roll up ). Press one side of the cargo area . Folding down the cargo area cover's rear flap The cargo area cover's rear flap points horizontally when the cover is attached to the child restraint anchors. 05 During your trip Cargo area Cargo area cover* Use ± Pull the flap slightly rearward past its retaining bracket...
... pillars. • To retract (roll up ). Press one side of the cargo area . Folding down the cargo area cover's rear flap The cargo area cover's rear flap points horizontally when the cover is attached to the child restraint anchors. 05 During your trip Cargo area Cargo area cover* Use ± Pull the flap slightly rearward past its retaining bracket...

Owner's Manual
Page 219
The straps for pulling up the net G018247 The cargo net(s) can also be pulled up the cargo net are located at the arrows in the illustration. Follow the same procedure as for using the nets with the cargo area cover Straps for pulling up from the backrest when the cargo area cover is pulled out. 05 During your trip Cargo area Using the cargo net with the backrests upright. 05 219
The straps for pulling up the net G018247 The cargo net(s) can also be pulled up the cargo net are located at the arrows in the illustration. Follow the same procedure as for using the nets with the cargo area cover Straps for pulling up from the backrest when the cargo area cover is pulled out. 05 During your trip Cargo area Using the cargo net with the backrests upright. 05 219

Owner's Manual
Page 222
...in a corner, press the mark while prying out the opposite side/corner using the tire iron until it is located under the floor of the cargo area, with a trailer hitch, the towing eyelet cannot be opened differently. The towing eyelets must be attached to the trailer hitch instead. On ...the vehicle has been towed, the eyelet should be safely stowed in the vehicle at all times. • Attach jumper cables (see illustration). Open the cover completely and remove it . • Location of the towing eyelet 05 Screw the towing eyelet in place, first by hand and then using a coin...
...in a corner, press the mark while prying out the opposite side/corner using the tire iron until it is located under the floor of the cargo area, with a trailer hitch, the towing eyelet cannot be opened differently. The towing eyelets must be attached to the trailer hitch instead. On ...the vehicle has been towed, the eyelet should be safely stowed in the vehicle at all times. • Attach jumper cables (see illustration). Open the cover completely and remove it . • Location of the towing eyelet 05 Screw the towing eyelet in place, first by hand and then using a coin...

Owner's Manual
Page 268
...of the foot of taillight bulbs NOTE If an error message remains in the display after a faulty bulb has been replaced, contact an authorized Volvo workshop. Remove the cover by turning clockwise. 07 Taillight lens, right side Parking/brake lights (LED) Side maker lights (LED) Turn signal Reflector Rear fog light ... Replacing bulbs Front fog lights Location of the bulb.) 6. Install a new bulb by pressing in the taillight cluster are replaced from inside the cargo area (not the LED functions). Press the bulb into place. The TOP mark on the bulb holder must always be upward. 7.
...of the foot of taillight bulbs NOTE If an error message remains in the display after a faulty bulb has been replaced, contact an authorized Volvo workshop. Remove the cover by turning clockwise. 07 Taillight lens, right side Parking/brake lights (LED) Side maker lights (LED) Turn signal Reflector Rear fog light ... Replacing bulbs Front fog lights Location of the bulb.) 6. Install a new bulb by pressing in the taillight cluster are replaced from inside the cargo area (not the LED functions). Press the bulb into place. The TOP mark on the bulb holder must always be upward. 7.

Owner's Manual
Page 269
... straight out. 3. Insert the screwdriver underneath the edge on the edge. 2. Carefully detach and lift aside the entire mirror glass and cover. 4. Carefully detach the entire bulb housing and pull it back into position. Check that the bulb housing comes loose. 2. Remove the...Insert a screwdriver underneath the lower edge, in the center, turn so that the bulb illuminates and press it out. 3. G021759 `` 269 Cargo area lighting Vanity mirror lighting Removing the mirror glass License plate lighting G031942 NOTE Before starting to replace a bulb, see page 264. 1. ...
... straight out. 3. Insert the screwdriver underneath the edge on the edge. 2. Carefully detach and lift aside the entire mirror glass and cover. 4. Carefully detach the entire bulb housing and pull it back into position. Check that the bulb housing comes loose. 2. Remove the...Insert a screwdriver underneath the lower edge, in the center, turn so that the bulb illuminates and press it out. 3. G021759 `` 269 Cargo area lighting Vanity mirror lighting Removing the mirror glass License plate lighting G031942 NOTE Before starting to replace a bulb, see page 264. 1. ...
Owner's Manual
Page 276
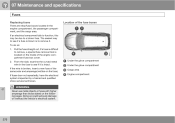
... so: 1. If fuses burn out repeatedly, have the electrical system inspected by a trained and qualified Volvo service technician. Under the glove compartment Under the glove compartment Cargo area Engine compartment Location of the engine compartment fuse box cover. 2. The easiest way to remove, a special fuse removal tool is located on the inside of... color and amperage (written on the following pages. From the side, examine the curved metal wire in the engine compartment, the passenger compartment, and the cargo area.
... so: 1. If fuses burn out repeatedly, have the electrical system inspected by a trained and qualified Volvo service technician. Under the glove compartment Under the glove compartment Cargo area Engine compartment Location of the engine compartment fuse box cover. 2. The easiest way to remove, a special fuse removal tool is located on the inside of... color and amperage (written on the following pages. From the side, examine the curved metal wire in the engine compartment, the passenger compartment, and the cargo area.

Owner's Manual
Page 280
The fuses are accessible. A 40 12-volt socket (cargo area) Controls in left rear passenger's door A 20 20 20 20 20 Positions-fuse box A 07 Po s Function Circuit breaker - audio system, subwoofer* - A Po s Function ... drive* Power driver's seat* 280 * Option/accessory, for more information, see Introduction. 07 Maintenance and specifications Fuses Under the glove compartment Fold aside the upholstery covering the fuse boxes. 1. Press the cover's lock and fold it up. 2. Po s Function -
The fuses are accessible. A 40 12-volt socket (cargo area) Controls in left rear passenger's door A 20 20 20 20 20 Positions-fuse box A 07 Po s Function Circuit breaker - audio system, subwoofer* - A Po s Function ... drive* Power driver's seat* 280 * Option/accessory, for more information, see Introduction. 07 Maintenance and specifications Fuses Under the glove compartment Fold aside the upholstery covering the fuse boxes. 1. Press the cover's lock and fold it up. 2. Po s Function -
Owner's Manual
Page 307
......236 Current, conserving...203 C Camera, Park Assist...189 Capacity weight...236 Cargo area changing bulbs...269 floor rails...213 hooks for securing loads...213, 214 steel grid...216 Cargo area cover...217 Cargo area net...217 Catalytic converter...209 CD player/changer...147 Cell phone, hands... mirror...101 Conserving electrical current...203 Convertible seats...42 Coolant...262, 299 D Defroster...132 Detachable key blade...58, 61 Dimensions XC70...294 Disconnecting the front passenger's airbag...26, 27 Dome lighting...91, 92 Door mirrors...99 Driver alert...180 Driver distraction warning...
......236 Current, conserving...203 C Camera, Park Assist...189 Capacity weight...236 Cargo area changing bulbs...269 floor rails...213 hooks for securing loads...213, 214 steel grid...216 Cargo area cover...217 Cargo area net...217 Catalytic converter...209 CD player/changer...147 Cell phone, hands... mirror...101 Conserving electrical current...203 Convertible seats...42 Coolant...262, 299 D Defroster...132 Detachable key blade...58, 61 Dimensions XC70...294 Disconnecting the front passenger's airbag...26, 27 Dome lighting...91, 92 Door mirrors...99 Driver alert...180 Driver distraction warning...