Owner's Manual
Page 4
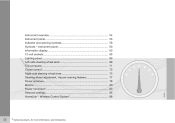
... moonroof*...Personal settings...HomeLink® Wireless Control System*... 54 56 58 60 63 65 66 69 71 73 75 77 78 80 83 85 88 4 * Option/accessory, for more information, see Introduction.
... moonroof*...Personal settings...HomeLink® Wireless Control System*... 54 56 58 60 63 65 66 69 71 73 75 77 78 80 83 85 88 4 * Option/accessory, for more information, see Introduction.
Owner's Manual
Page 5
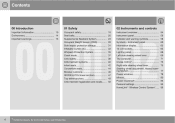
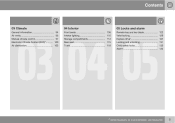
Contents 03 Climate General information...94 Air vents...96 Manual climate control...97 Electronic Climate Control (ECC)*...100 Air distribution...103 03 04 05 04 Interior 05 Locks and alarm Front seats...Interior lighting...Storage compartments...Rear seat...Trunk ...106 110 112 115 118 Remote key and key blade...Valet locking ...Keyless drive*...Locking and unlocking...Child safety locks...Alarm*... 122 126 127 131 133 134 * Option/accessory, for more information, see Introduction. 5
Contents 03 Climate General information...94 Air vents...96 Manual climate control...97 Electronic Climate Control (ECC)*...100 Air distribution...103 03 04 05 04 Interior 05 Locks and alarm Front seats...Interior lighting...Storage compartments...Rear seat...Trunk ...106 110 112 115 118 Remote key and key blade...Valet locking ...Keyless drive*...Locking and unlocking...Child safety locks...Alarm*... 122 126 127 131 133 134 * Option/accessory, for more information, see Introduction. 5
Owner's Manual
Page 6
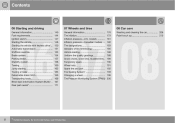
...) 176 179 181 182 183 185 186 188 189 190 191 192 193 198 200 Washing and cleaning the car...206 Paint touch up...210 6 * Option/accessory, for more information, see Introduction. Contents 06 Starting and driving General information...Fuel requirements...Ignition switch...Starting the vehicle...Starting the vehicle with keyless...
...) 176 179 181 182 183 185 186 188 189 190 191 192 193 198 200 Washing and cleaning the car...206 Paint touch up...210 6 * Option/accessory, for more information, see Introduction. Contents 06 Starting and driving General information...Fuel requirements...Ignition switch...Starting the vehicle...Starting the vehicle with keyless...
Owner's Manual
Page 12
... asterisk. Please note that country's applicable safety and emission control requirements. In some vehicles may render your Volvo retailer for additional information. Modifications to change specifications or design without notice and without incurring obligation. Special handling... components contain or emit chemicals known to comply with these requirements. Options and accessories Optional or accessory equipment described in an accident, unseen damage may contain Perchlorate material. Optional or accessory equipment may be equipped differently, depending on the following ...
... asterisk. Please note that country's applicable safety and emission control requirements. In some vehicles may render your Volvo retailer for additional information. Modifications to change specifications or design without notice and without incurring obligation. Special handling... components contain or emit chemicals known to comply with these requirements. Options and accessories Optional or accessory equipment described in an accident, unseen damage may contain Perchlorate material. Optional or accessory equipment may be equipped differently, depending on the following ...
Owner's Manual
Page 13
... specifications contained in a crash or nearcrash event. Fuel filler cap The fuel filler door, located on the front side of publication. Volvo Car Corporation service and repair facilities law enforcement or government agencies others who may be difficult or impossible to comply with each other countries... removed from this manual may be heard when the fuel filler door relocks. • Volvo reserves the right to make model changes at any time, or to know such information. Optional equipment described in all markets. Fuel filler door Press the button on the light switch ...
... specifications contained in a crash or nearcrash event. Fuel filler cap The fuel filler door, located on the front side of publication. Volvo Car Corporation service and repair facilities law enforcement or government agencies others who may be difficult or impossible to comply with each other countries... removed from this manual may be heard when the fuel filler door relocks. • Volvo reserves the right to make model changes at any time, or to know such information. Optional equipment described in all markets. Fuel filler door Press the button on the light switch ...
Owner's Manual
Page 37
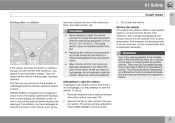
..., the text CRASH MODE SEE MANUAL may have damaged an important function in injury or improper system function. Remove the ignition key or optional keyless drive start the vehicle. This indicates that could result in the vehicle, such as the Attempting to start the vehicle If damage ... CRASH MODE is a feature that is absolutely necessary. To do not attempt to be driven or towed (pulled by a trained and qualified Volvo service technician. The collision may appear in the ignition switch. Leave the vehicle immediately. • G026363 WARNING Even if the vehicle appears to...
..., the text CRASH MODE SEE MANUAL may have damaged an important function in injury or improper system function. Remove the ignition key or optional keyless drive start the vehicle. This indicates that could result in the vehicle, such as the Attempting to start the vehicle If damage ... CRASH MODE is a feature that is absolutely necessary. To do not attempt to be driven or towed (pulled by a trained and qualified Volvo service technician. The collision may appear in the ignition switch. Leave the vehicle immediately. • G026363 WARNING Even if the vehicle appears to...
Owner's Manual
Page 52
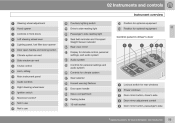
instrument panel...Information display...12-volt sockets...Lighting panel...Left-side steering wheel lever...Trip computer...Cruise control*...Right-side steering wheel lever...Steering wheel adjustment, Hazard warning flashers...Power windows...Mirrors...Power moonroof*...Personal settings...HomeLink® Wireless Control System*... 54 56 58 60 63 65 66 69 71 73 75 77 78 80 83 85 88 52 * Option/accessory, for more information, see Introduction. Instrument overview...Instrument panel...Indicator and warning symbols...Symbols -
instrument panel...Information display...12-volt sockets...Lighting panel...Left-side steering wheel lever...Trip computer...Cruise control*...Right-side steering wheel lever...Steering wheel adjustment, Hazard warning flashers...Power windows...Mirrors...Power moonroof*...Personal settings...HomeLink® Wireless Control System*... 54 56 58 60 63 65 66 69 71 73 75 77 78 80 83 85 88 52 * Option/accessory, for more information, see Introduction. Instrument overview...Instrument panel...Indicator and warning symbols...Symbols -
Owner's Manual
Page 55
... button, driver's side Door mirror adjustment control Door mirror button, passenger's side Courtesy lighting switch Driver's side reading light Passenger's side reading light Position for optional equipment Position for optional equipment 02 Control panel in driver's door Seat belt reminder and Occupant Weight Sensor indicator...
... button, driver's side Door mirror adjustment control Door mirror button, passenger's side Courtesy lighting switch Driver's side reading light Passenger's side reading light Position for optional equipment Position for optional equipment 02 Control panel in driver's door Seat belt reminder and Occupant Weight Sensor indicator...

Owner's Manual
Page 57
... of the air intake reduce the cooling capacity at high outside temperatures and high engine loads. 02 Instruments and controls Instrument panel odometer, trip odometers, optional rain sensor, and cruise control.
... of the air intake reduce the cooling capacity at high outside temperatures and high engine loads. 02 Instruments and controls Instrument panel odometer, trip odometers, optional rain sensor, and cruise control.
Owner's Manual
Page 58
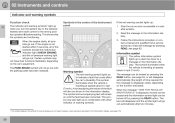
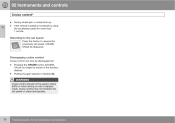
...at speeds below 5 mph (7 km/h). The PARK BRAKE symbol will go out. Follow the instructions provided, or contact a trained and qualified Volvo service technician. Information symbol The yellow information symbol lights up to alert the driver to indicate a fault that the symbols are functioning. The symbol... controls Indicator and warning symbols Function check 02 The indicator and warning symbols1 light up when you turn the ignition key or the optional keyless drive start control to disappear varies, depending on the car's equipment. When the engine starts, all of the symbols except ...
...at speeds below 5 mph (7 km/h). The PARK BRAKE symbol will go out. Follow the instructions provided, or contact a trained and qualified Volvo service technician. Information symbol The yellow information symbol lights up to alert the driver to indicate a fault that the symbols are functioning. The symbol... controls Indicator and warning symbols Function check 02 The indicator and warning symbols1 light up when you turn the ignition key or the optional keyless drive start control to disappear varies, depending on the car's equipment. When the engine starts, all of the symbols except ...
Owner's Manual
Page 65
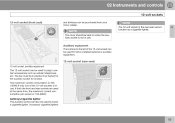
...12-volt socket can be used for the auxiliary socket to function. The maximum current consumption is in position I (or higher) for Volvo-installed optional or auxiliary equipment. If both the front and rear sockets are used at the same time, the maximum current consumption per socket is ... as a cigarette lighter. 02 NOTE The cover should be in use . Ashtrays/cigarette lighter The auxiliary socket can also be purchased from your Volvo retailer. 02 Instruments and controls 12-volt sockets 12-volt socket (front seat) and ashtrays can be used to power a cigarette lighter. The...
...12-volt socket can be used for the auxiliary socket to function. The maximum current consumption is in position I (or higher) for Volvo-installed optional or auxiliary equipment. If both the front and rear sockets are used at the same time, the maximum current consumption per socket is ... as a cigarette lighter. 02 NOTE The cover should be in use . Ashtrays/cigarette lighter The auxiliary socket can also be purchased from your Volvo retailer. 02 Instruments and controls 12-volt sockets 12-volt socket (front seat) and ashtrays can be used to power a cigarette lighter. The...
Owner's Manual
Page 66
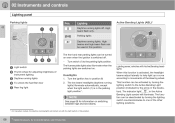
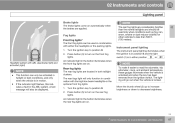
... Daytime running lights off . 02 Instruments and controls Lighting panel Parking lights 02 Pos. Lighting panel, vehicles with the light switch in this position. 66 * Option/accessory, for adjusting brightness of the steering wheel.
... Daytime running lights off . 02 Instruments and controls Lighting panel Parking lights 02 Pos. Lighting panel, vehicles with the light switch in this position. 66 * Option/accessory, for adjusting brightness of the steering wheel.
Owner's Manual
Page 67
... II and the light switch (1) is locked. Headlight pattern with the high/low beam headlights or the optional front fog lights. 1. Move the thumb wheel (2) up to increase brightness or down to decrease brightness. `` * Option/accessory, for other vehicles to turn on . An indicator light in both taillight clusters. The rear fog...
... II and the light switch (1) is locked. Headlight pattern with the high/low beam headlights or the optional front fog lights. 1. Move the thumb wheel (2) up to increase brightness or down to decrease brightness. `` * Option/accessory, for other vehicles to turn on . An indicator light in both taillight clusters. The rear fog...

Owner's Manual
Page 73
... • Press 0 to increase or decrease vehicle speed by approximately 1 mph (1.6 km/h). NOTE This does not set speed when the button is moved to position N. `` * Option/accessory, for approximately a half second and release the button to temporarily disengage cruise control. CRUISE-ONwill be displayed. • If the speed drops below 20...
... • Press 0 to increase or decrease vehicle speed by approximately 1 mph (1.6 km/h). NOTE This does not set speed when the button is moved to position N. `` * Option/accessory, for approximately a half second and release the button to temporarily disengage cruise control. CRUISE-ONwill be displayed. • If the speed drops below 20...
Owner's Manual
Page 74
... (CRUISEON will no longer be shown in the function display). • Putting the gear selector in heavy traffic or when driving on steep downgrades. 74 * Option/accessory, for more information, see Introduction. Disengaging cruise control Cruise control can also be disengaged by using the accelerator pedal for more than 1 minute. 02...
... (CRUISEON will no longer be shown in the function display). • Putting the gear selector in heavy traffic or when driving on steep downgrades. 74 * Option/accessory, for more information, see Introduction. Disengaging cruise control Cruise control can also be disengaged by using the accelerator pedal for more than 1 minute. 02...
Owner's Manual
Page 75
The following applies to decrease the speed. The wipers will be washed the first time the windshield is washed. Low/high beam headlights on The optional Active Bending Lights will spray the headlights. Parking lights on The headlights will make 2-3 sweeps across the windshield after the lever has been released. Before ...
The following applies to decrease the speed. The wipers will be washed the first time the windshield is washed. Low/high beam headlights on The optional Active Bending Lights will spray the headlights. Parking lights on The headlights will make 2-3 sweeps across the windshield after the lever has been released. Before ...
Owner's Manual
Page 76
... sensor's sensitivity when the this function is activated. The sensitivity of the rain sensor is left in the ignition. 76 * Option/accessory, for more frequently) or down . Switch on the windshield when the rain sensor is briefly moved up (the wipers will remain activated if the ...
... sensor's sensitivity when the this function is activated. The sensitivity of the rain sensor is left in the ignition. 76 * Option/accessory, for more frequently) or down . Switch on the windshield when the rain sensor is briefly moved up (the wipers will remain activated if the ...
Owner's Manual
Page 80
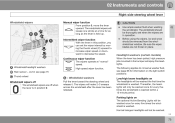
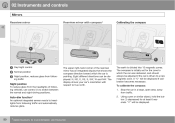
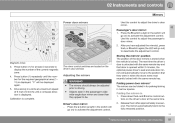
The upper right-hand corner of following traffic and automatically reduces glare. 80 * Option/accessory, for at least 6 seconds. "C" will be adjusted if the car is driven to headlights from following vehicles, use control (1) to true...displayed if calibration becomes necessary. Eight different directions can be displayed. The earth is pointing. To calibrate the compass: 1. Auto-dim function* An optional integrated sensor reacts to a new magnetic zone. The display shows your car's orientation with compass* Calibrating the compass Day/night control Normal position ...
The upper right-hand corner of following traffic and automatically reduces glare. 80 * Option/accessory, for at least 6 seconds. "C" will be adjusted if the car is driven to headlights from following vehicles, use control (1) to true...displayed if calibration becomes necessary. Eight different directions can be displayed. The earth is pointing. To calibrate the compass: 1. Auto-dim function* An optional integrated sensor reacts to a new magnetic zone. The display shows your car's orientation with compass* Calibrating the compass Day/night control Normal position ...
Owner's Manual
Page 81
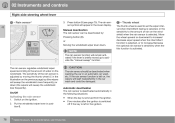
...of the current magnetic zone. 4. Magnetic zones 3. Press down the L and R mirror control buttons on ) to activate the adjustment control. * Option/accessory, for parking/driving in the passenger's side wide-angle door mirror are located on ) to activate the adjustment control. Use this control to... adjust the driver's door mirror. 02 Passenger's door mirror: 1. The next time the driver's door is opened within 2 minutes, the optional power driver's seat and side door mirrors will go out) to deactivate the adjustment control. Drive slowly in 1. Adjusting the mirrors WARNING &#...
...of the current magnetic zone. 4. Magnetic zones 3. Press down the L and R mirror control buttons on ) to activate the adjustment control. * Option/accessory, for parking/driving in the passenger's side wide-angle door mirror are located on ) to activate the adjustment control. Use this control to... adjust the driver's door mirror. 02 Passenger's door mirror: 1. The next time the driver's door is opened within 2 minutes, the optional power driver's seat and side door mirrors will go out) to deactivate the adjustment control. Drive slowly in 1. Adjusting the mirrors WARNING &#...

Owner's Manual
Page 82
.... In the menu system, go to their original (neutral) positions. Automatic folding When the vehicle is locked/unlocked with the remote key or with the optional keyless drive system (see page 85). Blind Spot Information System (BLIS)* The Blind Spot Information System (BLIS) is unlocked if they were folded in the... L and R mirror control buttons. Fold them out again by pressing the L and R mirror control buttons on the driver's door control panel. To do so: 82 * Option/accessory, for detailed information. Fold in or out. Return to the fully extended position. 1.
.... In the menu system, go to their original (neutral) positions. Automatic folding When the vehicle is locked/unlocked with the remote key or with the optional keyless drive system (see page 85). Blind Spot Information System (BLIS)* The Blind Spot Information System (BLIS) is unlocked if they were folded in the... L and R mirror control buttons. Fold them out again by pressing the L and R mirror control buttons on the driver's door control panel. To do so: 82 * Option/accessory, for detailed information. Fold in or out. Return to the fully extended position. 1.