

Owner's Manual
Page 7
Contents 09 Maintenance and servicing Volvo service...Maintaining your vehicle...Emission inspection readiness...Working on your vehicle...Hood and engine compartment...Engine oil...Fluids...Wiper blades...Battery...Replacing bulbs...Fuses...184 185 186 187 189 190 192 194 195 198 206 10 Audio ... 218 219 223 226 227 228 229 230 11 Specifications Label information...Dimensions ...Weights ...Capacities...Engine specifications...Bulbs...Electrical system...Three-way catalytic converter...Suspension...Volvo programs...234 236 238 240 242 243 244 245 246 247 09 10 11 7
Contents 09 Maintenance and servicing Volvo service...Maintaining your vehicle...Emission inspection readiness...Working on your vehicle...Hood and engine compartment...Engine oil...Fluids...Wiper blades...Battery...Replacing bulbs...Fuses...184 185 186 187 189 190 192 194 195 198 206 10 Audio ... 218 219 223 226 227 228 229 230 11 Specifications Label information...Dimensions ...Weights ...Capacities...Engine specifications...Bulbs...Electrical system...Three-way catalytic converter...Suspension...Volvo programs...234 236 238 240 242 243 244 245 246 247 09 10 11 7

Owner's Manual
Page 52
... out when the parking brake is displayed, the text can be erased and the yellow symbol light can be turned off by a trained and qualified Volvo service technician as soon as a red or yellow light depending on for low oil pressure is provided in the text window. Yellow symbol - The symbol... a suitable location and read the message shown in the reservoir, see page 71, or will remain on while driving or braking, stop immediately, open the hood and check the brake fluid level in the text window.
... out when the parking brake is displayed, the text can be erased and the yellow symbol light can be turned off by a trained and qualified Volvo service technician as soon as a red or yellow light depending on for low oil pressure is provided in the text window. Yellow symbol - The symbol... a suitable location and read the message shown in the reservoir, see page 71, or will remain on while driving or braking, stop immediately, open the hood and check the brake fluid level in the text window.
Owner's Manual
Page 114
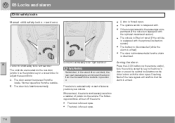
... safety lock - The door lock functions normally. When armed, the alarm continuously monitors a number of the turn signals will set off the alarm: • The hood is forced open the doors from the inside . left rear door The controls are located on the vehicle. The alarm is armed. 05 Locks and...
... safety lock - The door lock functions normally. When armed, the alarm continuously monitors a number of the turn signals will set off the alarm: • The hood is forced open the doors from the inside . left rear door The controls are located on the vehicle. The alarm is armed. 05 Locks and...

Owner's Manual
Page 189
.... 3. WARNING Check that the hood locks properly when closed! coolant Power steering fluid reservoir Washer fluid reservoir Dipstick - engine oil ... dash to 6 minutes) after the engine has been switched off. Engine compartment Expansion tank - Press up to release the hood lock. 2. Opening the hood 1. engine Clutch/brake fluid reservoir Relay/fuse box Air cleaner Battery (in trunk) 09 9 12 G027253 Data plate 6 ...may start or continue to operate (for up the release control located under the left side of the hood (at the center) and lift. 09 Maintenance and servicing...
.... 3. WARNING Check that the hood locks properly when closed! coolant Power steering fluid reservoir Washer fluid reservoir Dipstick - engine oil ... dash to 6 minutes) after the engine has been switched off. Engine compartment Expansion tank - Press up to release the hood lock. 2. Opening the hood 1. engine Clutch/brake fluid reservoir Relay/fuse box Air cleaner Battery (in trunk) 09 9 12 G027253 Data plate 6 ...may start or continue to operate (for up the release control located under the left side of the hood (at the center) and lift. 09 Maintenance and servicing...

Owner's Manual
Page 235
... consult your vehicle with the retailer and when ordering parts. 5. For further information regarding these regulations, please consult your Volvo retailer. 11 3. tification label on the right hand door pillar. Vehicle Emission Control Information/ Vacuum hose routing Your...correspondence concerning your Volvo retailer. 2. The VIN is also stamped on the underside of the dashboard. The Vehicle Identification Number (VIN) should always be quoted in all applicable safety standards, as evidenced by the certification label on the top left surface of the hood. Model plate...
... consult your vehicle with the retailer and when ordering parts. 5. For further information regarding these regulations, please consult your Volvo retailer. 11 3. tification label on the right hand door pillar. Vehicle Emission Control Information/ Vacuum hose routing Your...correspondence concerning your Volvo retailer. 2. The VIN is also stamped on the underside of the dashboard. The Vehicle Identification Number (VIN) should always be quoted in all applicable safety standards, as evidenced by the certification label on the top left surface of the hood. Model plate...

Owner's Manual
Page 249
......120 Fuel filler cap...122 Grocery bag holder...103 Gross vehicle weight (GVW)...163 H Handling...128 Head restraints, rear seat...103 Hoisting the car...187 Hood - opening...189 12 E Economical driving...127 Electrical system...244 Emission inspection...186 Engine specifications...242 starting...124 Engine compartment...189 Engine oil...190 Fuel filler...
......120 Fuel filler cap...122 Grocery bag holder...103 Gross vehicle weight (GVW)...163 H Handling...128 Head restraints, rear seat...103 Hoisting the car...187 Hood - opening...189 12 E Economical driving...127 Electrical system...244 Emission inspection...186 Engine specifications...242 starting...124 Engine compartment...189 Engine oil...190 Fuel filler...


