
Owner's Manual
Page 16
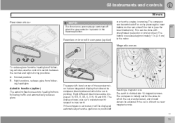
... • If you are taking any medication, consult your windshield and headlights clean. • Replace wiper blades when they start to stopping distance. Please check with regard to leave streaks. • Take into Volvo vehicles long before it may order a recall and remedy campaign. If you... drive doesn't depend on how old you cope with your driving abilities. We will not compromise our commitment to 1927 when the first Volvo rolled off the production line. You can also obtain other information about improving automobile safety. You can help you are suggestions to :...
... • If you are taking any medication, consult your windshield and headlights clean. • Replace wiper blades when they start to stopping distance. Please check with regard to leave streaks. • Take into Volvo vehicles long before it may order a recall and remedy campaign. If you... drive doesn't depend on how old you cope with your driving abilities. We will not compromise our commitment to 1927 when the first Volvo rolled off the production line. You can also obtain other information about improving automobile safety. You can help you are suggestions to :...

Owner's Manual
Page 49
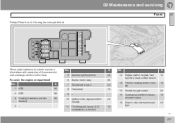
..., power windows Controls, door mirrors 52 02 88 60 59 97 97 76 18 73 112 73 73 76 15 16 17 1 2 Front fog lights Headlights/Parking lights/ switch for unlocking fuel filler door Rear fog light Turn signals/High/low beams Cruise control Horn Instrument panel Audio controls in steering...
..., power windows Controls, door mirrors 52 02 88 60 59 97 97 76 18 73 112 73 73 76 15 16 17 1 2 Front fog lights Headlights/Parking lights/ switch for unlocking fuel filler door Rear fog light Turn signals/High/low beams Cruise control Horn Instrument panel Audio controls in steering...

Owner's Manual
Page 57
...wheel when the vehicle is turning. The ignition key must be in position 1 (or higher) for the auxiliary socket to movements of ABL headlights adjust laterally to help light up a curve according to function. The indicator light in certain accessories such as cellular telephones, etc. 02 Instruments...button is on this function. 02 Temporarily disconnecting the alarm sensors (option) See page 116 for cigarette lighters, which are available at your Volvo retailer. 57 Front/rear park assist (option/ accessory) See page 150 for more information on when the function is started and can be...
...wheel when the vehicle is turning. The ignition key must be in position 1 (or higher) for the auxiliary socket to movements of ABL headlights adjust laterally to help light up a curve according to function. The indicator light in certain accessories such as cellular telephones, etc. 02 Instruments...button is on this function. 02 Temporarily disconnecting the alarm sensors (option) See page 116 for cigarette lighters, which are available at your Volvo retailer. 57 Front/rear park assist (option/ accessory) See page 150 for more information on when the function is started and can be...
Owner's Manual
Page 59
...turned on . The license plate lights also illuminate when the parking lights are switched on even when the ignition is activated, the headlight beams adjust laterally to help light up a curve according to position . In darkness, the daytime running lights will come on . Active Bi... filler door unlock button See page 62 for information on switching between high and low beams. Active Bi-Xenon headlight beams NOTE Active Bi-Xenon headlights (option): Turn the headlight switch to position 0 to position II. This function is activated automatically when the engine is in the illustration ...
...turned on . The license plate lights also illuminate when the parking lights are switched on even when the ignition is activated, the headlight beams adjust laterally to help light up a curve according to position . In darkness, the daytime running lights will come on . Active Bi... filler door unlock button See page 62 for information on switching between high and low beams. Active Bi-Xenon headlight beams NOTE Active Bi-Xenon headlights (option): Turn the headlight switch to position 0 to position II. This function is activated automatically when the engine is in the illustration ...
Owner's Manual
Page 60
An indicator light in combination with the high/low beam headlights or the optional front fog lights. Please note that the fuel filler door will remain unlocked until the vehicle begins to unlock the fuel filler ... the rear fog light is considerably brighter than 500 ft. (150 meters). Rear fog light The single rear fog light is located in either the headlights or the parking lights. • Turn the ignition key to position II. • Press button 2 to turn on . • Move the thumb wheel (4) up to...
An indicator light in combination with the high/low beam headlights or the optional front fog lights. Please note that the fuel filler door will remain unlocked until the vehicle begins to unlock the fuel filler ... the rear fog light is considerably brighter than 500 ft. (150 meters). Rear fog light The single rear fog light is located in either the headlights or the parking lights. • Turn the ignition key to position II. • Press button 2 to turn on . • Move the thumb wheel (4) up to...

Owner's Manual
Page 62
... front of the home safe lighting function to position II. 2. The turn signals will remain on models equipped with the optional Active Bi-Xenon headlights). With the light switch (1) in position, (see page 59) pull the turn signal bulb. Pull the direction indicator lever as far as... make use of the vehicle. 1. Exit the vehicle and lock the doors. 62 Remove the key from the ignition switch. 2. High/low beam headlights Continuous high beams 1. Turn the ignition key to position 4) and release it . G027178 If the turn signal indicator flashes faster than normal, check ...
... front of the home safe lighting function to position II. 2. The turn signals will remain on models equipped with the optional Active Bi-Xenon headlights). With the light switch (1) in position, (see page 59) pull the turn signal bulb. Pull the direction indicator lever as far as... make use of the vehicle. 1. Exit the vehicle and lock the doors. 62 Remove the key from the ignition switch. 2. High/low beam headlights Continuous high beams 1. Turn the ignition key to position 4) and release it . G027178 If the turn signal indicator flashes faster than normal, check ...

Owner's Manual
Page 63
02 Instruments and controls Left-side steering wheel lever > The headlights and parking lights will illuminate and remain on for 301, 60 or 90 seconds. The time interval can be changed by a trained and qualified Volvo service technician. 02 1 Factory setting 63
02 Instruments and controls Left-side steering wheel lever > The headlights and parking lights will illuminate and remain on for 301, 60 or 90 seconds. The time interval can be changed by a trained and qualified Volvo service technician. 02 1 Factory setting 63
Owner's Manual
Page 64
...move it upwards, the wipers will sweep one stroke at least position I and put the windshield wiper lever in the washer fluid reservoir, the headlights will not be removed from the windshield. Turn the ignition key to at a time for as long as you can be adjusted by twisting...-side steering wheel lever Windshield wipers 02 Intermittent wiper function With the lever in driving conditions where the windshield washers are used frequently, the headlights will only be washed once for every five times the windshield is washed within a 10 minute period. The sensitivity of water on the ...
...move it upwards, the wipers will sweep one stroke at least position I and put the windshield wiper lever in the washer fluid reservoir, the headlights will not be removed from the windshield. Turn the ignition key to at a time for as long as you can be adjusted by twisting...-side steering wheel lever Windshield wipers 02 Intermittent wiper function With the lever in driving conditions where the windshield washers are used frequently, the headlights will only be washed once for every five times the windshield is washed within a 10 minute period. The sensitivity of water on the ...
Owner's Manual
Page 75
Normal position B. Night position, reduces glare from following headlights G026965 G026660 Autodim function (option) The autodim function reacts to headlights from the headlights of the mirror (see the inset illustration). The upper left-hand corner of the rearview mirror has an integrated display that shows the compass direction ...
Normal position B. Night position, reduces glare from following headlights G026965 G026660 Autodim function (option) The autodim function reacts to headlights from the headlights of the mirror (see the inset illustration). The upper left-hand corner of the rearview mirror has an integrated display that shows the compass direction ...

Owner's Manual
Page 150
... when the system has been deactivated. The system must be deactivated when towing a trailer, carrying bicycles in the button will be close to combine auxiliary headlights and front park assist since these lights could trigger the system's sensors. NOTE Rear park assist is deactivated automatically when towing a trailer if...
... when the system has been deactivated. The system must be deactivated when towing a trailer, carrying bicycles in the button will be close to combine auxiliary headlights and front park assist since these lights could trigger the system's sensors. NOTE Rear park assist is deactivated automatically when towing a trailer if...

Owner's Manual
Page 176
...washing with a clean chamois and remember to clean the drain holes in the wintertime to prevent corrosion, when salt has been used on the headlights can be used to facilitate the softening of dirt and oil. • A water-soluble grease solvent may be permanently damaged. During high ... of the engine. However, use wax on the exterior of your Volvo retailer, for using these products should not be used in cases of high industrial fallout, more frequent washing is about 2.5 fl. Clean the headlights regularly, for water and blown dry if necessary. Always close the ...
...washing with a clean chamois and remember to clean the drain holes in the wintertime to prevent corrosion, when salt has been used on the headlights can be used to facilitate the softening of dirt and oil. • A water-soluble grease solvent may be permanently damaged. During high ... of the engine. However, use wax on the exterior of your Volvo retailer, for using these products should not be used in cases of high industrial fallout, more frequent washing is about 2.5 fl. Clean the headlights regularly, for water and blown dry if necessary. Always close the ...

Owner's Manual
Page 177
...Polishing and waxing Automatic washing - Some automatic washers do NOT recommend washing your vehicle's clear coat. For more difficult spots caused by Volvo for polishing a dull surface. Difficult spots may cause the clear coat to prevent pitting, fading, oxidation, etc. This is worth ... • Do not polish or wax your vehicle's paint warranty. Otherwise there is risk of the vehicle should be as thorough as headlights, fog lights, or tail lights. waxes are easy to use liquid or paste wax. • Several commercially available products contain both ...
...Polishing and waxing Automatic washing - Some automatic washers do NOT recommend washing your vehicle's clear coat. For more difficult spots caused by Volvo for polishing a dull surface. Difficult spots may cause the clear coat to prevent pitting, fading, oxidation, etc. This is worth ... • Do not polish or wax your vehicle's paint warranty. Otherwise there is risk of the vehicle should be as thorough as headlights, fog lights, or tail lights. waxes are easy to use liquid or paste wax. • Several commercially available products contain both ...

Owner's Manual
Page 185
...com. Each time the vehicle is refueled: • Check the engine oil level • Clean the windshield, windshield wipers, headlights, and tail lights NOTE Complete service information for qualified technicians is available online for purchase or subscription at the base of its... useful service life. Consult a trained and qualified Volvo service technician for corrosion. 09 Maintenance and servicing Maintaining your vehicle's Warranty and Service Records Information booklet. Monthly: • ...
...com. Each time the vehicle is refueled: • Check the engine oil level • Clean the windshield, windshield wipers, headlights, and tail lights NOTE Complete service information for qualified technicians is available online for purchase or subscription at the base of its... useful service life. Consult a trained and qualified Volvo service technician for corrosion. 09 Maintenance and servicing Maintaining your vehicle's Warranty and Service Records Information booklet. Monthly: • ...

Owner's Manual
Page 198
...be running just prior to the high voltage used by these headlights, these bulbs should always be disposed of by an authorized Volvo service technician: Location of the bulbs in the headlight housing Active Bi-Xenon headlights, Courtesy (dome) lighting, Reading lights, Glove compartment lights Turn...your fingers vaporize in this section, please contact your fingers. These bulbs should only be replaced by an authorized Volvo retailer. The following points in the headlight housing, if the engine has been running when changing bulbs. When changing in mind: Replacing bulbs at the ...
...be running just prior to the high voltage used by these headlights, these bulbs should always be disposed of by an authorized Volvo service technician: Location of the bulbs in the headlight housing Active Bi-Xenon headlights, Courtesy (dome) lighting, Reading lights, Glove compartment lights Turn...your fingers vaporize in this section, please contact your fingers. These bulbs should only be replaced by an authorized Volvo retailer. The following points in the headlight housing, if the engine has been running when changing bulbs. When changing in mind: Replacing bulbs at the ...

Owner's Manual
Page 199
Loosen the retaining spring by a trained and qualified Volvo service technician. High beam headlight Low beam headlight G028436 G028435 Installing the new bulb: Insert the new bulb, without touching the glass, with the guide lug upward....If you encounter difficulty when changing a bulb, please contact a trained and qualified Volvo service technician. 09 Maintenance and servicing Replacing bulbs Low beam headlight/parking light (halogen headlights) High beam headlight, parking light (Active Bi-Xenon headlights) Certain models may have a plastic tube that may hinder access to position 0....
Loosen the retaining spring by a trained and qualified Volvo service technician. High beam headlight Low beam headlight G028436 G028435 Installing the new bulb: Insert the new bulb, without touching the glass, with the guide lug upward....If you encounter difficulty when changing a bulb, please contact a trained and qualified Volvo service technician. 09 Maintenance and servicing Replacing bulbs Low beam headlight/parking light (halogen headlights) High beam headlight, parking light (Active Bi-Xenon headlights) Certain models may have a plastic tube that may hinder access to position 0....

Owner's Manual
Page 200
...the holder. Press the cover back into the holder 2. Installing the new bulb: 1. Press a new bulb into place. (Halogen headlights) (Active Bi-Xenon headlights) Removing the defective bulb: 1. Turn the bulb counterclockwise and pull it clicks into place. 3. Connect the wiring connector to access... bulb out of the holder. Pull out the parking light holder. 3. Switch off the headlights and turn it until it out. 4. 09 Maintenance and servicing 09 Replacing bulbs (Halogen headlights) Parking light Parking light Removing the defective bulb: 1. Reinsert the bulb and holder into ...
...the holder. Press the cover back into the holder 2. Installing the new bulb: 1. Press a new bulb into place. (Halogen headlights) (Active Bi-Xenon headlights) Removing the defective bulb: 1. Turn the bulb counterclockwise and pull it clicks into place. 3. Connect the wiring connector to access... bulb out of the holder. Pull out the parking light holder. 3. Switch off the headlights and turn it until it out. 4. 09 Maintenance and servicing 09 Replacing bulbs (Halogen headlights) Parking light Parking light Removing the defective bulb: 1. Reinsert the bulb and holder into ...

Owner's Manual
Page 201
... Pull out the bulb holder by twisting it seats properly. Remove radiator pipe (1) from filler pipe. Reinsert the bulb holder in the headlight housing and twist it clockwise until it counterclockwise. 3. Replace the bulb (same procedure as the driver's side bulb). 2. Reinstall the ...radiator pipe to position 0. 2. Pull the filler pipe (3) straight up. 5. Switch off the headlights and turn the ignition switch to the box (1). 09 Side marker light G028438 Removing the defective bulb: 1. Remove filler pipe screw (2). 4. Side ...
... Pull out the bulb holder by twisting it seats properly. Remove radiator pipe (1) from filler pipe. Reinsert the bulb holder in the headlight housing and twist it clockwise until it counterclockwise. 3. Replace the bulb (same procedure as the driver's side bulb). 2. Reinstall the ...radiator pipe to position 0. 2. Pull the filler pipe (3) straight up. 5. Switch off the headlights and turn the ignition switch to the box (1). 09 Side marker light G028438 Removing the defective bulb: 1. Remove filler pipe screw (2). 4. Side ...

Owner's Manual
Page 202
Reinsert the lamp holder and turn it clockwise until it clockwise. "TOP" must be inserted in one position). 202 G027227 Switch off the headlights and turn it seats properly. 2. Reinsert the bulb holder and turn the ignition switch to position 0. 2. Front fog lights (option) Front fog light Removing the defective bulb: 1. Turn the bulb holder slightly counterclockwise. 3. Installing the new bulb: 1. Pull out and remove the bulb. Insert the new bulb (it can only be upward. 09 Maintenance and servicing 09 Replacing bulbs 3.
Reinsert the lamp holder and turn it clockwise until it clockwise. "TOP" must be inserted in one position). 202 G027227 Switch off the headlights and turn it seats properly. 2. Reinsert the bulb holder and turn the ignition switch to position 0. 2. Front fog lights (option) Front fog light Removing the defective bulb: 1. Turn the bulb holder slightly counterclockwise. 3. Installing the new bulb: 1. Pull out and remove the bulb. Insert the new bulb (it can only be upward. 09 Maintenance and servicing 09 Replacing bulbs 3.
Owner's Manual
Page 207
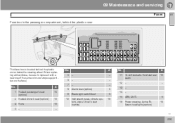
... 15 Engine control module, fuel injectors, mass airflow sensor Throttle housing control module Heated oxygen sensor Crankcase ventilation heater, solenoid valves Driver's side low beam headlight 15 10 20 10 20 Fuses in the engine compartment 09 When replacing fuses, be sure to replace a blown fuse with a new one of the... same color and amperage (written on the fuse). 09 Maintenance and servicing Fuses Relay/Fuse box in the engine compartment No. 1 2 3 4 ABS ABS Headlight washers (certain models) - A 30 30 35 7 8 9 10 11 20 16 10 G026972 A 207
... 15 Engine control module, fuel injectors, mass airflow sensor Throttle housing control module Heated oxygen sensor Crankcase ventilation heater, solenoid valves Driver's side low beam headlight 15 10 20 10 20 Fuses in the engine compartment 09 When replacing fuses, be sure to replace a blown fuse with a new one of the... same color and amperage (written on the fuse). 09 Maintenance and servicing Fuses Relay/Fuse box in the engine compartment No. 1 2 3 4 ABS ABS Headlight washers (certain models) - A 30 30 35 7 8 9 10 11 20 16 10 G026972 A 207
Owner's Manual
Page 209
front and rear seats ABS, DSTC Power steering, Active BiXenon headlights (option) A 15 - No. 1 2 3 4 Heated passenger's seat (option) Heated driver's seat (option) Horn - A 8 15 9 15 15 - 10 5 10 G028412 209 09 Maintenance and servicing Fuses Fuse ...
front and rear seats ABS, DSTC Power steering, Active BiXenon headlights (option) A 15 - No. 1 2 3 4 Heated passenger's seat (option) Heated driver's seat (option) Horn - A 8 15 9 15 15 - 10 5 10 G028412 209 09 Maintenance and servicing Fuses Fuse ...
