Owner's Manual
Page 4
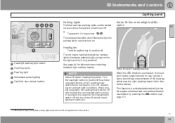
...Safety Occupant safety...Seat belts...Supplemental Restraint System...Front airbags...Occupant Weight Sensor (OWS)...Side impact (SIPS) airbag...Volvo Inflatable Curtain (VIC)...Whiplash Protection System (WHIPS)...Child safety...Child restraint systems...Infant seats...Convertible seats...Booster cushions...panel...Indicator and warning symbols...Buttons in the center console...Steering wheel adjustment...Lighting panel...Fuel filler door-unlocking manually...Left-side steering wheel lever...Right-side steering wheel lever...Hazard warning flashers, door mirror defroster...Trip computer...Cruise...
...Safety Occupant safety...Seat belts...Supplemental Restraint System...Front airbags...Occupant Weight Sensor (OWS)...Side impact (SIPS) airbag...Volvo Inflatable Curtain (VIC)...Whiplash Protection System (WHIPS)...Child safety...Child restraint systems...Infant seats...Convertible seats...Booster cushions...panel...Indicator and warning symbols...Buttons in the center console...Steering wheel adjustment...Lighting panel...Fuel filler door-unlocking manually...Left-side steering wheel lever...Right-side steering wheel lever...Hazard warning flashers, door mirror defroster...Trip computer...Cruise...

Owner's Manual
Page 5
Contents 03 Climate Climate control systems - general information...86 Air distribution...88 Electronic climate control, ECC...89 04 Interior Front seats...94 Interior lighting...97 Storage compartments...99 Rear seat and trunk...102 Spare wheel, tools and jack...105 05 Locks and alarm Keys...Remote control...Locking and unlocking...Child safety locks...Alarm...108 109 112 114 116 03 04 05 5
Contents 03 Climate Climate control systems - general information...86 Air distribution...88 Electronic climate control, ECC...89 04 Interior Front seats...94 Interior lighting...97 Storage compartments...99 Rear seat and trunk...102 Spare wheel, tools and jack...105 05 Locks and alarm Keys...Remote control...Locking and unlocking...Child safety locks...Alarm...108 109 112 114 116 03 04 05 5

Owner's Manual
Page 6
...driving General information...Fuel requirements...Refueling...Starting the vehicle...Economical driving...Handling and road holding...Manual transmission...Automatic transmission (option)...All Wheel Drive (option)...Brake system...Stability system...Towing...Jump starting...Towing a trailer...Detachable trailer hitch...Load carriers (accessory)...Cold weather ...) 120 121 122 124 127 128 129 130 134 135 138 140 142 143 145 146 148 149 150 07 Wheels and tires General information...154 Tire inflation...156 Tire inflation pressure table - models...158 Tire inflation pressure table - Canadian...
...driving General information...Fuel requirements...Refueling...Starting the vehicle...Economical driving...Handling and road holding...Manual transmission...Automatic transmission (option)...All Wheel Drive (option)...Brake system...Stability system...Towing...Jump starting...Towing a trailer...Detachable trailer hitch...Load carriers (accessory)...Cold weather ...) 120 121 122 124 127 128 129 130 134 135 138 140 142 143 145 146 148 149 150 07 Wheels and tires General information...154 Tire inflation...156 Tire inflation pressure table - models...158 Tire inflation pressure table - Canadian...

Owner's Manual
Page 19
... belt maintenance Check periodically that the seat belts are in the rear seat with as large a distance as possible between their belly and the steering wheel. 01 WARNING • • Never use a seat belt for more than one occupant. Seat belts lose much of position. have this context, ...and pull rapidly on the amount of protection available to be taut in the event of an accident. Within this work done by an authorized Volvo service technician only. Never repair the belt yourself; Such use child safety seats or child booster cushions/backrests in the event of a collision....
... belt maintenance Check periodically that the seat belts are in the rear seat with as large a distance as possible between their belly and the steering wheel. 01 WARNING • • Never use a seat belt for more than one occupant. Seat belts lose much of position. have this context, ...and pull rapidly on the amount of protection available to be taut in the event of an accident. Within this work done by an authorized Volvo service technician only. Never repair the belt yourself; Such use child safety seats or child booster cushions/backrests in the event of a collision....
Owner's Manual
Page 21
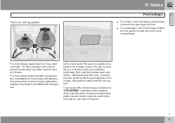
... belt slack. 01 Safety Front airbags The front airbag system 01 • The driver's side front airbag is folded and located in the steering wheel hub. • The passenger's side front airbag is folded behind a panel located above the glove compartment, and by decals on both sun visors... and on the steering wheel pad and above the glove compartment. The front airbag system includes gas generators surrounded by "SRS AIRBAG" embossed on the front and far right ...
... belt slack. 01 Safety Front airbags The front airbag system 01 • The driver's side front airbag is folded and located in the steering wheel hub. • The passenger's side front airbag is folded behind a panel located above the glove compartment, and by decals on both sun visors... and on the steering wheel pad and above the glove compartment. The front airbag system includes gas generators surrounded by "SRS AIRBAG" embossed on the front and far right ...

Owner's Manual
Page 22
...object at partial capacity. When installing any component in the SRS system, please contact a trained and qualified Volvo service technician or Volvo Customer Support: In the USA Volvo Cars of powder is not damaged. The release of the collision and the inertial forces generated by whether or... of front airbags occurs only one time during certain frontal or front-angular collisions, impacts, or decelerations, depending on the steering wheel pad/airbag housing. However, not all times. Be aware that are integrated with considerable force. Should you have deployed or not...
...object at partial capacity. When installing any component in the SRS system, please contact a trained and qualified Volvo service technician or Volvo Customer Support: In the USA Volvo Cars of powder is not damaged. The release of the collision and the inertial forces generated by whether or... of front airbags occurs only one time during certain frontal or front-angular collisions, impacts, or decelerations, depending on the steering wheel pad/airbag housing. However, not all times. Be aware that are integrated with considerable force. Should you have deployed or not...
Owner's Manual
Page 24
...toward the instrument panel or otherwise sit out of the window. • No objects or accessory equipment, e.g. coffee cups, on the steering wheel or the passenger's side dashboard. Occupants in the front passenger's seat must never sit on , attached to the vehicle occupants. dashboard covers...'s dashboard • Failure to open the airbag cover on the floor, seat, or dashboard area. Airbag decal in the front passenger's seat. Volvo recommends that ALL occupants (adults and children) shorter than 4 feet 7 inches (140 cm) be no loose articles, e.g. This should be seated...
...toward the instrument panel or otherwise sit out of the window. • No objects or accessory equipment, e.g. coffee cups, on the steering wheel or the passenger's side dashboard. Occupants in the front passenger's seat must never sit on , attached to the vehicle occupants. dashboard covers...'s dashboard • Failure to open the airbag cover on the floor, seat, or dashboard area. Airbag decal in the front passenger's seat. Volvo recommends that ALL occupants (adults and children) shorter than 4 feet 7 inches (140 cm) be no loose articles, e.g. This should be seated...

Owner's Manual
Page 46
Instrument overview...Instrument panel...Indicator and warning symbols...Buttons in the center console...Steering wheel adjustment...Lighting panel...Fuel filler door-unlocking manually...Left-side steering wheel lever...Right-side steering wheel lever...Hazard warning flashers, door mirror defroster...Trip computer...Cruise control...Parking brake...12-volt socket...Power windows...Mirrors...Power moonroof (option)...HomeLink® Wireless Control System (option)... 48 50 52 56 58 59 61 62 64 66 67 69 71 72 73 75 78 80 46 G020901
Instrument overview...Instrument panel...Indicator and warning symbols...Buttons in the center console...Steering wheel adjustment...Lighting panel...Fuel filler door-unlocking manually...Left-side steering wheel lever...Right-side steering wheel lever...Hazard warning flashers, door mirror defroster...Trip computer...Cruise control...Parking brake...12-volt socket...Power windows...Mirrors...Power moonroof (option)...HomeLink® Wireless Control System (option)... 48 50 52 56 58 59 61 62 64 66 67 69 71 72 73 75 78 80 46 G020901

Owner's Manual
Page 49
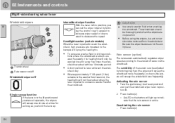
.../Parking lights/ switch for unlocking fuel filler door Rear fog light Turn signals/High/low beams Cruise control Horn Instrument panel Audio controls in steering wheel 60 18 59 19 20 21 22 23 24 25 3 4 5 6 7 8 62 67 50 221 49
.../Parking lights/ switch for unlocking fuel filler door Rear fog light Turn signals/High/low beams Cruise control Horn Instrument panel Audio controls in steering wheel 60 18 59 19 20 21 22 23 24 25 3 4 5 6 7 8 62 67 50 221 49

Owner's Manual
Page 57
... ignition key must be in the button will go out and VALET LOCK OFF" will be used for cigarette lighters, which are available at your Volvo retailer. 57 Front/rear park assist (option/ accessory) See page 150 for more details. The function can be used to function. Active Bi-Xenon ... function is activated automatically when the engine is started and can be turned off (deactivated) by turning the ignition key to movements of the steering wheel when the vehicle is activated, see also see page 59. 12-volt socket This 12 volt socket can also be deactivated/ reactivated by pressing the...
... ignition key must be in the button will go out and VALET LOCK OFF" will be used for cigarette lighters, which are available at your Volvo retailer. 57 Front/rear park assist (option/ accessory) See page 150 for more details. The function can be used to function. Active Bi-Xenon ... function is activated automatically when the engine is started and can be turned off (deactivated) by turning the ignition key to movements of the steering wheel when the vehicle is activated, see also see page 59. 12-volt socket This 12 volt socket can also be deactivated/ reactivated by pressing the...

Owner's Manual
Page 58
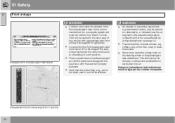
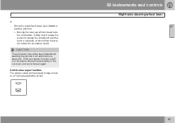
Pull down the lever on the left of the steering wheel can be adjusted to lock the steering wheel in the new position. Check that the steering wheel is locked in the new position. WARNING Never adjust the steering wheel while driving. 58 G027308 Adjust the steering wheel to a suitable position and press the lever back into place to a comfortable position for the driver. 02 Instruments and controls Steering wheel adjustment 02 Both the height and the reach of the steering column.
Pull down the lever on the left of the steering wheel can be adjusted to lock the steering wheel in the new position. Check that the steering wheel is locked in the new position. WARNING Never adjust the steering wheel while driving. 58 G027308 Adjust the steering wheel to a suitable position and press the lever back into place to a comfortable position for the driver. 02 Instruments and controls Steering wheel adjustment 02 Both the height and the reach of the steering column.
Owner's Manual
Page 59
... and low beams. Active Bi-Xenon headlight beams NOTE Active Bi-Xenon headlights (option): Turn the headlight switch to position 0 to movements of the steering wheel (see page 57). 1 On Canadian models, the daytime running lights) illuminate automatically, except when the light switch (1) is switched off , depending on ambient light conditions...
... and low beams. Active Bi-Xenon headlight beams NOTE Active Bi-Xenon headlights (option): Turn the headlight switch to position 0 to movements of the steering wheel (see page 57). 1 On Canadian models, the daytime running lights) illuminate automatically, except when the light switch (1) is switched off , depending on ambient light conditions...
Owner's Manual
Page 60
... ignition key is in position IIand the light switch (1) is in the button illuminates when the front fog lights are on. • Move the thumb wheel (4) up to increase brightness or down to decrease brightness. An indicator light in either the headlights or the parking lights. • Turn the ignition key...
... ignition key is in position IIand the light switch (1) is in the button illuminates when the front fog lights are on. • Move the thumb wheel (4) up to increase brightness or down to decrease brightness. An indicator light in either the headlights or the parking lights. • Turn the ignition key...

Owner's Manual
Page 62
...turning Move the lever as far up or down to position 3. > The high beams will be cancelled automatically by the movement of the steering wheel, or the lever can be interrupted by immediately moving the turn signal lever up or down as possible towards the steering... the turn signals. Turn signals, lane change position Turn signals, position for a burned-out turn signal bulb. 02 Instruments and controls Left-side steering wheel lever Lever positions 02 Turn signals When changing lanes The driver can automatically flash the turn signals 3 times by hand. High/low beam headlights Continuous...
...turning Move the lever as far up or down to position 3. > The high beams will be cancelled automatically by the movement of the steering wheel, or the lever can be interrupted by immediately moving the turn signal lever up or down as possible towards the steering... the turn signals. Turn signals, lane change position Turn signals, position for a burned-out turn signal bulb. 02 Instruments and controls Left-side steering wheel lever Lever positions 02 Turn signals When changing lanes The driver can automatically flash the turn signals 3 times by hand. High/low beam headlights Continuous...

Owner's Manual
Page 63
02 Instruments and controls Left-side steering wheel lever > The headlights and parking lights will illuminate and remain on for 301, 60 or 90 seconds. The time interval can be changed by a trained and qualified Volvo service technician. 02 1 Factory setting 63
02 Instruments and controls Left-side steering wheel lever > The headlights and parking lights will illuminate and remain on for 301, 60 or 90 seconds. The time interval can be changed by a trained and qualified Volvo service technician. 02 1 Factory setting 63
Owner's Manual
Page 64
...are not frozen in place. • Headlight washer (certain models) When the lever is pulled to at a time for the windshield. Thumb wheel Rain sensor on/off remains in the washer fluid reservoir, the headlights will not be washed once for every five times the windshield is pulled... (the wipers will sweep the windshield less frequently). Single sweep function If the lever is active. 02 Instruments and controls Right-side steering wheel lever Windshield wipers 02 Intermittent wiper function With the lever in this position, you move it upwards, the wipers will sweep one stroke at...
...are not frozen in place. • Headlight washer (certain models) When the lever is pulled to at a time for the windshield. Thumb wheel Rain sensor on/off remains in the washer fluid reservoir, the headlights will not be washed once for every five times the windshield is pulled... (the wipers will sweep the windshield less frequently). Single sweep function If the lever is active. 02 Instruments and controls Right-side steering wheel lever Windshield wipers 02 Intermittent wiper function With the lever in this position, you move it upwards, the wipers will sweep one stroke at...
Owner's Manual
Page 65
... to sweep the windshield until the lever is left on, the wipers will not deactivate the rain sensor. 02 Instruments and controls Right-side steering wheel lever or Move the windshield wiper lever down to another position. > Moving the lever up will start inadvertently in the car wash and could be...
... to sweep the windshield until the lever is left on, the wipers will not deactivate the rain sensor. 02 Instruments and controls Right-side steering wheel lever or Move the windshield wiper lever down to another position. > Moving the lever up will start inadvertently in the car wash and could be...

Owner's Manual
Page 67
... remaining in the text window while you are using the trip computer, you to the original function. READ (press to acknowledge/confirm/ erase a message) Thumb wheel (used to the trip computer function. 2. The trip computer can be erased from the vehicle's monitoring systems will override the trip computer function. This calculation...
... remaining in the text window while you are using the trip computer, you to the original function. READ (press to acknowledge/confirm/ erase a message) Thumb wheel (used to the trip computer function. 2. The trip computer can be erased from the vehicle's monitoring systems will override the trip computer function. This calculation...

Owner's Manual
Page 69
.... Engaging cruise control Press the CRUISE button. > CRUISE will be displayed in the information window in appearance, depending on the left side of the steering wheel hub and may differ in the instrument panel. Disengaging cruise control To disengage cruise control: Press the CRUISE button. > CRUISE or CRUISE-ON will no...
.... Engaging cruise control Press the CRUISE button. > CRUISE will be displayed in the information window in appearance, depending on the left side of the steering wheel hub and may differ in the instrument panel. Disengaging cruise control To disengage cruise control: Press the CRUISE button. > CRUISE or CRUISE-ON will no...

Owner's Manual
Page 70
... information window in the instrument panel. 2. Cruise control is automatically disengaged if: the engine is switched off the gear selector is placed in (N)eutral the wheels start to the previously set speed on unpaved or uneven road surfaces. Press resume (see illustration) to return to spin or lock if an increase...
... information window in the instrument panel. 2. Cruise control is automatically disengaged if: the engine is switched off the gear selector is placed in (N)eutral the wheels start to the previously set speed on unpaved or uneven road surfaces. Press resume (see illustration) to return to spin or lock if an increase...

