Owner's Manual
Page 3
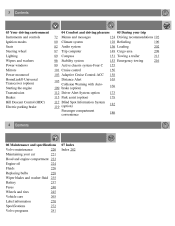
... Loading 202 Cargo area 208 Towing a trailer 213 Emergency towing 216 4 Contents 06 Maintenance and specifications Volvo maintenance 220 Maintaining your car 221 Hood and engine compartment 223 Engine oil 224 Fluids 226 Replacing bulbs 228 Wiper blades and washer fluid 235 Battery 237 Fuses 240 Wheels and tires 245 Vehicle care...
... Loading 202 Cargo area 208 Towing a trailer 213 Emergency towing 216 4 Contents 06 Maintenance and specifications Volvo maintenance 220 Maintaining your car 221 Hood and engine compartment 223 Engine oil 224 Fluids 226 Replacing bulbs 228 Wiper blades and washer fluid 235 Battery 237 Fuses 240 Wheels and tires 245 Vehicle care...

Owner's Manual
Page 83
NOTE This automatic flashing sequence can be returned to start the turn signals will be interrupted by hand. If the turn signal bulb. Off - On - Interior lighting, front Drivers side front reading light, on/off Passenger's side front reading light, on . 94 03 Your driving environment Lighting Interior ...
NOTE This automatic flashing sequence can be returned to start the turn signals will be interrupted by hand. If the turn signal bulb. Off - On - Interior lighting, front Drivers side front reading light, on/off Passenger's side front reading light, on . 94 03 Your driving environment Lighting Interior ...

Owner's Manual
Page 181
... electrical current Keep the following items should be able to avoid overheating the engine. Check for your vehicle checked by a trained and qualified Volvo service technician before any auxiliary lights from in front of current when the engine is not running , avoid using systems, accessories, etc., that...heavy loads, there is a risk that the engine and cooling system will occur if water is normal. Maintain a low speed when driving with bulbs, fuses, spark plugs and wiper blades for fuel, oil, and fluid leakage Have the transmission oil level checked. The optional 12 volt socket...
... electrical current Keep the following items should be able to avoid overheating the engine. Check for your vehicle checked by a trained and qualified Volvo service technician before any auxiliary lights from in front of current when the engine is not running , avoid using systems, accessories, etc., that...heavy loads, there is a risk that the engine and cooling system will occur if water is normal. Maintain a low speed when driving with bulbs, fuses, spark plugs and wiper blades for fuel, oil, and fluid leakage Have the transmission oil level checked. The optional 12 volt socket...
Owner's Manual
Page 203
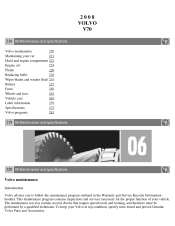
...inspections and services necessary for the proper function of your vehicle. 2008 VOLVO V70 218 06 Maintenance and specifications Volvo maintenance 220 Maintaining your car 221 Hood and engine compartment 223 Engine oil 224 Fluids 226 Replacing bulbs 228 Wiper blades and washer fluid 235 Battery 237 Fuses 240 ...Wheels and tires 245 Vehicle care 265 Label information 270 Specifications 272 Volvo programs 281 219 06 Maintenance and specifications 220 06 Maintenance ...
...inspections and services necessary for the proper function of your vehicle. 2008 VOLVO V70 218 06 Maintenance and specifications Volvo maintenance 220 Maintaining your car 221 Hood and engine compartment 223 Engine oil 224 Fluids 226 Replacing bulbs 228 Wiper blades and washer fluid 235 Battery 237 Fuses 240 ...Wheels and tires 245 Vehicle care 265 Label information 270 Specifications 272 Volvo programs 281 219 06 Maintenance and specifications 220 06 Maintenance ...
Owner's Manual
Page 211
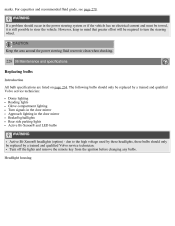
...off the lights and remove the remote key from the ignition before changing any bulbs. WARNING If a problem should only be replaced by a trained and qualified Volvo service technician. The following bulbs should occur in the power steering system or if the vehicle has no electrical... current and must be replaced by a trained and qualified Volvo service technician: Dome lighting Reading lights Glove compartment...
...off the lights and remove the remote key from the ignition before changing any bulbs. WARNING If a problem should only be replaced by a trained and qualified Volvo service technician. The following bulbs should occur in the power steering system or if the vehicle has no electrical... current and must be replaced by a trained and qualified Volvo service technician: Dome lighting Reading lights Glove compartment...
Owner's Manual
Page 212
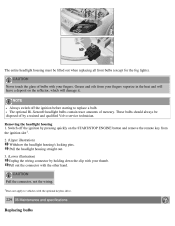
...keyless drive. 229 06 Maintenance and specifications Replacing bulbs NOTE Always switch off the ignition by pressing... off the ignition before starting to vehicles with your thumb. The optional Bi-Xenon® headlight bulbs contain trace amounts of by holding down the clip with the other hand. The entire headlight housing...Does not apply to replace a bulb. Grease and oils from the ignition slot 1 . 2. (Upper illustration) Withdraw the headlight housing's locking pins. These bulbs should always be lifted out when replacing all front bulbs (except for the fog lights). ...
...keyless drive. 229 06 Maintenance and specifications Replacing bulbs NOTE Always switch off the ignition by pressing... off the ignition before starting to vehicles with your thumb. The optional Bi-Xenon® headlight bulbs contain trace amounts of by holding down the clip with the other hand. The entire headlight housing...Does not apply to replace a bulb. Grease and oils from the ignition slot 1 . 2. (Upper illustration) Withdraw the headlight housing's locking pins. These bulbs should always be lifted out when replacing all front bulbs (except for the fog lights). ...

Owner's Manual
Page 213
...on the upper edge of the retaining spring downward and to avoid scratching the lens. 5. Plug in the connector until it to replace a bulb, see the instructions on or the remote key is inserted into place. 2. Removing the cover to access the headlights and parking lights NOTE Before... starting to the side. 2. Remove the headlight housing from the vehicle (see page 228. 1. Detach the bulb by pressing it clicks into the ignition slot. 3. Reinstall the headlight housing and locking pins. Low beam, halogen 1. Remove the cover over the...
...on the upper edge of the retaining spring downward and to avoid scratching the lens. 5. Plug in the connector until it to replace a bulb, see the instructions on or the remote key is inserted into place. 2. Removing the cover to access the headlights and parking lights NOTE Before... starting to the side. 2. Remove the headlight housing from the vehicle (see page 228. 1. Detach the bulb by pressing it clicks into the ignition slot. 3. Reinstall the headlight housing and locking pins. Low beam, halogen 1. Remove the cover over the...

Owner's Manual
Page 214
...housing from the vehicle (see the instructions on page 228). 2. Pull the defective bulb out of the headlight housing. 4. Remove the cover over the bulbs (see page 229). 3. Return the bulb holder into position and reinstall the headlight housing. 230 06 Maintenance and specifications Replacing... bulbs High beam, Halogen 1. 4. Extra high beam 1 1. Put the cover back into position in one position. 6. Pull the bulb holder out of the socket. 5. Replace the bulb and reinsert it snaps into position and reinstall ...
...housing from the vehicle (see the instructions on page 228). 2. Pull the defective bulb out of the headlight housing. 4. Remove the cover over the bulbs (see page 229). 3. Return the bulb holder into position and reinstall the headlight housing. 230 06 Maintenance and specifications Replacing... bulbs High beam, Halogen 1. 4. Extra high beam 1 1. Put the cover back into position in one position. 6. Pull the bulb holder out of the socket. 5. Replace the bulb and reinsert it snaps into position and reinstall ...

Owner's Manual
Page 215
...can only be inserted in one . Remove the headlight housing from the bulb. 5. Remove the burned out bulb and install a new one position. 6. It can only be secured in one way. 6. Remove the cover over the bulbs (see the instructions on page 228. 2. Put the cover back into...; headlights only. Return the bulb holder into place. 7. Pull the wire to withdraw the bulb holder. 5. Insert a new bulb in the connector until it snaps in the headlight housing. 7. To access the bulb, first remove the high beam bulb 4. Parking lights 1. Press the bulb holder into the socket and ...
...can only be inserted in one . Remove the headlight housing from the bulb. 5. Remove the burned out bulb and install a new one position. 6. It can only be secured in one way. 6. Remove the cover over the bulbs (see the instructions on page 228. 2. Put the cover back into...; headlights only. Return the bulb holder into place. 7. Pull the wire to withdraw the bulb holder. 5. Insert a new bulb in the connector until it snaps in the headlight housing. 7. To access the bulb, first remove the high beam bulb 4. Parking lights 1. Press the bulb holder into the socket and ...

Owner's Manual
Page 216
... can only be secured in slightly and turning out before pulling it clicks into position. Press a new bulb into place. 6. Reinstall the headlight housing. Remove the headlight housing from the vehicle (see the instructions on page 228). 2. Remove the round ... page 228. 1. Side marker lights NOTE Before starting to replace a bulb, see the instructions on page 228). 2. Pull out the burned out bulb and install a new one position. 5. 1. Press the bulb holder into position. 7. Remove the burned out bulb by pulling the tab until it clicks into the socket. 5. Press ...
... can only be secured in slightly and turning out before pulling it clicks into position. Press a new bulb into place. 6. Reinstall the headlight housing. Remove the headlight housing from the vehicle (see the instructions on page 228). 2. Remove the round ... page 228. 1. Side marker lights NOTE Before starting to replace a bulb, see the instructions on page 228). 2. Pull out the burned out bulb and install a new one position. 5. 1. Press the bulb holder into position. 7. Remove the burned out bulb by pulling the tab until it clicks into the socket. 5. Press ...
Owner's Manual
Page 217
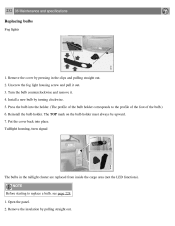
... the cover back into the holder. (The profile of the bulb holder corresponds to replace a bulb, see page 228. 1. Reinstall the bulb holder. Open the panel. 2. Turn the bulb counterclockwise and remove it out. 3. Install a new bulb by pulling straight out. Remove the insulation by turning clockwise.... starting to the profile of the foot of the bulb.) 6. Press the bulb into place. Taillight housing, turn signal The bulbs in the clips and pulling straight out. 2. 232 06 Maintenance and specifications Replacing bulbs Fog lights 1. Remove the cover by pressing in the...
... the cover back into the holder. (The profile of the bulb holder corresponds to replace a bulb, see page 228. 1. Reinstall the bulb holder. Open the panel. 2. Turn the bulb counterclockwise and remove it out. 3. Install a new bulb by pulling straight out. Remove the insulation by turning clockwise.... starting to the profile of the foot of the bulb.) 6. Press the bulb into place. Taillight housing, turn signal The bulbs in the clips and pulling straight out. 2. 232 06 Maintenance and specifications Replacing bulbs Fog lights 1. Remove the cover by pressing in the...
Owner's Manual
Page 218
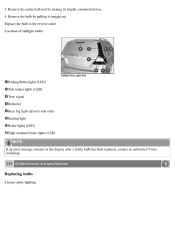
3. Remove the bulb by turning its handle counterclockwise. 4. Replace the bulb in the display after a faulty bulb has been replaced, contact an authorized Volvo workshop. 233 06 Maintenance and specifications Replacing bulbs License plate lighting Location of taillight bulbs Parking/brake lights (LED) Side maker lights (LED) Turn signal Reflector Rear fog light (driver's side only) Backup light Brake lights (LED) High-mounted brake lights (LED) NOTE If an error message remains in the reverse order. Remove the entire bulb unit by pulling it straight out.
3. Remove the bulb by turning its handle counterclockwise. 4. Replace the bulb in the display after a faulty bulb has been replaced, contact an authorized Volvo workshop. 233 06 Maintenance and specifications Replacing bulbs License plate lighting Location of taillight bulbs Parking/brake lights (LED) Side maker lights (LED) Turn signal Reflector Rear fog light (driver's side only) Backup light Brake lights (LED) High-mounted brake lights (LED) NOTE If an error message remains in the reverse order. Remove the entire bulb unit by pulling it straight out.

Owner's Manual
Page 219
Carefully detach the entire bulb housing and pull it into place. Cargo area lighting NOTE Refit the entire bulb housing and screw it out. 3. Replace the bulb. 4. Footwell lighting 1. Press the lens back into place. Replace the bulb. 4. Turn carefully until the lens comes loose. 3. Remove the screws with a screwdriver. 2. 1. Insert a screwdriver at the short end of the lens closest to the tunnel console (the center of the vehicle) and turn gently so that the lens comes loose. (Applies to both lights). 2.
Carefully detach the entire bulb housing and pull it into place. Cargo area lighting NOTE Refit the entire bulb housing and screw it out. 3. Replace the bulb. 4. Footwell lighting 1. Press the lens back into place. Replace the bulb. 4. Turn carefully until the lens comes loose. 3. Remove the screws with a screwdriver. 2. 1. Insert a screwdriver at the short end of the lens closest to the tunnel console (the center of the vehicle) and turn gently so that the lens comes loose. (Applies to both lights). 2.
Owner's Manual
Page 220
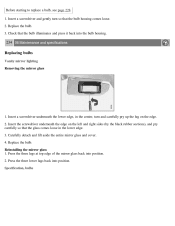
Insert a screwdriver underneath the lower edge, in the lower edge. 3. Specification, bulbs Replace the bulb. 3. Insert the screwdriver underneath the edge on the edge. 2. Carefully detach and lift aside the entire mirror glass and cover. 4. Insert a screwdriver and ...so that the glass comes loose in the center, turn so that the bulb illuminates and press it back into the bulb housing. 234 06 Maintenance and specifications Replacing bulbs Vanity mirror lighting Removing the mirror glass 1. Replace the bulb. Press the three lugs at top edge of the mirror glass back into...
Insert a screwdriver underneath the lower edge, in the lower edge. 3. Specification, bulbs Replace the bulb. 3. Insert the screwdriver underneath the edge on the edge. 2. Carefully detach and lift aside the entire mirror glass and cover. 4. Insert a screwdriver and ...so that the glass comes loose in the center, turn so that the bulb illuminates and press it back into the bulb housing. 234 06 Maintenance and specifications Replacing bulbs Vanity mirror lighting Removing the mirror glass 1. Replace the bulb. Press the three lugs at top edge of the mirror glass back into...
Owner's Manual
Page 263
... brake lights Brake system checking fluid level emergency brake assistance fluid general information Hill Descent Control warning light Bulbs cargo area lighting fog lights footwell lighting headlights introduction license plate lights side marker lights specifications taillight vanity mirror C... Capacity weight Cargo area changing bulbs cover floor rails 113 112-113 279 113 256 238-239 238 60 280 237 6, 220 182-184 ...
... brake lights Brake system checking fluid level emergency brake assistance fluid general information Hill Descent Control warning light Bulbs cargo area lighting fog lights footwell lighting headlights introduction license plate lights side marker lights specifications taillight vanity mirror C... Capacity weight Cargo area changing bulbs cover floor rails 113 112-113 279 113 256 238-239 238 60 280 237 6, 220 182-184 ...
Owner's Manual
Page 266
.../rear Four C (active chassis system) Front airbags disconnecting passenger's side airbag Front fog lights changing bulbs Front park assist Front seats heated Fuel filler cap Fuel filler door opening automatically opening manually Fuel level warning light Fuel requirements Fuel tank ...Glossary of tire terminology Glove compartment, locking Grocery bag holder Gross vehicle weight H Hazard warning flashers Headlight washers Headlights active bi-xenon® lights changing bulbs high beam flash high/low beams switch 220 205 279 76 232 91, 92 155 19-21 22-24 76, 91 232 178-180 84...
.../rear Four C (active chassis system) Front airbags disconnecting passenger's side airbag Front fog lights changing bulbs Front park assist Front seats heated Fuel filler cap Fuel filler door opening automatically opening manually Fuel level warning light Fuel requirements Fuel tank ...Glossary of tire terminology Glove compartment, locking Grocery bag holder Gross vehicle weight H Hazard warning flashers Headlight washers Headlights active bi-xenon® lights changing bulbs high beam flash high/low beams switch 220 205 279 76 232 91, 92 155 19-21 22-24 76, 91 232 178-180 84...

Owner's Manual
Page 269
..., engine Oxygen sensors, heated P Pacemaker (keyless drive warning) Paint, touching up Panic alarm Park assist Parking brake electric, applying/releasing warning light Parking lights changing bulbs Personal Car Communicator, unique functions Polishing the vehicle Power front seat memory function with keyless drive Power mirrors defroster Power moonroof Power steering fluid speed...
..., engine Oxygen sensors, heated P Pacemaker (keyless drive warning) Paint, touching up Panic alarm Park assist Parking brake electric, applying/releasing warning light Parking lights changing bulbs Personal Car Communicator, unique functions Polishing the vehicle Power front seat memory function with keyless drive Power mirrors defroster Power moonroof Power steering fluid speed...

Owner's Manual
Page 271
... child restraint systems unbuckling use during pregnancy using Seats, front Setting the clock Shiftlock override Side door mirrors Side impact airbags Side marker lights, changing bulbs Sirius satellite radio Snow chains Snow tires Sound settings, audio system Spare tire Speed-dependent steering Spin control SRS Stability system indicator light introduction operation...
... child restraint systems unbuckling use during pregnancy using Seats, front Setting the clock Shiftlock override Side door mirrors Side impact airbags Side marker lights, changing bulbs Sirius satellite radio Snow chains Snow tires Sound settings, audio system Spare tire Speed-dependent steering Spin control SRS Stability system indicator light introduction operation...
Owner's Manual
Page 272
warning light T Tailgate driving with it open locking/unlocking power operated wiper/washer Tailgate wiper, replacing the blade Taillights, changing bulbs Temporary spare tire Three-way catalytic converter Tire pressure monitoring system indicator light Tires age changing from summer to winter designations glossary of terms improving ...
warning light T Tailgate driving with it open locking/unlocking power operated wiper/washer Tailgate wiper, replacing the blade Taillights, changing bulbs Temporary spare tire Three-way catalytic converter Tire pressure monitoring system indicator light Tires age changing from summer to winter designations glossary of terms improving ...
Owner's Manual
Page 273
... the tailgate Unlocking the vehicle Upholstery care V Vanity mirror changing bulbs Vehicle dimensions V70 XC70 Vehicle event data Vehicle loading roof loads Vehicle maintenance performed by the owner Vehicle weights Ventilated seats Volvo and the environment Volvo Inflatable Curtain Volvo maintenance Volvo On Call Roadside Assistance Volvo programs W Warning flashers, hazard Warning lights Warning symbol Warning system...
... the tailgate Unlocking the vehicle Upholstery care V Vanity mirror changing bulbs Vehicle dimensions V70 XC70 Vehicle event data Vehicle loading roof loads Vehicle maintenance performed by the owner Vehicle weights Ventilated seats Volvo and the environment Volvo Inflatable Curtain Volvo maintenance Volvo On Call Roadside Assistance Volvo programs W Warning flashers, hazard Warning lights Warning symbol Warning system...

