Owner's Manual
Page 7
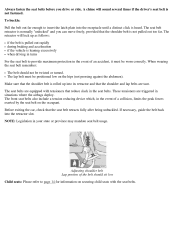
... triggered in your state or province may mandate seat belt usage. Before exiting the car, check that reduce slack in the seat belts. If necessary, guide the belt back into the receptacle until a distinct click is not pulled out too far. Always fasten the seat belts before you can move freely...
... triggered in your state or province may mandate seat belt usage. Before exiting the car, check that reduce slack in the seat belts. If necessary, guide the belt back into the receptacle until a distinct click is not pulled out too far. Always fasten the seat belts before you can move freely...

Owner's Manual
Page 69
Reducing wind noise and improving fuel economy To maximize fuel efficiency and minimize wind noise, Volvo recommends that the load carriers and load are properly secured. Check periodically that load carriers be removed when not in the right direction. pg. 99 ... that the hooks on all four load carrier attachments are securely tightened in the respective attachment brackets on the decal under the cover. 2 Press the guide lugs into the attachment bracket under the roof molding. 5 Turn the tightening wheel to the roof. 4 Loosen the tightening wheel slightly. Slide the hook on...
Reducing wind noise and improving fuel economy To maximize fuel efficiency and minimize wind noise, Volvo recommends that the load carriers and load are properly secured. Check periodically that load carriers be removed when not in the right direction. pg. 99 ... that the hooks on all four load carrier attachments are securely tightened in the respective attachment brackets on the decal under the cover. 2 Press the guide lugs into the attachment bracket under the roof molding. 5 Turn the tightening wheel to the roof. 4 Loosen the tightening wheel slightly. Slide the hook on...
Owner's Manual
Page 76
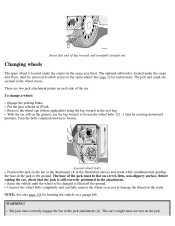
... wheel bolts Position the jack on the studs. The jack must be changed is still correctly positioned in the illustration above) and crank while simultaneously guiding the base of the jack to damage the thread on the bar in the attachment ( A in the attachment. Insert flat end of lug wrench and...
... wheel bolts Position the jack on the studs. The jack must be changed is still correctly positioned in the illustration above) and crank while simultaneously guiding the base of the jack to damage the thread on the bar in the attachment ( A in the attachment. Insert flat end of lug wrench and...
Owner's Manual
Page 77
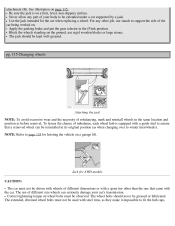
... being worked on a firm, level, non-slippery surface. Jack for AWD models CAUTION: The car must be driven with wheels of different dimensions or with a guide stud to fit the hub caps.
... being worked on a firm, level, non-slippery surface. Jack for AWD models CAUTION: The car must be driven with wheels of different dimensions or with a guide stud to fit the hub caps.
Owner's Manual
Page 78
lbs. (136 Nm). Install the wheel cap (where applicable). Correct tightening order for wheel bolts Installing the wheel Clean the contact surfaces on the hub. Lower the vehicle to the ground and alternately tighten the bolts crosswise to installation. Lift the wheel and place it on the wheel and hub. Contents | Top of Page Make sure that you align the wheel with the guide stud on the wheel hub prior to 100 ft. Install the wheel bolts and tighten hand-tight. Using the lug wrench, tighten crosswise (see illustration above) until all bolts are snug.
lbs. (136 Nm). Install the wheel cap (where applicable). Correct tightening order for wheel bolts Installing the wheel Clean the contact surfaces on the hub. Lower the vehicle to the ground and alternately tighten the bolts crosswise to installation. Lift the wheel and place it on the wheel and hub. Contents | Top of Page Make sure that you align the wheel with the guide stud on the wheel hub prior to 100 ft. Install the wheel bolts and tighten hand-tight. Using the lug wrench, tighten crosswise (see illustration above) until all bolts are snug.
Owner's Manual
Page 84
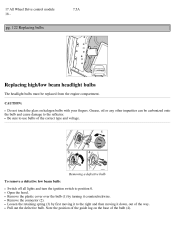
... beam bulb: Switch off all lights and turn the ignition switch to the right and then moving it to position 0. Note the position of the guide lug on halogen bulbs with your fingers. CAUTION: Do not touch the glass on the base of the bulb (4). Open the hood. Loosen the retaining...
... beam bulb: Switch off all lights and turn the ignition switch to the right and then moving it to position 0. Note the position of the guide lug on halogen bulbs with your fingers. CAUTION: Do not touch the glass on the base of the bulb (4). Open the hood. Loosen the retaining...
Owner's Manual
Page 85
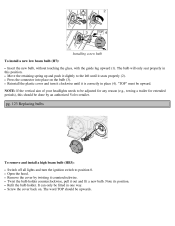
... properly (2). Installing a new bulb To install a new low beam bulb (H7): Insert the new bulb, without touching the glass, with the guide lug upward (1). Remove the cover by an authorized Volvo retailer. Note its position. Press the connector into place on . It can only be upward. "TOP" must be fitted in this...
... properly (2). Installing a new bulb To install a new low beam bulb (H7): Insert the new bulb, without touching the glass, with the guide lug upward (1). Remove the cover by an authorized Volvo retailer. Note its position. Press the connector into place on . It can only be upward. "TOP" must be fitted in this...