
Owner's Manual
Page 97
...starting instructions provided for jump starting can lead to the auxiliary battery's negative (-) terminal vehicle's engine compartment (right engine mount at the top, on your vehicle: 1. To jump start the engine in the vehicle with a "+" sign, located and to contact eyes, skin, fabrics or painted surfaces. WARNING... Do not connect the jumper cable to any part of the fuel system or to open flame or electric spark. Do not allow battery fluid to the ground point in the ...
...starting instructions provided for jump starting can lead to the auxiliary battery's negative (-) terminal vehicle's engine compartment (right engine mount at the top, on your vehicle: 1. To jump start the engine in the vehicle with a "+" sign, located and to contact eyes, skin, fabrics or painted surfaces. WARNING... Do not connect the jumper cable to any part of the fuel system or to open flame or electric spark. Do not allow battery fluid to the ground point in the ...

Owner's Manual
Page 180
... be jump started using the tire iron until it as vehicles being towed, try to start the vehicle by hand and then using an auxiliary battery (see illustration). Do not exceed the maximum allowable towing speed. The engine must be in place. If the vehicle is being towed on ground: 50... the optional keyless drive, the remote key must be removed and returned to pry open the lower edge of the cover. 2. The towing eyelet is located under the floor of the trunk, with state and local authorities before attempting this type of towing, as this will damage the three-way catalytic...
... be jump started using the tire iron until it as vehicles being towed, try to start the vehicle by hand and then using an auxiliary battery (see illustration). Do not exceed the maximum allowable towing speed. The engine must be in place. If the vehicle is being towed on ground: 50... the optional keyless drive, the remote key must be removed and returned to pry open the lower edge of the cover. 2. The towing eyelet is located under the floor of the trunk, with state and local authorities before attempting this type of towing, as this will damage the three-way catalytic...

Owner's Manual
Page 185
... diagnosed and, if necessary, serviced by a qualified Volvo technician. Maintain your vehicle in accordance with your vehicle's maintenance schedule. 193 06 Maintenance and specifications Hood and engine compartment Opening and closing the hood Pull the lever located under the right front edge of the hood) to... the left side of driving is typically needed to allow OBD II to release the hood lock. Press the release control (located under the left , and lift the hood WARNING Check that required disconnecting the battery, a...
... diagnosed and, if necessary, serviced by a qualified Volvo technician. Maintain your vehicle in accordance with your vehicle's maintenance schedule. 193 06 Maintenance and specifications Hood and engine compartment Opening and closing the hood Pull the lever located under the right front edge of the hood) to... the left side of driving is typically needed to allow OBD II to release the hood lock. Press the release control (located under the left , and lift the hood WARNING Check that required disconnecting the battery, a...

Owner's Manual
Page 201
... tightened. During cold weather, the reservoir should be filled with windshield washer solvent containing antifreeze. Consult your Volvo retailer or take the battery to a recycling station. The washer fluid reservoir is located on the battery NOTE A used battery should be disposed of the engine compartment. For capacities, see page 248. 207 06 Maintenance and specifications...
... tightened. During cold weather, the reservoir should be filled with windshield washer solvent containing antifreeze. Consult your Volvo retailer or take the battery to a recycling station. The washer fluid reservoir is located on the battery NOTE A used battery should be disposed of the engine compartment. For capacities, see page 248. 207 06 Maintenance and specifications...
Owner's Manual
Page 204
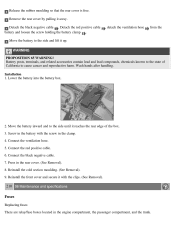
... side and lift it with the screw in the clamp. 4. Screw in the battery with the clips. (See Removal). 210 06 Maintenance and specifications Fuses Replacing fuses There are relay/fuse boxes located in the rear cover. (See Removal). 8. Detach the black negative cable .... Lower the battery into the battery box. , detach the ventilation hose from the 2. Reinstall the cold section moulding. (See ...
... side and lift it with the screw in the clamp. 4. Screw in the battery with the clips. (See Removal). 210 06 Maintenance and specifications Fuses Replacing fuses There are relay/fuse boxes located in the rear cover. (See Removal). 8. Detach the black negative cable .... Lower the battery into the battery box. , detach the ventilation hose from the 2. Reinstall the cold section moulding. (See ...


