
Owner's Manual
Page 1
...the driver's door opening and on the left wheel housing in the engine compartment. Your Volvo is designed to meet all times in this (or any impairment that you will enjoy many years of safe driving in your Volvo, an automobile designed with the equipment descriptions, ...evidenced by alcohol, medication or any other) automobile. For further information please contact your retailer, or: In the USA : Volvo Cars of Canada Corp. 2007 VOLVO S60 VOLVO OWNER'S MANUAL S60 pg. 1 Introduction Welcome to the worldwide family of course, please do not operate a vehicle if you may be affected ...
...the driver's door opening and on the left wheel housing in the engine compartment. Your Volvo is designed to meet all times in this (or any impairment that you will enjoy many years of safe driving in your Volvo, an automobile designed with the equipment descriptions, ...evidenced by alcohol, medication or any other) automobile. For further information please contact your retailer, or: In the USA : Volvo Cars of Canada Corp. 2007 VOLVO S60 VOLVO OWNER'S MANUAL S60 pg. 1 Introduction Welcome to the worldwide family of course, please do not operate a vehicle if you may be affected ...
Owner's Manual
Page 5
... and simpler. pg. 6 Introduction This page left intentionally blank. pg. 7 Introduction Contents Safety Instruments and controls Climate control Interior Locks and alarm Starting and driving Wheels and tires Vehicle care Maintenance and service Specifications Audio Index pg. 8 Introduction This page left intentionally blank. A driver has a responsibility to do everything possible to...
... and simpler. pg. 6 Introduction This page left intentionally blank. pg. 7 Introduction Contents Safety Instruments and controls Climate control Interior Locks and alarm Starting and driving Wheels and tires Vehicle care Maintenance and service Specifications Audio Index pg. 8 Introduction This page left intentionally blank. A driver has a responsibility to do everything possible to...
Owner's Manual
Page 9
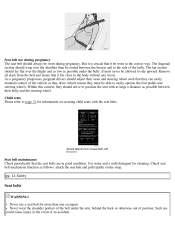
...that they can easily maintain control of the belt under the belly. As a pregnancy progresses, pregnant drivers should adjust their belly and the steering wheel. Check seat belt mechanism function as follows: attach the seat belt and pull rapidly on securing child seats with as large a distance as ...position the seat with the seat belts. The diagonal section should lay flat over the shoulder then be routed between their seats and steering wheel such that it be able to ride upward. It must be worn in the correct way. Seat belt maintenance Check periodically that it ...
...that they can easily maintain control of the belt under the belly. As a pregnancy progresses, pregnant drivers should adjust their belly and the steering wheel. Check seat belt mechanism function as follows: attach the seat belt and pull rapidly on securing child seats with as large a distance as ...position the seat with the seat belts. The diagonal section should lay flat over the shoulder then be routed between their seats and steering wheel such that it be able to ride upward. It must be worn in the correct way. Seat belt maintenance Check periodically that it ...
Owner's Manual
Page 11
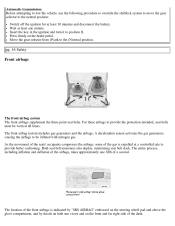
... better cushioning. As the movement of the seats' occupants compresses the airbags, some of the gas is indicated by "SRS AIRBAG" embossed on the steering wheel pad and above the glove compartment, and by decals on both sun visors and on the brake pedal. Wait at a controlled rate to the (N)eutral...
... better cushioning. As the movement of the seats' occupants compresses the airbags, some of the gas is indicated by "SRS AIRBAG" embossed on the steering wheel pad and above the glove compartment, and by decals on both sun visors and on the brake pedal. Wait at a controlled rate to the (N)eutral...

Owner's Manual
Page 12
...However, not all possible injuries that may appear as smoke-like matter. If the impact is not damaged. Never drive a vehicle with a steering wheel-mounted airbag with considerable force. If the collision involves a nonrigid object (e.g., a snow drift or bush), or a rigid, fixed object at all ...times. NOTE: Deployment of their total capacity. The front airbags are triggered at full capacity. Volvo's dual-threshold, dual-stage front airbags use special sensors that the front airbag system is less severe, but severe enough to present a clear...
...However, not all possible injuries that may appear as smoke-like matter. If the impact is not damaged. Never drive a vehicle with a steering wheel-mounted airbag with considerable force. If the collision involves a nonrigid object (e.g., a snow drift or bush), or a rigid, fixed object at all ...times. NOTE: Deployment of their total capacity. The front airbags are triggered at full capacity. Volvo's dual-threshold, dual-stage front airbags use special sensors that the front airbag system is less severe, but severe enough to present a clear...

Owner's Manual
Page 14
...comfort allows and be on the floor, e.g., not on page 16). No objects or accessory equipment, e.g. Occupants in the front passenger's seat. Volvo recommends that ALL occupants (adults and children) shorter than 4 feet 7 inches (140 cm) be placed on, attached to the vehicle occupants. ...near the air bag hatch (the area above the glove compartment) or the area affected by a trained and qualified Volvo service technician. coffee cups, on the steering wheel or the passenger's side dashboard. See page 30 for guidelines. WARNING! Never try to follow these instructions can ...
...comfort allows and be on the floor, e.g., not on page 16). No objects or accessory equipment, e.g. Occupants in the front passenger's seat. Volvo recommends that ALL occupants (adults and children) shorter than 4 feet 7 inches (140 cm) be placed on, attached to the vehicle occupants. ...near the air bag hatch (the area above the glove compartment) or the area affected by a trained and qualified Volvo service technician. coffee cups, on the steering wheel or the passenger's side dashboard. See page 30 for guidelines. WARNING! Never try to follow these instructions can ...
Owner's Manual
Page 34
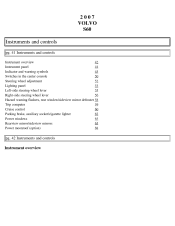
2007 VOLVO S60 Instruments and controls pg. 41 Instruments and controls Instrument overview 42 Instrument panel 44 Indicator and warning symbols 45 Switches in the center console 50 Steering wheel adjustment 52 Lighting panel 53 Left-side steering wheel lever 55 Right-side steering wheel lever 56 Hazard warning flashers, rear window/sideview mirror defroster 58 Trip computer 59 Cruise control 60 Parking brake, auxiliary socket/cigarette lighter 62 Power windows 63 Rearview mirror/sideview mirrors 65 Power moonroof (option) 68 pg. 42 Instruments and controls Instrument overview
2007 VOLVO S60 Instruments and controls pg. 41 Instruments and controls Instrument overview 42 Instrument panel 44 Indicator and warning symbols 45 Switches in the center console 50 Steering wheel adjustment 52 Lighting panel 53 Left-side steering wheel lever 55 Right-side steering wheel lever 56 Hazard warning flashers, rear window/sideview mirror defroster 58 Trip computer 59 Cruise control 60 Parking brake, auxiliary socket/cigarette lighter 62 Power windows 63 Rearview mirror/sideview mirrors 65 Power moonroof (option) 68 pg. 42 Instruments and controls Instrument overview

Owner's Manual
Page 35
Turn signals/High/low beams 53 5. Rear fog light 54 4. Instrument panel 44 8. Audio controls in steering wheel 218 9. Front fog lights 54 2. pg. 43 Instruments and controls Instrument overview 1. Horn 7 7. Parking brake (hand brake) 62 Headlights/Parking lights/switch for unlocking fuel filler door 54 3. Cruise control 60 6. Windshield wipers 56 10.
Turn signals/High/low beams 53 5. Rear fog light 54 4. Instrument panel 44 8. Audio controls in steering wheel 218 9. Front fog lights 54 2. pg. 43 Instruments and controls Instrument overview 1. Horn 7 7. Parking brake (hand brake) 62 Headlights/Parking lights/switch for unlocking fuel filler door 54 3. Cruise control 60 6. Windshield wipers 56 10.

Owner's Manual
Page 37
... remains high, check coolant level - Ambient temperature gauge This display indicates the air temperature outside your vehicle. Fuel gauge The fuel tank holds approximately: Front wheel drive, non-turbo models - 18.5 US gal. (70 liters) All turbo models - 18 US gal. (68 liters) When the warning light in the gauge comes...
... remains high, check coolant level - Ambient temperature gauge This display indicates the air temperature outside your vehicle. Fuel gauge The fuel tank holds approximately: Front wheel drive, non-turbo models - 18.5 US gal. (70 liters) All turbo models - 18 US gal. (68 liters) When the warning light in the gauge comes...

Owner's Manual
Page 42
.... Four-C active chassis system (option) Please see page 125. Folding head restraints This button is controlled via the menu control ring on the left steering wheel lever, see page 121 for more information. See page 126 for information on R-models only and is switched off. NOTE: If the head restraints have...
.... Four-C active chassis system (option) Please see page 125. Folding head restraints This button is controlled via the menu control ring on the left steering wheel lever, see page 121 for more information. See page 126 for information on R-models only and is switched off. NOTE: If the head restraints have...

Owner's Manual
Page 43
...in the text window to position II. - The ignition key must be displayed in the button is turning. option The beams of the steering wheel when the vehicle is on this function: - Press the "Valet lock" button. The function can be deactivated/reactivated by turning the ignition key... up and "VALET LOCK pg. 51 Instruments and controls Switches in position 1 (or higher) for cigarette lighters, which are available at your Volvo retailer. Temporarily disconnecting the alarm sensors (option) See page 104 for more information on when the function is started and can also be used...
...in the text window to position II. - The ignition key must be displayed in the button is turning. option The beams of the steering wheel when the vehicle is on this function: - Press the "Valet lock" button. The function can be deactivated/reactivated by turning the ignition key... up and "VALET LOCK pg. 51 Instruments and controls Switches in position 1 (or higher) for cigarette lighters, which are available at your Volvo retailer. Temporarily disconnecting the alarm sensors (option) See page 104 for more information on when the function is started and can also be used...

Owner's Manual
Page 44
... lighting 5. The license plate lights also illuminate when the parking lights are switched on the left of the steering wheel can be adjusted to a comfortable position for the driver. Adjust the steering wheel to a suitable position and press the lever back into place to position . Rear fog light 4. Turn switch ...1 to lock the steering wheel in the new position. pg. 53 Instruments and controls Lighting panel 1. Fuel filler door unlock button Parking lights The front and rear ...
... lighting 5. The license plate lights also illuminate when the parking lights are switched on the left of the steering wheel can be adjusted to a comfortable position for the driver. Adjust the steering wheel to a suitable position and press the lever back into place to position . Rear fog light 4. Turn switch ...1 to lock the steering wheel in the new position. pg. 53 Instruments and controls Lighting panel 1. Fuel filler door unlock button Parking lights The front and rear ...

Owner's Manual
Page 45
... is in the button illuminates when the front fog lights are on the rear fog light. Turn the ignition key to movements of the steering wheel (see page 51). 1.
... is in the button illuminates when the front fog lights are on the rear fog light. Turn the ignition key to movements of the steering wheel (see page 51). 1.
Owner's Manual
Page 46
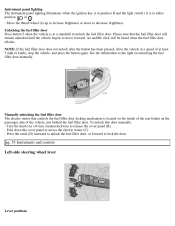
... to the right on the passenger side of at a standstill to access the electric motor (C). - pg. 55 Instruments and controls Left-side steering wheel lever Lever positions Turn the knob (A) 1/4 turn counterclockwise to lock the door. Manually unlocking the fuel filler door The electric motor that the fuel... filler door will be heard when the fuel filler door relocks. Move the thumb wheel (4) up to increase brightness or down the cover panel to unlock the fuel filler door. Unlocking the fuel filler door Press button 5 ...
... to the right on the passenger side of at a standstill to access the electric motor (C). - pg. 55 Instruments and controls Left-side steering wheel lever Lever positions Turn the knob (A) 1/4 turn counterclockwise to lock the door. Manually unlocking the fuel filler door The electric motor that the fuel... filler door will be heard when the fuel filler door relocks. Move the thumb wheel (4) up to increase brightness or down the cover panel to unlock the fuel filler door. Unlocking the fuel filler door Press button 5 ...

Owner's Manual
Page 47
...- NOTE: This automatic flashing sequence can be cancelled automatically by the movement of the steering wheel, or the lever can automatically flash the turn signals 3 times by an authorized Volvo retailer. 1. The headlights and parking lights will remain on until the lever is released. ...Factory setting pg. 56 Instruments and controls Right-side steering wheel lever Toggle between high and low beams (this also ...
...- NOTE: This automatic flashing sequence can be cancelled automatically by the movement of the steering wheel, or the lever can automatically flash the turn signals 3 times by an authorized Volvo retailer. 1. The headlights and parking lights will remain on until the lever is released. ...Factory setting pg. 56 Instruments and controls Right-side steering wheel lever Toggle between high and low beams (this also ...

Owner's Manual
Page 49
... rain sensor. The LED will cause the wipers to turn off the heating after approximately 12 minutes. pg. 57 Instruments and controls Right-side steering wheel lever CAUTION! pg. 58 Instruments and controls Hazard warning flashers, rear window/sideview mirror defroster Hazard warning flashers The four-way flasher should be deactivated...
... rain sensor. The LED will cause the wipers to turn off the heating after approximately 12 minutes. pg. 57 Instruments and controls Right-side steering wheel lever CAUTION! pg. 58 Instruments and controls Hazard warning flashers, rear window/sideview mirror defroster Hazard warning flashers The four-way flasher should be deactivated...

Owner's Manual
Page 51
... is pressed again. 5. pg. 60 Instruments and controls Cruise control Cruise control The cruise control panel is located on the left side of the steering wheel hub and may vary slightly depending on the circumference of the vehicle's current speed from km/h to set the vehicle's speed. NOTE: This does not...
... is pressed again. 5. pg. 60 Instruments and controls Cruise control Cruise control The cruise control panel is located on the left side of the steering wheel hub and may vary slightly depending on the circumference of the vehicle's current speed from km/h to set the vehicle's speed. NOTE: This does not...

Owner's Manual
Page 52
... below approximately 20 mph (30 km/h). Press the brake pedal. Braking Cruise control is automatically disengaged when the brake pedal is placed in (N)eutral the wheels start to increase or decrease vehicle speed by approximately 1 mph (1.6 km/h). Pressing resume will no longer be displayed in the information window in the instrument...
... below approximately 20 mph (30 km/h). Press the brake pedal. Braking Cruise control is automatically disengaged when the brake pedal is placed in (N)eutral the wheels start to increase or decrease vehicle speed by approximately 1 mph (1.6 km/h). Pressing resume will no longer be displayed in the information window in the instrument...

Owner's Manual
Page 53
...cigarette lighter Parking brake (hand brake) The lever is parked. Press firmly on a hill If the vehicle is pointing downhill, turn the front wheels so that they point toward the curb. WARNING! Always apply the parking brake fully when the vehicle is located between the front seats. Put ... the end of the lever and lower the lever completely. The key must be folded down when the auxiliary socket is applied to the rear wheels. WARNING! Pull up slightly, press the button at a standstill. - Cruise control should be in position I (or higher) for the auxiliary socket ...
...cigarette lighter Parking brake (hand brake) The lever is parked. Press firmly on a hill If the vehicle is pointing downhill, turn the front wheels so that they point toward the curb. WARNING! Always apply the parking brake fully when the vehicle is located between the front seats. Put ... the end of the lever and lower the lever completely. The key must be folded down when the auxiliary socket is applied to the rear wheels. WARNING! Pull up slightly, press the button at a standstill. - Cruise control should be in position I (or higher) for the auxiliary socket ...

Owner's Manual
Page 69
... the front edge of the seat cushion (option): use the control to adjust the angle of the backrest. 6. 2007 VOLVO S60 Interior pg. 79 Interior Front seats 80 Interior lighting 84 Storage compartments 86 Rear seat and trunk 90 Spare wheel, tools and jack 93 pg. 80 Interior Front seats Manually adjusted front seats 1.
... the front edge of the seat cushion (option): use the control to adjust the angle of the backrest. 6. 2007 VOLVO S60 Interior pg. 79 Interior Front seats 80 Interior lighting 84 Storage compartments 86 Rear seat and trunk 90 Spare wheel, tools and jack 93 pg. 80 Interior Front seats Manually adjusted front seats 1.

