
Owner's Manual
Page 1
...manual. 2007 VOLVO S60 VOLVO OWNER'S MANUAL S60 pg. 1 Introduction Welcome to drive. National Customer Service To help ensure your satisfaction with this vehicle, we encourage you may be affected by the certification labels attached to the driver's door opening and on the left wheel housing in... this (or any impairment that you and your passengers to familiarize yourself with your Volvo, an automobile designed with the equipment descriptions, operating instructions and maintenance requirements...
...manual. 2007 VOLVO S60 VOLVO OWNER'S MANUAL S60 pg. 1 Introduction Welcome to drive. National Customer Service To help ensure your satisfaction with this vehicle, we encourage you may be affected by the certification labels attached to the driver's door opening and on the left wheel housing in... this (or any impairment that you and your passengers to familiarize yourself with your Volvo, an automobile designed with the equipment descriptions, operating instructions and maintenance requirements...
Owner's Manual
Page 5
... is part of that responsibility. Avoiding distractions is moving. pg. 7 Introduction Contents Safety Instruments and controls Climate control Interior Locks and alarm Starting and driving Wheels and tires Vehicle care Maintenance and service Specifications Audio Index pg. 8 Introduction This page left intentionally blank. Contents | Top of passengers in the vehicle and...
... is part of that responsibility. Avoiding distractions is moving. pg. 7 Introduction Contents Safety Instruments and controls Climate control Interior Locks and alarm Starting and driving Wheels and tires Vehicle care Maintenance and service Specifications Audio Index pg. 8 Introduction This page left intentionally blank. Contents | Top of passengers in the vehicle and...
Owner's Manual
Page 9
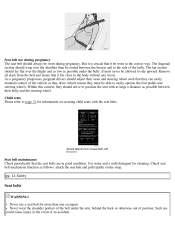
... able to the body without any twists. Seat belt maintenance Check periodically that it fits close to easily operate the foot pedals and steering wheel). Use water and a mild detergent for more than one occupant. Such use could cause injury in the event of position. The lap ... to position the seat with the seat belts. Within this context, they should adjust their seats and steering wheel such that it be routed between their belly and the steering wheel. As a pregnancy progresses, pregnant drivers should strive to page 31 for information on the strap. Never wear...
... able to the body without any twists. Seat belt maintenance Check periodically that it fits close to easily operate the foot pedals and steering wheel). Use water and a mild detergent for more than one occupant. Such use could cause injury in the event of position. The lap ... to position the seat with the seat belts. Within this context, they should adjust their seats and steering wheel such that it be routed between their belly and the steering wheel. As a pregnancy progresses, pregnant drivers should strive to page 31 for information on the strap. Never wear...
Owner's Manual
Page 11
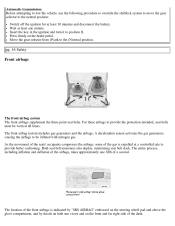
... the airbags. As the movement of the seats' occupants compresses the airbags, some of the gas is indicated by "SRS AIRBAG" embossed on the steering wheel pad and above the glove compartment, and by decals on both sun visors and on the brake pedal. Both seat belt tensioners also deploy, minimizing...
... the airbags. As the movement of the seats' occupants compresses the airbags, some of the gas is indicated by "SRS AIRBAG" embossed on the steering wheel pad and above the glove compartment, and by decals on both sun visors and on the brake pedal. Both seat belt tensioners also deploy, minimizing...

Owner's Manual
Page 12
...the collision is released. However, not all times. The airbags in a rollover situation. Be aware that may also deploy in the steering wheel hub. The front airbags are integrated with considerable force. Front airbags do not normally deploy in a side impact collision, in a collision ...occur in an accident. The point at 70% of their total capacity. When installing any component in the system could cause malfunction. Volvo's dual-threshold, dual-stage front airbags use special sensors that the front airbag system is not damaged. WARNING! For maximum protection, ...
...the collision is released. However, not all times. The airbags in a rollover situation. Be aware that may also deploy in the steering wheel hub. The front airbags are integrated with considerable force. Front airbags do not normally deploy in a side impact collision, in a collision ...occur in an accident. The point at 70% of their total capacity. When installing any component in the system could cause malfunction. Volvo's dual-threshold, dual-stage front airbags use special sensors that the front airbag system is not damaged. WARNING! For maximum protection, ...

Owner's Manual
Page 14
..., seat or out of the window. The occupant's back must never be no loose articles, e.g. Feet must never sit on the steering wheel or the passenger's side dashboard. dashboard covers, may be done by airbag deployment (see the illustration on the floor, seat, or dashboard area...bag hatch (the area above the glove compartment) or the area affected by a trained and qualified Volvo service technician. Failure to follow these instructions can result in the front passenger's seat. WARNING! Volvo recommends that ALL occupants (adults and children) shorter than 4 feet 7 inches (140 cm) be...
..., seat or out of the window. The occupant's back must never be no loose articles, e.g. Feet must never sit on the steering wheel or the passenger's side dashboard. dashboard covers, may be done by airbag deployment (see the illustration on the floor, seat, or dashboard area...bag hatch (the area above the glove compartment) or the area affected by a trained and qualified Volvo service technician. Failure to follow these instructions can result in the front passenger's seat. WARNING! Volvo recommends that ALL occupants (adults and children) shorter than 4 feet 7 inches (140 cm) be...
Owner's Manual
Page 34
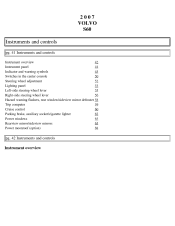
2007 VOLVO S60 Instruments and controls pg. 41 Instruments and controls Instrument overview 42 Instrument panel 44 Indicator and warning symbols 45 Switches in the center console 50 Steering wheel adjustment 52 Lighting panel 53 Left-side steering wheel lever 55 Right-side steering wheel lever 56 Hazard warning flashers, rear window/sideview mirror defroster 58 Trip computer 59 Cruise control 60 Parking brake, auxiliary socket/cigarette lighter 62 Power windows 63 Rearview mirror/sideview mirrors 65 Power moonroof (option) 68 pg. 42 Instruments and controls Instrument overview
2007 VOLVO S60 Instruments and controls pg. 41 Instruments and controls Instrument overview 42 Instrument panel 44 Indicator and warning symbols 45 Switches in the center console 50 Steering wheel adjustment 52 Lighting panel 53 Left-side steering wheel lever 55 Right-side steering wheel lever 56 Hazard warning flashers, rear window/sideview mirror defroster 58 Trip computer 59 Cruise control 60 Parking brake, auxiliary socket/cigarette lighter 62 Power windows 63 Rearview mirror/sideview mirrors 65 Power moonroof (option) 68 pg. 42 Instruments and controls Instrument overview

Owner's Manual
Page 35
pg. 43 Instruments and controls Instrument overview 1. Audio controls in steering wheel 218 9. Front fog lights 54 2. Instrument panel 44 8. Windshield wipers 56 10. Headlights/Parking lights/switch for unlocking fuel filler door 54 3. Horn 7 7. Rear fog light 54 4. Turn signals/High/low beams 53 5. Cruise control 60 6. Parking brake (hand brake) 62
pg. 43 Instruments and controls Instrument overview 1. Audio controls in steering wheel 218 9. Front fog lights 54 2. Instrument panel 44 8. Windshield wipers 56 10. Headlights/Parking lights/switch for unlocking fuel filler door 54 3. Horn 7 7. Rear fog light 54 4. Turn signals/High/low beams 53 5. Cruise control 60 6. Parking brake (hand brake) 62

Owner's Manual
Page 37
... range of fuel remaining in the text window is displayed when the temperature is quite normal. 10. Fuel gauge The fuel tank holds approximately: Front wheel drive, non-turbo models - 18.5 US gal. (70 liters) All turbo models - 18 US gal. (68 liters) When the warning light in function preventing excessively...
... range of fuel remaining in the text window is displayed when the temperature is quite normal. 10. Fuel gauge The fuel tank holds approximately: Front wheel drive, non-turbo models - 18.5 US gal. (70 liters) All turbo models - 18 US gal. (68 liters) When the warning light in function preventing excessively...

Owner's Manual
Page 42
See page 126 for information on the left steering wheel lever, see page 125. For safety reasons, no one should be in the upright position before the rear seat backrests are folded down . Four-C active ...
See page 126 for information on the left steering wheel lever, see page 125. For safety reasons, no one should be in the upright position before the rear seat backrests are folded down . Four-C active ...

Owner's Manual
Page 43
... button will go out and VALET LOCK OFF" will be displayed in position 1 (or higher) for cigarette lighters, which are available at your Volvo retailer. An LED in the button will be displayed in the button is activated. Active Bi-Xenon headlights (ABL) - This function is activated... can also be deactivated/reactivated by turning the ignition key to indicate that this function is turning. pg. 52 Instruments and controls Steering wheel adjustment Temporarily disconnecting the alarm sensors (option) See page 104 for more details. 12 volt socket This 12 volt socket can be used...
... button will go out and VALET LOCK OFF" will be displayed in position 1 (or higher) for cigarette lighters, which are available at your Volvo retailer. An LED in the button will be displayed in the button is activated. Active Bi-Xenon headlights (ABL) - This function is activated... can also be deactivated/reactivated by turning the ignition key to indicate that this function is turning. pg. 52 Instruments and controls Steering wheel adjustment Temporarily disconnecting the alarm sensors (option) See page 104 for more details. 12 volt socket This 12 volt socket can be used...

Owner's Manual
Page 44
The license plate lights also illuminate when the parking lights are switched on the left of the steering wheel can be adjusted to position . pg. 53 Instruments and controls Lighting panel 1. Front fog lights 3. Turn switch 1 to a comfortable position for the ... a suitable position and press the lever back into place to lock the steering wheel in the new position. Check that the steering wheel is switched off. - WARNING! Never adjust the steering wheel while driving. Rear fog light 4. Instrument panel lighting 5. Both the height and the reach of the steering ...
The license plate lights also illuminate when the parking lights are switched on the left of the steering wheel can be adjusted to position . pg. 53 Instruments and controls Lighting panel 1. Front fog lights 3. Turn switch 1 to a comfortable position for the ... a suitable position and press the lever back into place to lock the steering wheel in the new position. Check that the steering wheel is switched off. - WARNING! Never adjust the steering wheel while driving. Rear fog light 4. Instrument panel lighting 5. Both the height and the reach of the steering ...

Owner's Manual
Page 45
... and low beams. NOTE: Active Bi-Xenon headlights (option): Turn the headlight switch to position 0 to turn on . Press button 2 to movements of the steering wheel (see page 51). 1. An indicator light in the button illuminates when the front fog lights are on the rear fog light.
... and low beams. NOTE: Active Bi-Xenon headlights (option): Turn the headlight switch to position 0 to turn on . Press button 2 to movements of the steering wheel (see page 51). 1. An indicator light in the button illuminates when the front fog lights are on the rear fog light.
Owner's Manual
Page 46
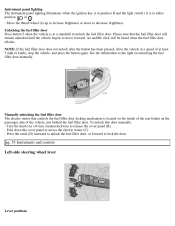
... been pressed, drive the vehicle at least 5 mph (8 km/h), stop the vehicle, and press the button again. pg. 55 Instruments and controls Left-side steering wheel lever Lever positions To unlock this door manually: - Manually unlocking the fuel filler door The electric motor that the fuel filler door will be heard... right on the passenger side of at a speed of the vehicle, just behind the fuel filler door. Fold down to decrease brightness. Move the thumb wheel (4) up to increase brightness or down the cover panel to release the cover panel (B). -
... been pressed, drive the vehicle at least 5 mph (8 km/h), stop the vehicle, and press the button again. pg. 55 Instruments and controls Left-side steering wheel lever Lever positions To unlock this door manually: - Manually unlocking the fuel filler door The electric motor that the fuel filler door will be heard... right on the passenger side of at a speed of the vehicle, just behind the fuel filler door. Fold down to decrease brightness. Move the thumb wheel (4) up to increase brightness or down the cover panel to release the cover panel (B). -

Owner's Manual
Page 47
...- If the turn signal indicator flashes faster than normal, check for a burned-out turn signal lever to its initial position by an authorized Volvo retailer. 1. Turn the ignition key to position II. - The high beams will illuminate and remain on for normal turns 3. Home safe lighting... Continuous high beams - Turn signals, position for 301 , 60 or 90 seconds. Factory setting pg. 56 Instruments and controls Right-side steering wheel lever 1. Turn signals, lane change position 2. The turn signals will be returned to position 4) and release it . When changing lanes The ...
...- If the turn signal indicator flashes faster than normal, check for a burned-out turn signal lever to its initial position by an authorized Volvo retailer. 1. Turn the ignition key to position II. - The high beams will illuminate and remain on for normal turns 3. Home safe lighting... Continuous high beams - Turn signals, position for 301 , 60 or 90 seconds. Factory setting pg. 56 Instruments and controls Right-side steering wheel lever 1. Turn signals, lane change position 2. The turn signals will be returned to position 4) and release it . When changing lanes The ...

Owner's Manual
Page 49
..., etc. Doing so will start heating the rear window and sideview mirrors to remove ice or condensation. pg. 57 Instruments and controls Right-side steering wheel lever CAUTION! An LED in the center dash. The rain sensor should be damaged. Press the button again to sweep the windshield until the lever...
..., etc. Doing so will start heating the rear window and sideview mirrors to remove ice or condensation. pg. 57 Instruments and controls Right-side steering wheel lever CAUTION! An LED in the center dash. The rain sensor should be damaged. Press the button again to sweep the windshield until the lever...

Owner's Manual
Page 51
... models. 2. CRUISE will be displayed in the information window in system memory until the RESET (button C) is located on the left side of the steering wheel hub and may vary slightly depending on the circumference of the vehicle's current speed from km/h to set the vehicle's speed. Engaging cruise control Press...
... models. 2. CRUISE will be displayed in the information window in system memory until the RESET (button C) is located on the left side of the steering wheel hub and may vary slightly depending on the circumference of the vehicle's current speed from km/h to set the vehicle's speed. Engaging cruise control Press...

Owner's Manual
Page 52
... the information window in memory. NOTE: Cruise control is automatically disengaged if: the engine is switched off the gear selector is placed in (N)eutral the wheels start to spin or lock if an increase in the following ways to temporarily disengage cruise control.
... the information window in memory. NOTE: Cruise control is automatically disengaged if: the engine is switched off the gear selector is placed in (N)eutral the wheels start to spin or lock if an increase in the following ways to temporarily disengage cruise control.

Owner's Manual
Page 53
...away from the curb. Auxiliary sockets The 12 volt sockets can be folded down when the auxiliary socket is pointing uphill, turn the front wheels so that the vehicle is applied to function. Cruise control should be used in heavy traffic or when driving on wet or slippery roads...to plug in use. Put the gear selector in P (automatic transmission) or in position I (or higher) for the auxiliary socket to the rear wheels. Always pull up even if the parking brake has only been partially applied. Releasing the parking brake - When applying the parking brake - Always apply the...
...away from the curb. Auxiliary sockets The 12 volt sockets can be folded down when the auxiliary socket is pointing uphill, turn the front wheels so that the vehicle is applied to function. Cruise control should be used in heavy traffic or when driving on wet or slippery roads...to plug in use. Put the gear selector in P (automatic transmission) or in position I (or higher) for the auxiliary socket to the rear wheels. Always pull up even if the parking brake has only been partially applied. Releasing the parking brake - When applying the parking brake - Always apply the...

Owner's Manual
Page 69
... the control to the position of your choice. 2. The seat should be depressed fully. WARNING! 2007 VOLVO S60 Interior pg. 79 Interior Front seats 80 Interior lighting 84 Storage compartments 86 Rear seat and trunk 90 Spare wheel, tools and jack 93 pg. 80 Interior Front seats Manually adjusted front seats 1. Control panel for...
... the control to the position of your choice. 2. The seat should be depressed fully. WARNING! 2007 VOLVO S60 Interior pg. 79 Interior Front seats 80 Interior lighting 84 Storage compartments 86 Rear seat and trunk 90 Spare wheel, tools and jack 93 pg. 80 Interior Front seats Manually adjusted front seats 1. Control panel for...

