Owner's Manual
Page 2
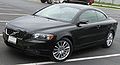
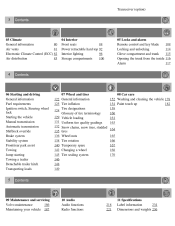
instrument panel Information display Lighting panel Left-side steering wheel lever Trip computer Right-side steering wheel lever Cruise control Right-side steering wheel keypad Steering wheel adjustment, Hazard warning flashers Parking brake 12-volt sockets Power windows Mirrors Personal settings HomeLink...Baker Road North York, Ontario M2H 2N7 1-800-663-8255 www.volvocanada.com 2006 © Volvo Car Corporation. All rights reserved. 2 Contents 00 Introduction General information 6 Volvo and the environment 7 Important warnings 9 01 Safety Occupant safety 12 Seat belts 14 Supplemental ...
instrument panel Information display Lighting panel Left-side steering wheel lever Trip computer Right-side steering wheel lever Cruise control Right-side steering wheel keypad Steering wheel adjustment, Hazard warning flashers Parking brake 12-volt sockets Power windows Mirrors Personal settings HomeLink...Baker Road North York, Ontario M2H 2N7 1-800-663-8255 www.volvocanada.com 2006 © Volvo Car Corporation. All rights reserved. 2 Contents 00 Introduction General information 6 Volvo and the environment 7 Important warnings 9 01 Safety Occupant safety 12 Seat belts 14 Supplemental ...
Owner's Manual
Page 3
...Opening the trunk from the inside 116 Alarm 117 4 Contents 06 Starting and driving General information Fuel requirements Ignition switch, Steering wheel lock Starting the vehicle Manual transmission Automatic transmission Shiftlock override Brake system Stability system Front/rear park assist Towing Jump starting Towing a...Tire rotation Temporary spare Changing a wheel Tire sealing system 08 Car care 152 Washing and cleaning the vehicle 178 154 Paint touch up 182 158 160 161 163 164 165 166 167 168 170 5 Contents 09 Maintenance and servicing Volvo maintenance 186 Maintaining your vehicle ...
...Opening the trunk from the inside 116 Alarm 117 4 Contents 06 Starting and driving General information Fuel requirements Ignition switch, Steering wheel lock Starting the vehicle Manual transmission Automatic transmission Shiftlock override Brake system Stability system Front/rear park assist Towing Jump starting Towing a...Tire rotation Temporary spare Changing a wheel Tire sealing system 08 Car care 152 Washing and cleaning the vehicle 178 154 Paint touch up 182 158 160 161 163 164 165 166 167 168 170 5 Contents 09 Maintenance and servicing Volvo maintenance 186 Maintaining your vehicle ...
Owner's Manual
Page 12
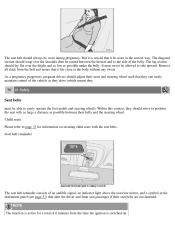
...the seat with the seat belts. As a pregnancy progresses, pregnant drivers should adjust their seats and steering wheel such that alert the driver and front seat passenger if their belly and the steering wheel. But it is switched on securing child seats with as large a distance as they drive (which ...must be allowed to the side of 6 minutes from the belt and insure that it fits close to easily operate the foot pedals and steering wheel). The seat belt should always be worn in the instrument panel (see page 51) that they can easily maintain control of the vehicle as...
...the seat with the seat belts. As a pregnancy progresses, pregnant drivers should adjust their seats and steering wheel such that alert the driver and front seat passenger if their belly and the steering wheel. But it is switched on securing child seats with as large a distance as they drive (which ...must be allowed to the side of 6 minutes from the belt and insure that it fits close to easily operate the foot pedals and steering wheel). The seat belt should always be worn in the instrument panel (see page 51) that they can easily maintain control of the vehicle as...
Owner's Manual
Page 15
... trigger the front airbags, are designed to help prevent serious injury. However, not all times. Never drive a vehicle with a steering wheel-mounted airbag with considerable force. The airbags may also deploy in an accident. Both seat belt tensioners also deploy, minimizing seat belt slack...and located in the vehicle are designed to deploy during certain frontal or front-angular collisions, impacts, or decelerations, depending on the steering wheel pad/airbag housing. If the collision involves a nonrigid object (e.g., a snow drift or bush), or a rigid, fixed object at all...
... trigger the front airbags, are designed to help prevent serious injury. However, not all times. Never drive a vehicle with a steering wheel-mounted airbag with considerable force. The airbags may also deploy in an accident. Both seat belt tensioners also deploy, minimizing seat belt slack...and located in the vehicle are designed to deploy during certain frontal or front-angular collisions, impacts, or decelerations, depending on the steering wheel pad/airbag housing. If the collision involves a nonrigid object (e.g., a snow drift or bush), or a rigid, fixed object at all...
Owner's Manual
Page 18
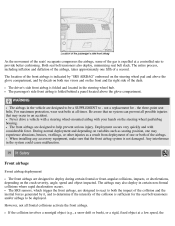
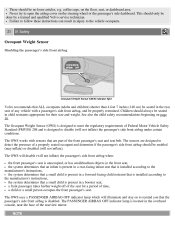
...seat for their size and weight. There should be done by a trained and qualified Volvo service technician. coffee cups, on page 30. Never try to disable (will illuminate and stay on the steering wheel or the passenger's side dashboard. The OWS uses a PASSENGER AIRBAG OFF indicator lamp ...-facing child restraint that is installed according to the vehicle occupants. 21 01 Safety Occupant Weight Sensor Disabling the passenger's side front airbag Volvo recommends that a small child is designed to open the airbag cover on to remind you that are designed to detect the presence of...
...seat for their size and weight. There should be done by a trained and qualified Volvo service technician. coffee cups, on page 30. Never try to disable (will illuminate and stay on the steering wheel or the passenger's side dashboard. The OWS uses a PASSENGER AIRBAG OFF indicator lamp ...-facing child restraint that is installed according to the vehicle occupants. 21 01 Safety Occupant Weight Sensor Disabling the passenger's side front airbag Volvo recommends that a small child is designed to open the airbag cover on to remind you that are designed to detect the presence of...
Owner's Manual
Page 39
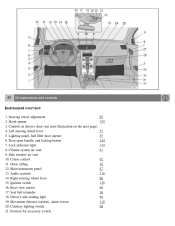
... 2. Lock indicator light 8. Horn, airbag 12. Right steering wheel lever 15. Driver's side reading light 19. Position for accessory switch 65 189 57 55 114 114 81 62 18 47 218 60 128 69 ... window air vent 10. Rear-view mirror 17. Courtesy lighting switch 21. Climate system air vent 9. Ignition switch 16. Seat belt reminder 18. Left steering wheel lever 5. Cruise control 11. Main instrument panel 13. Controls in driver's door (see inset illustration on the next page) 4. Movement detector (option), alarm sensor 20...
... 2. Lock indicator light 8. Horn, airbag 12. Right steering wheel lever 15. Driver's side reading light 19. Position for accessory switch 65 189 57 55 114 114 81 62 18 47 218 60 128 69 ... window air vent 10. Rear-view mirror 17. Courtesy lighting switch 21. Climate system air vent 9. Ignition switch 16. Seat belt reminder 18. Left steering wheel lever 5. Cruise control 11. Main instrument panel 13. Controls in driver's door (see inset illustration on the next page) 4. Movement detector (option), alarm sensor 20...
Owner's Manual
Page 50
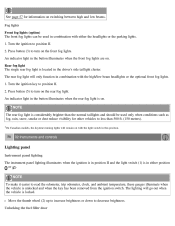
... in either the headlights or the parking lights. 1. Unlocking the fuel filler door An indicator light in the driver's side taillight cluster. Move the thumb wheel (2) up to increase brightness or down to read the odometer, trip odometer, clock, and ambient temperature, these gauges illuminate when the vehicle is locked. The...
... in either the headlights or the parking lights. 1. Unlocking the fuel filler door An indicator light in the driver's side taillight cluster. Move the thumb wheel (2) up to increase brightness or down to read the odometer, trip odometer, clock, and ambient temperature, these gauges illuminate when the vehicle is locked. The...
Owner's Manual
Page 51
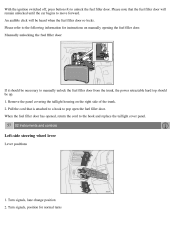
... forward. With the ignition switched off, press button (4) to the hook and replace the taillight cover panel. 57 02 Instruments and controls Left-side steering wheel lever Lever positions 1. Please refer to manually unlock the fuel filler door from the trunk, the power retractable hard top should be necessary to the...
... forward. With the ignition switched off, press button (4) to the hook and replace the taillight cover panel. 57 02 Instruments and controls Left-side steering wheel lever Lever positions 1. Please refer to manually unlock the fuel filler door from the trunk, the power retractable hard top should be necessary to the...
Owner's Manual
Page 52
...flashes faster than normal, check for 301 , 60 or 90 seconds. Pull the turn signal lever up or down as possible towards the steering wheel (to its original position. The high beams will remain on for a burned-out turn signals will illuminate and remain on until the lever ...is released. The headlights and parking lights will be cancelled automatically by immediately moving the lever in front of the steering wheel, or the lever can be returned to position 4) and release it . NOTE This automatic flashing sequence can be interrupted by the movement ...
...flashes faster than normal, check for 301 , 60 or 90 seconds. Pull the turn signal lever up or down as possible towards the steering wheel (to its original position. The high beams will remain on for a burned-out turn signals will illuminate and remain on until the lever ...is released. The headlights and parking lights will be cancelled automatically by immediately moving the lever in front of the steering wheel, or the lever can be returned to position 4) and release it . NOTE This automatic flashing sequence can be interrupted by the movement ...
Owner's Manual
Page 54
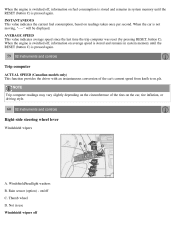
... the driver with an instantaneous conversion of the tires on the car, tire inflation, or driving style. 60 02 Instruments and controls Right-side steering wheel lever Windshield wipers A. Not in use Windshield wipers off C. AVERAGE SPEED This value indicates average speed since the last time the trip computer was reset...
... the driver with an instantaneous conversion of the tires on the car, tire inflation, or driving style. 60 02 Instruments and controls Right-side steering wheel lever Windshield wipers A. Not in use Windshield wipers off C. AVERAGE SPEED This value indicates average speed since the last time the trip computer was reset...
Owner's Manual
Page 55
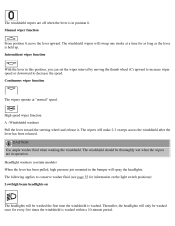
... be washed the first time the windshield is washed within a 10-minute period. High speed wiper function. A -Windshield washers Pull the lever toward the steering wheel and release it. The wipers will only be thoroughly wet when the wipers are off when the lever is held up. CAUTION Use ample washer... windshield should be washed once for as long as the lever is in this position, you can set the wiper interval by moving the thumb wheel (C) upward to increase wiper speed or downward to conserve washer fluid (see page 55 for information on the light switch positions): Low/high beam ...
... be washed the first time the windshield is washed within a 10-minute period. High speed wiper function. A -Windshield washers Pull the lever toward the steering wheel and release it. The wipers will only be thoroughly wet when the wipers are off when the lever is held up. CAUTION Use ample washer... windshield should be washed once for as long as the lever is in this position, you can set the wiper interval by moving the thumb wheel (C) upward to increase wiper speed or downward to conserve washer fluid (see page 55 for information on the light switch positions): Low/high beam ...
Owner's Manual
Page 56
On/Off To activate the rain sensor: 1. Thumb wheel The rain sensor can be deactivated by moving the thumb wheel (C in the illustration on the previous page) up , the rain sensor function will start inadvertently in the lower display. or Moving the windshield wiper lever ... wash, etc. Switch on the windshield. Parking lights on Optional Bi-Xenon headlights will not be washed. 61 02 Instruments and controls Right-side steering wheel lever B -
On/Off To activate the rain sensor: 1. Thumb wheel The rain sensor can be deactivated by moving the thumb wheel (C in the illustration on the previous page) up , the rain sensor function will start inadvertently in the lower display. or Moving the windshield wiper lever ... wash, etc. Switch on the windshield. Parking lights on Optional Bi-Xenon headlights will not be washed. 61 02 Instruments and controls Right-side steering wheel lever B -
Owner's Manual
Page 57
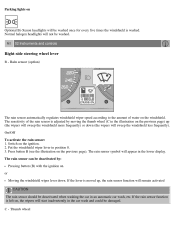
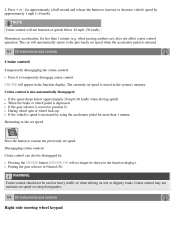
...speed. Press and hold down + or - Increasing or decreasing speed Use + or - in the center of the steering wheel hub. 1. Press the CRUISE button. The thumb wheel is used to set the wiper interval when intermittent wiping is selected, or the sensitivity to the amount of rain on the... left side of the instrument panel. Move the wheel upward or downward to increase/decrease wiper speed when the intermittent function is selected, or to increase/decrease the optional rain sensor's sensitivity ...
...speed. Press and hold down + or - Increasing or decreasing speed Use + or - in the center of the steering wheel hub. 1. Press the CRUISE button. The thumb wheel is used to set the wiper interval when intermittent wiping is selected, or the sensitivity to the amount of rain on the... left side of the instrument panel. Move the wheel upward or downward to increase/decrease wiper speed when the intermittent function is selected, or to increase/decrease the optional rain sensor's sensitivity ...
Owner's Manual
Page 58
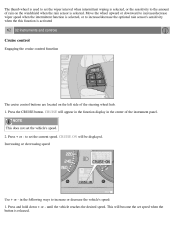
... Putting the gear selector in the function display. 2. NOTE Cruise control will no longer be used in the function display). During wheel spin or wheel lock-up. Disengaging cruise control Cruise control can also be disengaged by using the accelerator pedal for more than 1 minute (e.g. If... Cruise control should not be shown in heavy traffic or when driving on steep downgrades. 64 02 Instruments and controls Right-side steering wheel keypad Cruise control is increased by : Pressing the CRUISE button (CRUISE ON will not function at speeds below approximately 20 mph (30...
... Putting the gear selector in the function display. 2. NOTE Cruise control will no longer be used in the function display). During wheel spin or wheel lock-up. Disengaging cruise control Cruise control can also be disengaged by using the accelerator pedal for more than 1 minute (e.g. If... Cruise control should not be shown in heavy traffic or when driving on steep downgrades. 64 02 Instruments and controls Right-side steering wheel keypad Cruise control is increased by : Pressing the CRUISE button (CRUISE ON will not function at speeds below approximately 20 mph (30...
Owner's Manual
Page 59
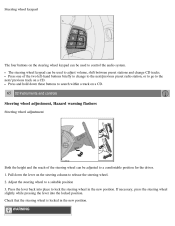
... on the steering column to release the steering wheel. 2. Adjust the steering wheel to a suitable position 3. If necessary, press the steering wheel slightly while pressing the lever into place to lock the steering wheel in the new position. Check that the steering wheel is locked in the new position. Pull down...and the reach of the two left-hand buttons briefly to change CD tracks. The steering wheel keypad can be used to control the audio system. WARNING Press one of the steering wheel can be used to adjust volume, shift between preset stations and change to the next/previous...
... on the steering column to release the steering wheel. 2. Adjust the steering wheel to a suitable position 3. If necessary, press the steering wheel slightly while pressing the lever into place to lock the steering wheel in the new position. Check that the steering wheel is locked in the new position. Pull down...and the reach of the two left-hand buttons briefly to change CD tracks. The steering wheel keypad can be used to control the audio system. WARNING Press one of the steering wheel can be used to adjust volume, shift between preset stations and change to the next/previous...
Owner's Manual
Page 60
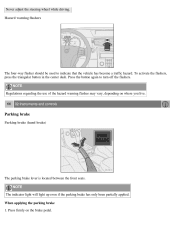
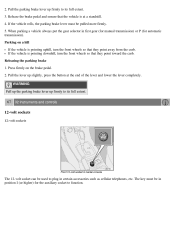
.... 66 02 Instruments and controls Parking brake Parking brake (hand brake) The parking brake lever is located between the front seats. Never adjust the steering wheel while driving. Press the button again to indicate that the vehicle has become a traffic hazard. NOTE The indicator light will light up even if the...
.... 66 02 Instruments and controls Parking brake Parking brake (hand brake) The parking brake lever is located between the front seats. Never adjust the steering wheel while driving. Press the button again to indicate that the vehicle has become a traffic hazard. NOTE The indicator light will light up even if the...
Owner's Manual
Page 61
... vehicle rolls, the parking brake lever must be in certain accessories such as cellular telephones, etc. If the vehicle is pointing uphill, turn the front wheels so that they point toward the curb. Press firmly on a hill If the vehicle is pointing downhill, turn the front... wheels so that they point away from the curb. The key must be used to function. Releasing the parking brake 1. When parking a vehicle always put the ...
... vehicle rolls, the parking brake lever must be in certain accessories such as cellular telephones, etc. If the vehicle is pointing uphill, turn the front wheels so that they point toward the curb. Press firmly on a hill If the vehicle is pointing downhill, turn the front... wheels so that they point away from the curb. The key must be used to function. Releasing the parking brake 1. When parking a vehicle always put the ...
Owner's Manual
Page 67
... control. See page 57 for which the car's lights will remain on when the high beam lever on the steering column is pulled toward the wheel with one press on the remote control. Press ENTER (D). 4. NOTE Pulling the handle twice on the central locking system's remote control is locked/unlocked with...
... control. See page 57 for which the car's lights will remain on when the high beam lever on the steering column is pulled toward the wheel with one press on the remote control. Press ENTER (D). 4. NOTE Pulling the handle twice on the central locking system's remote control is locked/unlocked with...
Owner's Manual
Page 89
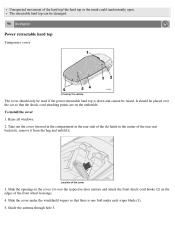
... power retractable hard top is one fold under the windshield wipers so that the shock-cord attaching points are on the edges of the front wheel housings. 4. Unexpected movement of the rear seat backrest), remove it from the bag and unfold it. 3. The retractable hard top can be damaged. 96 04...
... power retractable hard top is one fold under the windshield wipers so that the shock-cord attaching points are on the edges of the front wheel housings. 4. Unexpected movement of the rear seat backrest), remove it from the bag and unfold it. 3. The retractable hard top can be damaged. 96 04...
Owner's Manual
Page 90
.... The zipper in the wind blocker can be opened to sit in the side panels until they rest on the upper edge of the rear wheel housings. 7. Raise the wind blocker. Press the side lock tabs into the holes in the rear seat when the wind blocker is securely attached. When...
.... The zipper in the wind blocker can be opened to sit in the side panels until they rest on the upper edge of the rear wheel housings. 7. Raise the wind blocker. Press the side lock tabs into the holes in the rear seat when the wind blocker is securely attached. When...
