
Owner's Manual
Page 21
If a light does not go on the S80 All Wheel Drive and the S80 2.5T Front Wheel Drive. Yellow light: Follow the instructions shown in the text ... parking brake (hand brake) is applied. See page 138 for more information. Drive to test the function of the bulbs. Canadian models are approximately 1.8 US gal. (8 liters) of fuel remaining in the tank. 14 Indicator and warning ...US gal. (80 liters) on T6 models, or 18 US gal. (68 liters) on to an authorized Volvo retailer for an inspection of the instrument panel should go off until the parking brake has been fully released. The...
If a light does not go on the S80 All Wheel Drive and the S80 2.5T Front Wheel Drive. Yellow light: Follow the instructions shown in the text ... parking brake (hand brake) is applied. See page 138 for more information. Drive to test the function of the bulbs. Canadian models are approximately 1.8 US gal. (8 liters) of fuel remaining in the tank. 14 Indicator and warning ...US gal. (80 liters) on T6 models, or 18 US gal. (68 liters) on to an authorized Volvo retailer for an inspection of the instrument panel should go off until the parking brake has been fully released. The...
Owner's Manual
Page 79
Maintenance/Servicing pg. 113 Maintenance/Servicing Fuses 114 Replacing bulbs 119 Paint touch up 126 Washing the car 127 Cleaning the upholstery 129 Maintenance service, Warranty 130 Fuel/emissions systems 131 Drive belt, Coolant 132 Emissions maintenance 133 Washer fluid, Hoisting the car 134 Opening the hood, Engine compartment 135 Engine oil 136 Power steering/Brake fluid reservoirs 138 Replacing the battery 139 Battery maintenance 140 Replacing wiper blades 141 pg. 114 Fuses 2005 VOLVO S80 Chapter 8 -
Maintenance/Servicing pg. 113 Maintenance/Servicing Fuses 114 Replacing bulbs 119 Paint touch up 126 Washing the car 127 Cleaning the upholstery 129 Maintenance service, Warranty 130 Fuel/emissions systems 131 Drive belt, Coolant 132 Emissions maintenance 133 Washer fluid, Hoisting the car 134 Opening the hood, Engine compartment 135 Engine oil 136 Power steering/Brake fluid reservoirs 138 Replacing the battery 139 Battery maintenance 140 Replacing wiper blades 141 pg. 114 Fuses 2005 VOLVO S80 Chapter 8 -

Owner's Manual
Page 85
..., brake light, fog light, turn signal 25A Main fuse: fuses 37 and 38 40A Heated rear window 20A Heated rear window 20A pg. 119 Replacing bulbs power window, power window cut -out function 20A Rear driver's side door -
..., brake light, fog light, turn signal 25A Main fuse: fuses 37 and 38 40A Heated rear window 20A Heated rear window 20A pg. 119 Replacing bulbs power window, power window cut -out function 20A Rear driver's side door -

Owner's Manual
Page 86
...it seats properly (2). "TOP" must be done by an authorized Volvo retailer. Be sure to use bulbs of the guide lug on the bulb (3). The bulb will only seat properly in place (4). CAUTION: Do not touch the glass on halogen bulbs with the guide lug upward (1). Grease, oil or any reason ... connector into place on the base of your fingers. NOTE: If the vertical aim of the bulb (4). Replacing high/low beam headlight bulbs The headlight bulbs must be carbonized onto the bulb and cause damage to the reflector. Open the hood. Reinstall the plastic cover and turn it ...
...it seats properly (2). "TOP" must be done by an authorized Volvo retailer. Be sure to use bulbs of the guide lug on the bulb (3). The bulb will only seat properly in place (4). CAUTION: Do not touch the glass on halogen bulbs with the guide lug upward (1). Grease, oil or any reason ... connector into place on the base of your fingers. NOTE: If the vertical aim of the bulb (4). Replacing high/low beam headlight bulbs The headlight bulbs must be carbonized onto the bulb and cause damage to the reflector. Open the hood. Reinstall the plastic cover and turn it ...
Owner's Manual
Page 87
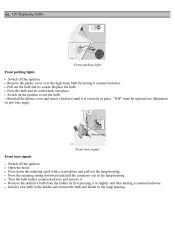
...of the lamp housing. Front turn signal Front turn it clockwise until it counterclockwise. Pull out the bulb and its socket back into place. Open the hood. pg. 120 Replacing bulbs Front parking light Front parking lights Switch off the ignition. "TOP" must be upward (see ...illustration on the ignition to test the bulb. Install a new bulb in the holder and reinsert the bulb and holder in slightly and then turning it . Turn the bulb holder counterclockwise and remove it counterclockwise. Switch on previous page). Remove the plastic ...
...of the lamp housing. Front turn signal Front turn it clockwise until it counterclockwise. Pull out the bulb and its socket back into place. Open the hood. pg. 120 Replacing bulbs Front parking light Front parking lights Switch off the ignition. "TOP" must be upward (see ...illustration on the ignition to test the bulb. Install a new bulb in the holder and reinsert the bulb and holder in slightly and then turning it . Turn the bulb holder counterclockwise and remove it counterclockwise. Switch on previous page). Remove the plastic ...
Owner's Manual
Page 88
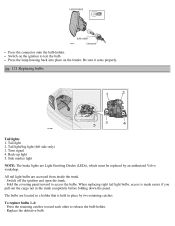
... is held in the trunk completely before folding down the panel. Press the connector onto the bulb holder. Press the lamp housing back into place on the ignition to test the bulb. Tail light 2. Turn signal 4. The bulbs are located in a holder that is made easier if you pull out the cargo net... in place by an authorized Volvo workshop. pg. 121 Replacing bulbs Tail lights 1. Back-up light 5. Tail light/fog light (left side only) 3. Side marker light NOTE: The brake lights are accessed from inside the trunk. &#...
... is held in the trunk completely before folding down the panel. Press the connector onto the bulb holder. Press the lamp housing back into place on the ignition to test the bulb. Tail light 2. Turn signal 4. The bulbs are located in a holder that is made easier if you pull out the cargo net... in place by an authorized Volvo workshop. pg. 121 Replacing bulbs Tail lights 1. Back-up light 5. Tail light/fog light (left side only) 3. Side marker light NOTE: The brake lights are accessed from inside the trunk. &#...
Owner's Manual
Page 89
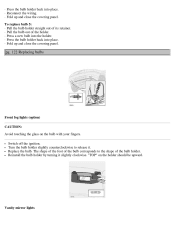
... to the shape of the holder. · Press a new bulb into the holder. · Press the bulb holder back into place. · Reconnect the wiring. · Fold up and close the covering panel. pg. 122 Replacing bulbs Front fog lights (option) CAUTION: Avoid touching the glass on ...the holder should be upward. · Press the bulb holder back into place. · Fold up and close the covering panel. The shape of...
... to the shape of the holder. · Press a new bulb into the holder. · Press the bulb holder back into place. · Reconnect the wiring. · Fold up and close the covering panel. pg. 122 Replacing bulbs Front fog lights (option) CAUTION: Avoid touching the glass on ...the holder should be upward. · Press the bulb holder back into place. · Fold up and close the covering panel. The shape of...
Owner's Manual
Page 90
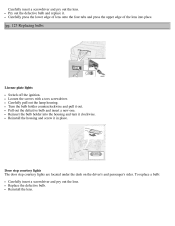
... plate lights Switch off the ignition. Carefully pull out the lamp housing. Reinsert the bulb holder into place. Replace the defective bulb. Loosen the screws with a torx screwdriver. Reinstall the housing and screw it clockwise. Reinstall the lens. Carefully press the lower edge of lens onto the ...four tabs and press the upper edge of the lens into the housing and turn it in place. Pry out the defective bulb and replace it out. Door step courtesy lights The door step courtesy lights are located under the dash on the driver's and passenger's sides. Turn...
... plate lights Switch off the ignition. Carefully pull out the lamp housing. Reinsert the bulb holder into place. Replace the defective bulb. Loosen the screws with a torx screwdriver. Reinstall the housing and screw it clockwise. Reinstall the lens. Carefully press the lower edge of lens onto the ...four tabs and press the upper edge of the lens into the housing and turn it in place. Pry out the defective bulb and replace it out. Door step courtesy lights The door step courtesy lights are located under the dash on the driver's and passenger's sides. Turn...
Owner's Manual
Page 91
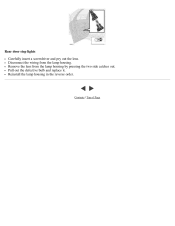
Rear door step lights Carefully insert a screwdriver and pry out the lens. Pull out the defective bulb and replace it. Reinstall the lamp housing in the reverse order. Contents | Top of Page Remove the lens from the lamp housing. Disconnect the wiring from the lamp housing by pressing the two side catches out.
Rear door step lights Carefully insert a screwdriver and pry out the lens. Pull out the defective bulb and replace it. Reinstall the lamp housing in the reverse order. Contents | Top of Page Remove the lens from the lamp housing. Disconnect the wiring from the lamp housing by pressing the two side catches out.
Owner's Manual
Page 97
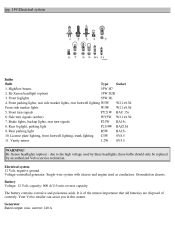
Front turn signals P21W BA15s 8. Single-wire system with chassis and engine used by these headlights, these bulbs should only be replaced by an authorized Volvo service technician. Battery Voltage: 12 Volt, capacity: 600 A/115 min. due to the high voltage used as ... PY21W BAU 15s 6. Rear parking light R5W BA15s 10. Vanity mirror 1.2W SV5.5 WARNING! pg. 149 Electrical system Bulbs Bulb Type Socket 1. Grounded on chassis. Your Volvo retailer can assist you in this matter. Bi-Xenon headlight (option) 35W D2R 3. License plate lighting, front footwell lighting...
Front turn signals P21W BA15s 8. Single-wire system with chassis and engine used by these headlights, these bulbs should only be replaced by an authorized Volvo service technician. Battery Voltage: 12 Volt, capacity: 600 A/115 min. due to the high voltage used as ... PY21W BAU 15s 6. Rear parking light R5W BA15s 10. Vanity mirror 1.2W SV5.5 WARNING! pg. 149 Electrical system Bulbs Bulb Type Socket 1. Grounded on chassis. Your Volvo retailer can assist you in this matter. Bi-Xenon headlight (option) 35W D2R 3. License plate lighting, front footwell lighting...
Owner's Manual
Page 113
......93, 149 maintenance...140 replacing...139 ventilation hose...139 Blinds - integrated...15 Brake failure warning light ...28 Brake fluid...138, 147 Brake system...18 Bulbs (list)...149 Bulbs - general information...50 Clock...27 Coat hanger...55 Cold weather driving...93 Combination filter...47, 51 Coolant...132, 147 Cooling system...86, 147 Courtesy...
......93, 149 maintenance...140 replacing...139 ventilation hose...139 Blinds - integrated...15 Brake failure warning light ...28 Brake fluid...138, 147 Brake system...18 Bulbs (list)...149 Bulbs - general information...50 Clock...27 Coat hanger...55 Cold weather driving...93 Combination filter...47, 51 Coolant...132, 147 Cooling system...86, 147 Courtesy...

Owner's Manual
Page 115
...)...11 Inflation pressure tables...101 Instrument illumination...34 Instrument panel...27 Instruments...26 Integrated booster cushion ...15 Interior Air Quality system ...51 center rear...3 Headlight bulbs -
...)...11 Inflation pressure tables...101 Instrument illumination...34 Instrument panel...27 Instruments...26 Integrated booster cushion ...15 Interior Air Quality system ...51 center rear...3 Headlight bulbs -

Owner's Manual
Page 117
heated...39 Rearview mirror...42 Refrigerant...50, 147 Refueling...74 Remote control - replacing batteries...64 Remote keyless entry system and the driver's seat...55 Replacing bulbs...119-125 Replacing fuses...114 Replacing the battery...139 Replacing wiper blades...141 Reporting safety defects...13 Road assistance...150 Roadholding...85 Roof load - child......
heated...39 Rearview mirror...42 Refrigerant...50, 147 Refueling...74 Remote control - replacing batteries...64 Remote keyless entry system and the driver's seat...55 Replacing bulbs...119-125 Replacing fuses...114 Replacing the battery...139 Replacing wiper blades...141 Reporting safety defects...13 Road assistance...150 Roadholding...85 Roof load - child......

Owner's Manual
Page 118
... in center console...58 Storage compartments...57 Sun blinds...44 Supplemental Restraint System...4, 28 Suspension...148 Switches in center console ...31 T Tachometer...27 Tail light bulbs - front...54 Self supporting run flat tires...103 Servicing...133, 134 Shiftlock...75, 76, 78, 80 Side impact airbag system (SIPS)...10 Side marker lights...
... in center console...58 Storage compartments...57 Sun blinds...44 Supplemental Restraint System...4, 28 Suspension...148 Switches in center console ...31 T Tachometer...27 Tail light bulbs - front...54 Self supporting run flat tires...103 Servicing...133, 134 Shiftlock...75, 76, 78, 80 Side impact airbag system (SIPS)...10 Side marker lights...
Owner's Manual
Page 119
replacing...124 Turn signal bulbs (front)...120 U Unlocking the trunk with master key...65 Trunk lights - electrically operated...41 Windshield washer solvent ...93 Windshield wiper blades - cleaning...129 V Vanity mirror ......141 maximum...145 Transmission - replacing...122 Vehicle Identification Number (VIN)...144 Vehicle loading...148 Ventilation...46 Ventilation hose, battery ...139 Volumes (oils and fluids) ...147 Volvo On Call...150 W Warning lights...28, 29 Warranty...130 Washer fluid reservoir...134 Washer fluid solvent...93 Washing the car...127 - 129 Water repellent glass...
replacing...124 Turn signal bulbs (front)...120 U Unlocking the trunk with master key...65 Trunk lights - electrically operated...41 Windshield washer solvent ...93 Windshield wiper blades - cleaning...129 V Vanity mirror ......141 maximum...145 Transmission - replacing...122 Vehicle Identification Number (VIN)...144 Vehicle loading...148 Ventilation...46 Ventilation hose, battery ...139 Volumes (oils and fluids) ...147 Volvo On Call...150 W Warning lights...28, 29 Warranty...130 Washer fluid reservoir...134 Washer fluid solvent...93 Washing the car...127 - 129 Water repellent glass...