Owner's Manual
Page 47
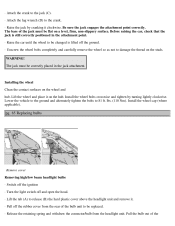
...· Release the retaining spring and withdraw the connector/bulb from the rear of the bulb unit to be changed is still correctly positioned in the jack attachment. Install the wheel bolts crosswise ... open the hood. · Lift the tab (A) to release (B) the hard plastic cover above the headlight unit and remove it on the wheel and hub. WARNING! Pull the bulb out of the jack must be...base of the Lift the wheel and place it . · Pull off the rubber cover from the headlight unit. lbs. (110 Nm). The jack must be correctly placed in the attachment point. · Raise ...
...· Release the retaining spring and withdraw the connector/bulb from the rear of the bulb unit to be changed is still correctly positioned in the jack attachment. Install the wheel bolts crosswise ... open the hood. · Lift the tab (A) to release (B) the hard plastic cover above the headlight unit and remove it on the wheel and hub. WARNING! Pull the bulb out of the jack must be...base of the Lift the wheel and place it . · Pull off the rubber cover from the headlight unit. lbs. (110 Nm). The jack must be correctly placed in the attachment point. · Raise ...
Owner's Manual
Page 48
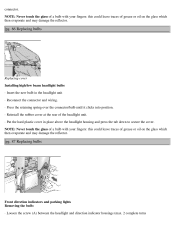
...secure the cover. pg. 87 Replacing bulbs Front direction indicators and parking lights Removing the bulb: · Loosen the screw (A) between the headlight and direction indicator housings (max. 2 complete turns NOTE: Never touch the glass of a bulb with your fingers: this could leave traces... the reflector. NOTE: Never touch the glass of a bulb with your fingers: this could leave traces of the headlight unit. · Put the hard plastic cover in the headlight unit · Reconnect the connector and wiring. · Press the retaining spring over the connector/bulb until it clicks...
...secure the cover. pg. 87 Replacing bulbs Front direction indicators and parking lights Removing the bulb: · Loosen the screw (A) between the headlight and direction indicator housings (max. 2 complete turns NOTE: Never touch the glass of a bulb with your fingers: this could leave traces... the reflector. NOTE: Never touch the glass of a bulb with your fingers: this could leave traces of the headlight unit. · Put the hard plastic cover in the headlight unit · Reconnect the connector and wiring. · Press the retaining spring over the connector/bulb until it clicks...
Owner's Manual
Page 74
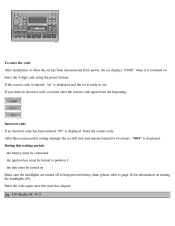
...been entered "rPt" is ready to use. After three unsuccessful coding attempts the set will lock and remain locked for information on Make sure the headlights are turned off ). Enter the code again once this waiting period: · the battery must be connected · the ignition key must ...be turned on turning the headlights off to help prevent battery drain (please refer to position I · the unit must enter the correct code again from power, the set displays "COdE" when it is displayed. If you...
...been entered "rPt" is ready to use. After three unsuccessful coding attempts the set will lock and remain locked for information on Make sure the headlights are turned off ). Enter the code again once this waiting period: · the battery must be connected · the ignition key must ...be turned on turning the headlights off to help prevent battery drain (please refer to position I · the unit must enter the correct code again from power, the set displays "COdE" when it is displayed. If you...