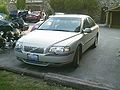

Owner's Manual
Page 20
... has detected a fault. Red light: Stop the car as soon as possible in a suitable location and read the message shown in the center of the bulbs. BRAKE Brake failure warning light If the light comes on the severity of the system. See page 109 for more information. Turn the button to... an authorized Volvo retailer for an inspection of the fault that has been detected. NOTE: The parking brake reminder light will not go off until the parking brake...
... has detected a fault. Red light: Stop the car as soon as possible in a suitable location and read the message shown in the center of the bulbs. BRAKE Brake failure warning light If the light comes on the severity of the system. See page 109 for more information. Turn the button to... an authorized Volvo retailer for an inspection of the fault that has been detected. NOTE: The parking brake reminder light will not go off until the parking brake...

Owner's Manual
Page 61
Maintenance/Servicing pg.87 Maintenance/Servicing Fuses 88 Replacing bulbs 92 Paint touch up 99 Washing the car 100 Cleaning the upholstery 101 Maintenance service, Warranty 102 Maintenance schedule 103 Fuel/emissions systems 105 Drive belt, Air pump system, Coolant 106 Servicing 107 Opening the hood, Engine compartment 109 Engine oil 110 Power steering/Brake fluid reservoirs 112 Automatic transmission fluid 113 Battery maintenance 114 Replacing wiper blades 116 pg.88 Fuses 1999 VOLVO S80 Chapter 8 -
Maintenance/Servicing pg.87 Maintenance/Servicing Fuses 88 Replacing bulbs 92 Paint touch up 99 Washing the car 100 Cleaning the upholstery 101 Maintenance service, Warranty 102 Maintenance schedule 103 Fuel/emissions systems 105 Drive belt, Air pump system, Coolant 106 Servicing 107 Opening the hood, Engine compartment 109 Engine oil 110 Power steering/Brake fluid reservoirs 112 Automatic transmission fluid 113 Battery maintenance 114 Replacing wiper blades 116 pg.88 Fuses 1999 VOLVO S80 Chapter 8 -

Owner's Manual
Page 66
..., oil or any other impurities can be replaced from the engine compartment. CAUTION: · Do not touch the glass on halogen bulbs with your fingers. Ordinary fuses Location Amperage 1 Rear electrical module, trunk lights 10A 2 Rear fog light 10A 3 Brake lights 15A 4 Backup lights 10A 5 6 ... head restraints 10A 8 Central locking system - rear doors/fuel tank cover 15A 9 Connector for trailer 20A 10 CD changer 10A pg.92 Replacing bulbs Replacing high/low beam headlight bulbs The headlight bulbs must be carbonized onto the bulb and cause damage to the reflector. · Be sure to use...
..., oil or any other impurities can be replaced from the engine compartment. CAUTION: · Do not touch the glass on halogen bulbs with your fingers. Ordinary fuses Location Amperage 1 Rear electrical module, trunk lights 10A 2 Rear fog light 10A 3 Brake lights 15A 4 Backup lights 10A 5 6 ... head restraints 10A 8 Central locking system - rear doors/fuel tank cover 15A 9 Connector for trailer 20A 10 CD changer 10A pg.92 Replacing bulbs Replacing high/low beam headlight bulbs The headlight bulbs must be carbonized onto the bulb and cause damage to the reflector. · Be sure to use...

Owner's Manual
Page 67
... should be upward. · Switch off the ignition. · Open the hood. · Remove the plastic cover over the bulb (1) by turning it counterclockwise. · Remove the connector (2). · Loosen the retaining spring (3) by an authorized Volvo retailer. Note the position of the fender, push the lamp housing out. · Turn the...
... should be upward. · Switch off the ignition. · Open the hood. · Remove the plastic cover over the bulb (1) by turning it counterclockwise. · Remove the connector (2). · Loosen the retaining spring (3) by an authorized Volvo retailer. Note the position of the fender, push the lamp housing out. · Turn the...

Owner's Manual
Page 68
...out the lamp housing. · Press the retaining spring downward and pull the connector out of the lamp housing. · Turn the bulb holder counterclockwise and remove it. · Remove the defective bulb from the holder by first pressing it in the lamp housing. · Press the connector onto the... bulb holder. · Switch on the ignition to test the bulb. · Press the lamp housing back into place on the fender. Be sure it counterclockwise. · Install a new bulb in the holder and reinsert the bulb and holder in slightly and then turning it...
...out the lamp housing. · Press the retaining spring downward and pull the connector out of the lamp housing. · Turn the bulb holder counterclockwise and remove it. · Remove the defective bulb from the holder by first pressing it in the lamp housing. · Press the connector onto the... bulb holder. · Switch on the ignition to test the bulb. · Press the lamp housing back into place on the fender. Be sure it counterclockwise. · Install a new bulb in the holder and reinsert the bulb and holder in slightly and then turning it...

Owner's Manual
Page 69
... from inside the trunk. · Switch off the ignition and open the trunk. · Fold the covering panel inward to access the bulbs. When replacing right tail light bulbs, access is made easier if you pull out the cargo net in two separate holders, an upper and a lower one. Each holder has... of the car to release the upper part of the holder. · Press the retaining catch downward to release the holder. · Replace the defective bulb. · Press the bulb holder back into place. · Reconnect the wiring. · Fold up light 3. Fog light (left side only) All tail light...
... from inside the trunk. · Switch off the ignition and open the trunk. · Fold the covering panel inward to access the bulbs. When replacing right tail light bulbs, access is made easier if you pull out the cargo net in two separate holders, an upper and a lower one. Each holder has... of the car to release the upper part of the holder. · Press the retaining catch downward to release the holder. · Replace the defective bulb. · Press the bulb holder back into place. · Reconnect the wiring. · Fold up light 3. Fog light (left side only) All tail light...

Owner's Manual
Page 70
... doors are equipped with your fingers (or a small piece of the lens into place. pg.96 Replacing bulbs The shape of the foot of the bulb corresponds to the shape of the bulb holder. · Reinstall the bulb holder by turning it . · Carefully press the lower edge of lens onto the four tabs... the upper edge of plastic or wood if necessary to avoid scratching the paint) press the lens upward and pull it out. · Replace the bulb. · Press the lens back into place. Avoid touching the glass on the holder should be upward.
... doors are equipped with your fingers (or a small piece of the lens into place. pg.96 Replacing bulbs The shape of the foot of the bulb corresponds to the shape of the bulb holder. · Reinstall the bulb holder by turning it . · Carefully press the lower edge of lens onto the four tabs... the upper edge of plastic or wood if necessary to avoid scratching the paint) press the lens upward and pull it out. · Replace the bulb. · Press the lens back into place. Avoid touching the glass on the holder should be upward.

Owner's Manual
Page 71
...with a torx screwdriver. · Carefully pull out the lamp housing. · Turn the bulb holder counterclockwise and pull it out. · Pull out the defective bulb and insert a new one. · Reinsert the bulb holder into the housing and turn it clockwise. · Reinstall the housing and screw it... in place. To replace a bulb: · Carefully insert a screwdriver and pry out the lens. · Replace the defective bulb. · Reinstall the lens. Door step courtesy lights The door step courtesy lights are located under ...
...with a torx screwdriver. · Carefully pull out the lamp housing. · Turn the bulb holder counterclockwise and pull it out. · Pull out the defective bulb and insert a new one. · Reinsert the bulb holder into the housing and turn it clockwise. · Reinstall the housing and screw it... in place. To replace a bulb: · Carefully insert a screwdriver and pry out the lens. · Replace the defective bulb. · Reinstall the lens. Door step courtesy lights The door step courtesy lights are located under ...

Owner's Manual
Page 72
Contents | Top of Page · Remove the lens from the lamp housing by pressing the two side catches out. · Pull out the defective bulb and replace it. · Reinstall the lamp housing in the reverse order.
Contents | Top of Page · Remove the lens from the lamp housing by pressing the two side catches out. · Pull out the defective bulb and replace it. · Reinstall the lamp housing in the reverse order.
Owner's Manual
Page 79
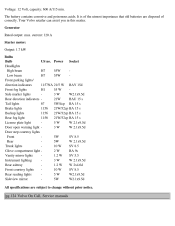
current: 120 A Starter motor: Output: 1.7 kW Bulbs Bulb US no. Headlights High beam H7 Low beam H7 Front parking lights/ direction indicators 1157NA Front...mirror lights Instrument lighting Rear ashtray Front courtesy lights Rear reading lights Sideview mirror - The battery contains corrosive and poisonous acids. Your Volvo retailer can assist you in this matter. Power 55W 55W Socket - 21/5 W BAY 15d 55 W 3W W2.1x9.5d 21W...without prior notice. Voltage: 12 Volt, capacity: 600 A/115 min. Generator Rated output: max. pg.124 Volvo On Call, Service manuals It is of correctly.
current: 120 A Starter motor: Output: 1.7 kW Bulbs Bulb US no. Headlights High beam H7 Low beam H7 Front parking lights/ direction indicators 1157NA Front...mirror lights Instrument lighting Rear ashtray Front courtesy lights Rear reading lights Sideview mirror - The battery contains corrosive and poisonous acids. Your Volvo retailer can assist you in this matter. Power 55W 55W Socket - 21/5 W BAY 15d 55 W 3W W2.1x9.5d 21W...without prior notice. Voltage: 12 Volt, capacity: 600 A/115 min. Generator Rated output: max. pg.124 Volvo On Call, Service manuals It is of correctly.
Owner's Manual
Page 90
... Child safety Child safety locks - general information Courtesy light Courtesy lights (front) - Backrests, rear seat - replacing C Capacities (oils and fluids) Cargo net in period Bulbs (list) Bulbs - rear seat Central locking buttons Chains - three-way Center console - integrated Brake failure warning light Brake fluid Brake system Break-in trunk Catalytic converters - opening...
... Child safety Child safety locks - general information Courtesy light Courtesy lights (front) - Backrests, rear seat - replacing C Capacities (oils and fluids) Cargo net in period Bulbs (list) Bulbs - rear seat Central locking buttons Chains - three-way Center console - integrated Brake failure warning light Brake fluid Brake system Break-in trunk Catalytic converters - opening...
Owner's Manual
Page 92
... panel Instruments Integrated booster cushion Interior features - replacing Headlights Heated front seats Heated rear window Heated sideview mirrors Heating Hoisting the car Hood - folding Headlight bulbs -
... panel Instruments Integrated booster cushion Interior features - replacing Headlights Heated front seats Heated rear window Heated sideview mirrors Heating Hoisting the car Hood - folding Headlight bulbs -
Owner's Manual
Page 94
... - cleaning 101 Seats - folding 27 Sideview mirrors - replacing 96 Rear fog light 25, 30 Rear reading lights 48 Rear seat backrests - replacing batteries 57 Replacing bulbs 92-98 Replacing fuses 88 Replacing wiper blades 116 Reporting safety defects 11 Road assistance 124 Roadholding 70 Roof load - heated 33 Rearview mirror 36...
... - cleaning 101 Seats - folding 27 Sideview mirrors - replacing 96 Rear fog light 25, 30 Rear reading lights 48 Rear seat backrests - replacing batteries 57 Replacing bulbs 92-98 Replacing fuses 88 Replacing wiper blades 116 Reporting safety defects 11 Road assistance 124 Roadholding 70 Roof load - heated 33 Rearview mirror 36...
Owner's Manual
Page 95
... Steering wheel lock Storage compartment in center console Storage compartments Studded tires Sun roof Supplemental Restraint System Suspension Switches in center console T Tachometer Tail light bulbs -
... Steering wheel lock Storage compartment in center console Storage compartments Studded tires Sun roof Supplemental Restraint System Suspension Switches in center console T Tachometer Tail light bulbs -