

Owners Manual
Page 44
... *: 8-passenger models only Third center seat Vertical adjustment Up Pull the head restraints up . Down Lock release button Push the head restraint down while pushing the lock release button. Front seats Vertical adjustment Up Pull the head restraints up. 1 -3 . Adjust a ble c om pone nt s (se a t s, m irrors, st e e ring w he e l) H e a d re st ra...
... *: 8-passenger models only Third center seat Vertical adjustment Up Pull the head restraints up . Down Lock release button Push the head restraint down while pushing the lock release button. Front seats Vertical adjustment Up Pull the head restraints up. 1 -3 . Adjust a ble c om pone nt s (se a t s, m irrors, st e e ring w he e l) H e a d re st ra...

Owners Manual
Page 45
Adjustable components (seats, mirrors, steering wheel) Third outside seats To use Lift up the head restraint until it locks. 1 To fold Before driving Pull the head restraint lock release lever to fold the head restraint. 1-3.
Adjustable components (seats, mirrors, steering wheel) Third outside seats To use Lift up the head restraint until it locks. 1 To fold Before driving Pull the head restraint lock release lever to fold the head restraint. 1-3.

Owners Manual
Page 46
1-3. Adjustable components (seats, mirrors, steering wheel) Third seats Pull the head restraint up while pushing the lock release button. The head restraint of outside seat cannot be removed.
1-3. Adjustable components (seats, mirrors, steering wheel) Third seats Pull the head restraint up while pushing the lock release button. The head restraint of outside seat cannot be removed.

Owners Manual
Page 49
Adjustable components (seats, mirrors, steering wheel) Releasing the belt Press the release button. 1 Before driving 1-3.
Adjustable components (seats, mirrors, steering wheel) Releasing the belt Press the release button. 1 Before driving 1-3.

Owners Manual
Page 74
If the window continues to close but then re-open slightly even after the window has closed. 1-4. If you release the switch while the window is moving, start again from the beginning. Continue holding the switch for a further 2 seconds after performing the above procedure correctly, have the vehicle inspected by your Toyota dealer. Opening and closing the windows and moon roof Hold the power back window switch in the one-touch closing position once again.
If the window continues to close but then re-open slightly even after the window has closed. 1-4. If you release the switch while the window is moving, start again from the beginning. Continue holding the switch for a further 2 seconds after performing the above procedure correctly, have the vehicle inspected by your Toyota dealer. Opening and closing the windows and moon roof Hold the power back window switch in the one-touch closing position once again.

Owners Manual
Page 79
Refueling Hang the fuel tank cap on the back of the fuel filler door. 1 Before driving Closing the fuel tank cap When installing the fuel tank cap, turn slightly to the opposite direction when released. 1-5. The cap will turn it until you hear a click.
Refueling Hang the fuel tank cap on the back of the fuel filler door. 1 Before driving Closing the fuel tank cap When installing the fuel tank cap, turn slightly to the opposite direction when released. 1-5. The cap will turn it until you hear a click.

Owners Manual
Page 120
Third center seat Secure the child restraint using the LATCH anchors or seat belt, and adjust the head restraint to the upmost position. 144 Safety information Removing a child restraint installed with a top tether strap Second seat Secure the child restraint using the LATCH anchors or seat belt, and adjust the head restraint to the upmost position. Child restraint systems with a seat belt Push the buckle release button and fully retract the seat belt. 1-7.
Third center seat Secure the child restraint using the LATCH anchors or seat belt, and adjust the head restraint to the upmost position. 144 Safety information Removing a child restraint installed with a top tether strap Second seat Secure the child restraint using the LATCH anchors or seat belt, and adjust the head restraint to the upmost position. Child restraint systems with a seat belt Push the buckle release button and fully retract the seat belt. 1-7.
Owners Manual
Page 141
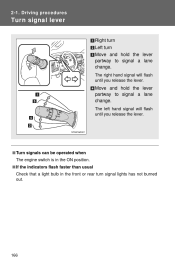
Driving proc e dure s Tur n signa l leve r Right turn Left turn Move and hold the lever partway to signal a lane change . 2 -1 . Move and hold the lever partway to signal a lane change . The left hand signal will flash until you release the lever. The right hand signal will flash until you release the lever.
Driving proc e dure s Tur n signa l leve r Right turn Left turn Move and hold the lever partway to signal a lane change . 2 -1 . Move and hold the lever partway to signal a lane change . The left hand signal will flash until you release the lever. The right hand signal will flash until you release the lever.

Owners Manual
Page 142
Canada Set the parking brake*. (Depressing the pedal again releases the parking brake.) At this time, the indicator will come on. *: Fully depress the parking brake pedal with your left foot while depressing the brake pedal with your right foot. 2 When driving Driving proc e dure s Pa rk ing bra ke U.S.A. 2 -1 .
Canada Set the parking brake*. (Depressing the pedal again releases the parking brake.) At this time, the indicator will come on. *: Fully depress the parking brake pedal with your left foot while depressing the brake pedal with your right foot. 2 When driving Driving proc e dure s Pa rk ing bra ke U.S.A. 2 -1 .

Owners Manual
Page 167
Operating the lights and wipers Turning on the high beam headlights With the headlights on, push the lever forward to turn on the high beams. Pull the lever back to the center position to turn them off. You can flash the high beams with the headlights on the high beams. Release the lever to turn on or off . Pull the lever toward you to turn the high beams off . 2-3.
Operating the lights and wipers Turning on the high beam headlights With the headlights on, push the lever forward to turn on the high beams. Pull the lever back to the center position to turn them off. You can flash the high beams with the headlights on the high beams. Release the lever to turn on or off . Pull the lever toward you to turn the high beams off . 2-3.

Owners Manual
Page 268
...blocks under both the vehicle's and trailer's wheels. Apply the parking brake firmly. Apply the parking brake firmly, and put the transmission in place, release the brakes slowly until the blocks absorb the load. 2-5. Avoid parking on a slope, but if unavoidable, do so only after parking on a ... into P and turn off the engine. ● When restarting after performing the following: Apply the brakes and keep the brake pedal pressed. Release the parking brake and brake pedal, and slowly pull or back away from the wheel blocks. Driving information ● Always place wheel blocks under...
...blocks under both the vehicle's and trailer's wheels. Apply the parking brake firmly. Apply the parking brake firmly, and put the transmission in place, release the brakes slowly until the blocks absorb the load. 2-5. Avoid parking on a slope, but if unavoidable, do so only after parking on a ... into P and turn off the engine. ● When restarting after performing the following: Apply the brakes and keep the brake pedal pressed. Release the parking brake and brake pedal, and slowly pull or back away from the wheel blocks. Driving information ● Always place wheel blocks under...

Owners Manual
Page 363
... side up , positioning the cut off corner to play the disc automatically. If the ejected disc remains in the slot for approximately 10 seconds and release it. Press disc. Using the rear seat entertainment system Loading and ejecting a disc Insert the disc into the slot with the label side up...
... side up , positioning the cut off corner to play the disc automatically. If the ejected disc remains in the slot for approximately 10 seconds and release it. Press disc. Using the rear seat entertainment system Loading and ejecting a disc Insert the disc into the slot with the label side up...

Owners Manual
Page 461
Remove the lid. Stow the lid. Using the storage features Map holder Map holder Center console Push the tab down to release the lock. CAUTION 3-7.
Remove the lid. Stow the lid. Using the storage features Map holder Map holder Center console Push the tab down to release the lock. CAUTION 3-7.

Owners Manual
Page 476
3-7. Using the storage features Auxiliary boxes Rear Pull the lid up to release the lock. Rear console box (if equipped) Pull the lever up . Pull the handle. 3 Interior features CAUTION
3-7. Using the storage features Auxiliary boxes Rear Pull the lid up to release the lock. Rear console box (if equipped) Pull the lever up . Pull the handle. 3 Interior features CAUTION

Owners Manual
Page 486
Lift the lid. 3 Interior features Back of the front console box (12 V)*1 *1 : Vehicles without rear seat entertainment system 513 3-8. Other interior features Inside the front console box (12 V) Pull the knob up to release the lock.
Lift the lid. 3 Interior features Back of the front console box (12 V)*1 *1 : Vehicles without rear seat entertainment system 513 3-8. Other interior features Inside the front console box (12 V) Pull the knob up to release the lock.
Owners Manual
Page 509
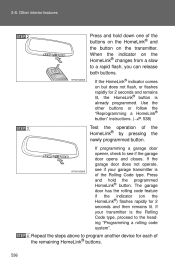
... lit. the the If programming a garage door opener, check to see if your transmitter is the Rolling Code type, proceed to a rapid flash, you can release both buttons. If the HomeLink® indicator comes on the HomeLink® changes from a slow to the heading "Programming a rolling code system". Other interior features...
... lit. the the If programming a garage door opener, check to see if your transmitter is the Rolling Code type, proceed to a rapid flash, you can release both buttons. If the HomeLink® indicator comes on the HomeLink® changes from a slow to the heading "Programming a rolling code system". Other interior features...

Owners Manual
Page 536
4 -3 . Pull up slightly. Pull the hood lock release lever. Do-it -yourse lf m a int e na nc e H ood Release the lock from the inside of the vehicle to open the hood. The hood will pop up the hood catch lever and lift the hood. CAUTION
4 -3 . Pull up slightly. Pull the hood lock release lever. Do-it -yourse lf m a int e na nc e H ood Release the lock from the inside of the vehicle to open the hood. The hood will pop up the hood catch lever and lift the hood. CAUTION

Owners Manual
Page 604
... safe place and contact your Toyota dealer. Warning light Warning light/Details Charging system warning light Indicates a malfunction in the brake system. The following warnings indicate the possibility of damage to the vehicle that parking brake is not released. Warning light Warning light/Details ...Brake system warning light (warning buzzer)* • Low brake fluid • Malfunction in a safe place and contact your Toyota dealer. Immediately stop the vehicle in the brake system...
... safe place and contact your Toyota dealer. Warning light Warning light/Details Charging system warning light Indicates a malfunction in the brake system. The following warnings indicate the possibility of damage to the vehicle that parking brake is not released. Warning light Warning light/Details ...Brake system warning light (warning buzzer)* • Low brake fluid • Malfunction in a safe place and contact your Toyota dealer. Immediately stop the vehicle in the brake system...

Owners Manual
Page 617
If the light does not go off, contact your Toyota dealer. Indicates a malfunction in a safe place, shift the shift lever to take in an emergency Warning message Details Correction procedure Stop the vehicle in the automatic transmission system A buzzer also sounds. Release the parking brake. (Flashing) Indicates that the washer fluid level is...
If the light does not go off, contact your Toyota dealer. Indicates a malfunction in a safe place, shift the shift lever to take in an emergency Warning message Details Correction procedure Stop the vehicle in the automatic transmission system A buzzer also sounds. Release the parking brake. (Flashing) Indicates that the washer fluid level is...

Owners Manual
Page 632
5 -2 . St e ps t o t a k e in a n e m e rge nc y I f t he e ngine w ill not st a r t If the engine still does not start after following the correct starting procedure (→P. 159) or releasing the steering lock (→P. 160), confirm the following points.
5 -2 . St e ps t o t a k e in a n e m e rge nc y I f t he e ngine w ill not st a r t If the engine still does not start after following the correct starting procedure (→P. 159) or releasing the steering lock (→P. 160), confirm the following points.


