

Owners Manual
Page 203
... the "Navigation System Owner's Manual". The image is shifted out of the area behind the vehicle. Vehicles with a navigation system Refer to...8226; The shift lever is displayed in reverse on the inside rear view mirror. Vehicles without a navigation system The rear view image is turned off if any one on the screen. The screen is displayed on for 5 minutes Shift lever Screen ∗:... m s Re a r vie w m onit or syst e m ∗ The rear view monitor system assists the driver by displaying an image of R • The screen remains on the inside rear view mirror. 2 -4 .
... the "Navigation System Owner's Manual". The image is shifted out of the area behind the vehicle. Vehicles with a navigation system Refer to...8226; The shift lever is displayed in reverse on the inside rear view mirror. Vehicles without a navigation system The rear view image is turned off if any one on the screen. The screen is displayed on for 5 minutes Shift lever Screen ∗:... m s Re a r vie w m onit or syst e m ∗ The rear view monitor system assists the driver by displaying an image of R • The screen remains on the inside rear view mirror. 2 -4 .
Owners Manual
Page 367
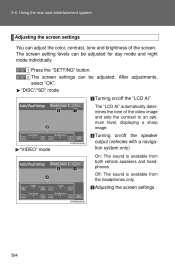
... 394 After adjustments, select "OK". The screen setting levels can adjust the color, contrast, tone and brightness of the video image and sets the contrast to an optimum level, displaying a sharp image. "VIDEO" mode Turning on /off the speaker output (vehicles with a navigation system only) On: The sound is available from both...
... 394 After adjustments, select "OK". The screen setting levels can adjust the color, contrast, tone and brightness of the video image and sets the contrast to an optimum level, displaying a sharp image. "VIDEO" mode Turning on /off the speaker output (vehicles with a navigation system only) On: The sound is available from both...
Owners Manual
Page 398
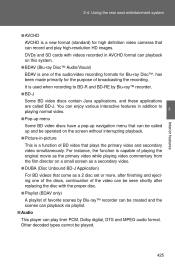
... a secondary video. ● DUBA (Disc Unbound BD-J Application) For BD videos that can be created and the scenes can record and play high-resolution HD images. DVDs and SD cards with the proper disc. ● Playlist (BDAV only) A playlist of favorite scenes by Blu-ray™ recorder. ● BD-J Some BD...
... a secondary video. ● DUBA (Disc Unbound BD-J Application) For BD videos that can be created and the scenes can record and play high-resolution HD images. DVDs and SD cards with the proper disc. ● Playlist (BDAV only) A playlist of favorite scenes by Blu-ray™ recorder. ● BD-J Some BD...

Navigation Manual
Page 20
... operated for a scheduled maintenance check, the "Maintenance Reminder" screen will be displayed when the navigation system is pressed, the function's corresponding screen will be displayed. Images shown on page 107. To register maintenance information, see "MAINTENANCE" on the initial screen can be changed to suit individual preferences. (See page 44.) CAUTION...
... operated for a scheduled maintenance check, the "Maintenance Reminder" screen will be displayed when the navigation system is pressed, the function's corresponding screen will be displayed. Images shown on page 107. To register maintenance information, see "MAINTENANCE" on the initial screen can be changed to suit individual preferences. (See page 44.) CAUTION...

Navigation Manual
Page 21
... the display properly. In such case, please leave the screen untouched and do not operate the touch screen until dew condensation disappears. ● The displayed image may become darker and moving images may be slightly distorted when the screen is sometimes difficult to clean the touch screen. 1.
... the display properly. In such case, please leave the screen untouched and do not operate the touch screen until dew condensation disappears. ● The displayed image may become darker and moving images may be slightly distorted when the screen is sometimes difficult to clean the touch screen. 1.

Navigation Manual
Page 24
BASIC INFORMATION BEFORE OPERATION 4. "Map·Menu": Touch to return to adjust the image the camera displays. The display can be turned off, and/or changed to either day or night mode. (For information regarding audio/video screen adjustment, ....) Adjusting the screen display "Camera": Touch to the screen display settings. 2 Touch "Display". 30 SCREEN SETTINGS ADJUSTMENT ADJUSTING SCREEN DISPLAY AND CAMERA SETTINGS Adjusting the image the camera displays 1 Press the "SETUP" button. SCREEN ADJUSTMENT The contrast and brightness of the screen display and the...
BASIC INFORMATION BEFORE OPERATION 4. "Map·Menu": Touch to return to adjust the image the camera displays. The display can be turned off, and/or changed to either day or night mode. (For information regarding audio/video screen adjustment, ....) Adjusting the screen display "Camera": Touch to the screen display settings. 2 Touch "Display". 30 SCREEN SETTINGS ADJUSTMENT ADJUSTING SCREEN DISPLAY AND CAMERA SETTINGS Adjusting the image the camera displays 1 Press the "SETUP" button. SCREEN ADJUSTMENT The contrast and brightness of the screen display and the...
Navigation Manual
Page 35
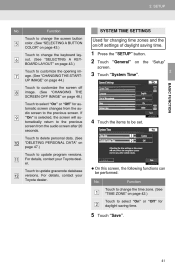
...the "SETUP" button. Function Touch to change the keyboard layout. (See "SELECTING A KEYBOARD LAYOUT" on page 43.) Touch to customize the opening image. (See "CHANGING THE STARTUP IMAGE" on page 44.) Touch to select "On" or "Off" for daylight saving time. 5 Touch "Save". 41 SYSTEM TIME SETTINGS Used for ...changing time zones and the on page 42.) Touch to the previous screen. For details, contact your Toyota dealer. On this ...
...the "SETUP" button. Function Touch to change the keyboard layout. (See "SELECTING A KEYBOARD LAYOUT" on page 43.) Touch to customize the opening image. (See "CHANGING THE STARTUP IMAGE" on page 44.) Touch to select "On" or "Off" for daylight saving time. 5 Touch "Save". 41 SYSTEM TIME SETTINGS Used for ...changing time zones and the on page 42.) Touch to the previous screen. For details, contact your Toyota dealer. On this ...

Navigation Manual
Page 38
2. SETUP 4 Touch "ABC" or "QWERTY" of "Keyboard Layout" to select a keyboard layout. An image can be copied from a USB memory and used as the startup image. (For information regarding the opening image, see "INITIAL SCREEN" on page 26.) INFORMATION The previous screen will be displayed. 5 Touch "Save". CHANGING THE STARTUP IMAGE When the engine switch is in the "ACC" or "ON" position, the initial screen will be displayed.
2. SETUP 4 Touch "ABC" or "QWERTY" of "Keyboard Layout" to select a keyboard layout. An image can be copied from a USB memory and used as the startup image. (For information regarding the opening image, see "INITIAL SCREEN" on page 26.) INFORMATION The previous screen will be displayed. 5 Touch "Save". CHANGING THE STARTUP IMAGE When the engine switch is in the "ACC" or "ON" position, the initial screen will be displayed.

Navigation Manual
Page 40
An image can be copied from a USB memory and can be set to turn off the screen. 2. SETUP CHANGING THE SCREEN OFF IMAGE Touch "Screen Off" to display when "Screen Off" is touched. (For more information on "Screen Off", see "SCREEN ADJUSTMENT" on page 30.) 5 Touch "Transfer". 6 1 2 3 4 Touch "Yes".
An image can be copied from a USB memory and can be set to turn off the screen. 2. SETUP CHANGING THE SCREEN OFF IMAGE Touch "Screen Off" to display when "Screen Off" is touched. (For more information on "Screen Off", see "SCREEN ADJUSTMENT" on page 30.) 5 Touch "Transfer". 6 1 2 3 4 Touch "Yes".
Navigation Manual
Page 41
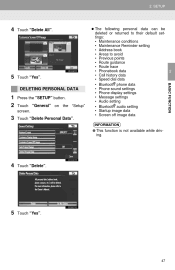
... • Bluetooth • Phone sound settings • Phone display settings • Message settings • Audio setting ® audio setting • Bluetooth • Startup image data • Screen off image data INFORMATION 2 BASIC FUNCTION ● This function is not available while driving. 4 Touch "Delete". 5 Touch "Yes". 47 DELETING PERSONAL DATA 1 2 3 Press the "SETUP...
... • Bluetooth • Phone sound settings • Phone display settings • Message settings • Audio setting ® audio setting • Bluetooth • Startup image data • Screen off image data INFORMATION 2 BASIC FUNCTION ● This function is not available while driving. 4 Touch "Delete". 5 Touch "Yes". 47 DELETING PERSONAL DATA 1 2 3 Press the "SETUP...

Navigation Manual
Page 109
...is connected, the following registered data cannot be read: • Phonebook data • Call history data • Speed dial data • Image data • Messages • Quick reply messages • All phone settings INFORMATION ● Once initialized, the data and settings will be ...initialized: • Phonebook data • Call history data • Speed dial data • Image data • All phone settings • Message settings INFORMATION Volume control switch Press the "+" side to decrease the volume. When another phone ...
...is connected, the following registered data cannot be read: • Phonebook data • Call history data • Speed dial data • Image data • Messages • Quick reply messages • All phone settings INFORMATION ● Once initialized, the data and settings will be ...initialized: • Phonebook data • Call history data • Speed dial data • Image data • All phone settings • Message settings INFORMATION Volume control switch Press the "+" side to decrease the volume. When another phone ...

Navigation Manual
Page 117
.... If your cellular phone is complete, "Done" will appear on the phonebook may be necessary to perform additional steps on the phone. • The registered image on the screen. To cancel this function, touch "Cancel". 4 PBAP compatible models When the data transfer from the connected phone. 1.
.... If your cellular phone is complete, "Done" will appear on the phonebook may be necessary to perform additional steps on the phone. • The registered image on the screen. To cancel this function, touch "Cancel". 4 PBAP compatible models When the data transfer from the connected phone. 1.

Navigation Manual
Page 132
... is displayed. 3 3 Touch "On". This is not the case when "Cancel" is transferred. INFORMATION ● Depending on the type of Bluetooth® phone, the registered image on the type of data, the phonebook data transferred until then will be required when transferring phonebook data. Touch "Automatically Download Call History" to the...
... is displayed. 3 3 Touch "On". This is not the case when "Cancel" is transferred. INFORMATION ● Depending on the type of Bluetooth® phone, the registered image on the type of data, the phonebook data transferred until then will be required when transferring phonebook data. Touch "Automatically Download Call History" to the...

Navigation Manual
Page 145
... the phone is displayed and it can be operated on the upper side of the automatic phonebook transfer completion message to set the display of images displayed during calls to "On" or "Off". Screen" or "Drop Screen button "Full Screen" mode Function When a call display. (See "...screen and it can only be operated: No. SETUP SCREEN FOR "Phone Display Settings" INCOMING CALL DISPLAY The type of images during calls. (See "ROTATING CONTACT IMAGES" on page 154.) For PBAP compatible models, touch to set the orientation of the automatic call display can be operated ...
... the phone is displayed and it can be operated on the upper side of the automatic phonebook transfer completion message to set the display of images displayed during calls to "On" or "Off". Screen" or "Drop Screen button "Full Screen" mode Function When a call display. (See "...screen and it can only be operated: No. SETUP SCREEN FOR "Phone Display Settings" INCOMING CALL DISPLAY The type of images during calls. (See "ROTATING CONTACT IMAGES" on page 154.) For PBAP compatible models, touch to set the orientation of the automatic call display can be operated ...

Navigation Manual
Page 146
SETUP 3 Touch "Save". ROTATING CONTACT IMAGES For PBAP compatible models, when "Contact Image for Incoming Calls" is set . 1 Touch "Default". 1 Touch "Rotate Contact Images". 2 Touch "Yes". 4 PHONE 2 Select the desired orientation of the image can be initialized. 2. The orientation of the image to "On", images stored together with phone numbers in the cellular phone's phonebook will be displayed. 3 Touch "Save". 155 INITIALIZING THE SETTINGS The settings can be set to be transferred and displayed during the incoming call.
SETUP 3 Touch "Save". ROTATING CONTACT IMAGES For PBAP compatible models, when "Contact Image for Incoming Calls" is set . 1 Touch "Default". 1 Touch "Rotate Contact Images". 2 Touch "Yes". 4 PHONE 2 Select the desired orientation of the image can be initialized. 2. The orientation of the image to "On", images stored together with phone numbers in the cellular phone's phonebook will be displayed. 3 Touch "Save". 155 INITIALIZING THE SETTINGS The settings can be set to be transferred and displayed during the incoming call.

Navigation Manual
Page 185
... separately.) "Audio" 197 "Subtitle" 197 DVD OPTIONS "Angle" 197 1 2 3 Press the "MEDIA" button. Touch to display the initial set up screen. Touch to display the image quality adjustment screen. Screen button "Search" Function Touch to display the title search screen.
... separately.) "Audio" 197 "Subtitle" 197 DVD OPTIONS "Angle" 197 1 2 3 Press the "MEDIA" button. Touch to display the initial set up screen. Touch to display the image quality adjustment screen. Screen button "Search" Function Touch to display the title search screen.

Navigation Manual
Page 267
... the parking space will vary according to traffic conditions, road surface conditions, vehicle condition, etc. when parking. The image shown on the screen may differ from the actual state, and you would when backing up any vehicle. ● Never back up , be sure to ... only guidelines. REAR VIEW MONITOR SYSTEM 1. REAR VIEW MONITOR SYSTEM REAR VIEW MONITOR SYSTEM The rear view monitor system assists the driver by displaying an image of and behind the vehicle with fixed guide lines on the rear view monitor system entirely when backing up looking only at the screen, possibly...
... the parking space will vary according to traffic conditions, road surface conditions, vehicle condition, etc. when parking. The image shown on the screen may differ from the actual state, and you would when backing up any vehicle. ● Never back up , be sure to ... only guidelines. REAR VIEW MONITOR SYSTEM 1. REAR VIEW MONITOR SYSTEM REAR VIEW MONITOR SYSTEM The rear view monitor system assists the driver by displaying an image of and behind the vehicle with fixed guide lines on the rear view monitor system entirely when backing up looking only at the screen, possibly...

Navigation Manual
Page 268
... objects and pedestrians that are not flat or straight, such as curves or slopes. ● In low temperatures, the screen may darken or the image may become unable to visually check all around the vehicle both directly and using tire chains or emergency tires • When the back door is... moving, or you may change. ● The camera uses a special lens. Be sure to see the image on the screen will differ from the actual distances. (See page 287.) PERIPHERAL MONITORING SYSTEM 9 283 REAR VIEW MONITOR SYSTEM CAUTION ● Do not use...
... objects and pedestrians that are not flat or straight, such as curves or slopes. ● In low temperatures, the screen may darken or the image may become unable to visually check all around the vehicle both directly and using tire chains or emergency tires • When the back door is... moving, or you may change. ● The camera uses a special lens. Be sure to see the image on the screen will differ from the actual distances. (See page 287.) PERIPHERAL MONITORING SYSTEM 9 283 REAR VIEW MONITOR SYSTEM CAUTION ● Do not use...

Navigation Manual
Page 271
...for the rear view monitor system is extremely dirty, wash it cannot transmit a clear image. 1. REAR VIEW MONITOR SYSTEM PRECAUTIONS AREA DISPLAYED ON SCREEN The rear view monitor system displays an image of bumper The image adjustment procedure for the rear view monitor system screen is the same as shown in ...to either corner of the vehicle. Screen USING THE CAMERA If the camera lens becomes dirty, it with a soft cloth. The distance of the image that appears on the screen differs from the bumper of the rear area of the bumper or under the bumper cannot be displayed on the...
...for the rear view monitor system is extremely dirty, wash it cannot transmit a clear image. 1. REAR VIEW MONITOR SYSTEM PRECAUTIONS AREA DISPLAYED ON SCREEN The rear view monitor system displays an image of bumper The image adjustment procedure for the rear view monitor system screen is the same as shown in ...to either corner of the vehicle. Screen USING THE CAMERA If the camera lens becomes dirty, it with a soft cloth. The distance of the image that appears on the screen differs from the bumper of the rear area of the bumper or under the bumper cannot be displayed on the...

Navigation Manual
Page 272
... for flat road surfaces. This may not be equal, even when they appear to be so. If this happens, have the vehicle inspected by your Toyota dealer as soon as this could cause a malfunction. The distances between the fixed guide lines on the screen and the actual distance/course on the... the camera malfunctioning. ● Do not expose the camera to the camera. Be sure to check visually. If this happens, wipe it cannot transmit a clear image. • Do not allow organic solvent, car wax, window cleaner or glass coat to adhere to strong impacts as possible.
... for flat road surfaces. This may not be equal, even when they appear to be so. If this happens, have the vehicle inspected by your Toyota dealer as soon as this could cause a malfunction. The distances between the fixed guide lines on the screen and the actual distance/course on the... the camera malfunctioning. ● Do not expose the camera to the camera. Be sure to check visually. If this happens, wipe it cannot transmit a clear image. • Do not allow organic solvent, car wax, window cleaner or glass coat to adhere to strong impacts as possible.
