

Owners Manual
Page 24
Adjust a ble c om pone nt s (se a t s, m irrors, st e e ring w he e l) Front se at s Driver's seat Seat position lever adjustment 1 Seatback angle adjustment lever Vertical height adjustment lever (if equipped) Before driving 43 1 -3 .
Adjust a ble c om pone nt s (se a t s, m irrors, st e e ring w he e l) Front se at s Driver's seat Seat position lever adjustment 1 Seatback angle adjustment lever Vertical height adjustment lever (if equipped) Before driving 43 1 -3 .

Owners Manual
Page 28
1 -3 . Stow the rear seat belt buckles as shown. 1 Before driving Stow the seat belts. Center →P. 55 Outside Use the seat belt hangers to the lowest position. 47 Adjust a ble c om pone nt s (se a t s, m irrors, st e e ring w he e l) Re a r se at s The seatbacks of the rear seats can be folded down. Remove the outside head restraints. (→P. 51) Vehicles with a split rear seats Lower the center head restraint to prevent the belts from being tangled.
1 -3 . Stow the rear seat belt buckles as shown. 1 Before driving Stow the seat belts. Center →P. 55 Outside Use the seat belt hangers to the lowest position. 47 Adjust a ble c om pone nt s (se a t s, m irrors, st e e ring w he e l) Re a r se at s The seatbacks of the rear seats can be folded down. Remove the outside head restraints. (→P. 51) Vehicles with a split rear seats Lower the center head restraint to prevent the belts from being tangled.

Owners Manual
Page 32
Adjust a ble c om pone nt s (se a t s, m irrors, st e e ring w he e l) H e a d re st ra int s Head restraints are provided for all seats. 1 -3 . Lock release button Before driving Up Pull the head restraint up. 1 Down Push the head restraint down while pushing the lock release button.
Adjust a ble c om pone nt s (se a t s, m irrors, st e e ring w he e l) H e a d re st ra int s Head restraints are provided for all seats. 1 -3 . Lock release button Before driving Up Pull the head restraint up. 1 Down Push the head restraint down while pushing the lock release button.

Owners Manual
Page 35
Adjust a ble c om pone nt s (se a t s, m irrors, st e e ring w he e l) Se at be lt s Make sure that all occupants are wearing their seat belts before driving the vehicle. 1 -3 .
Adjust a ble c om pone nt s (se a t s, m irrors, st e e ring w he e l) Se at be lt s Make sure that all occupants are wearing their seat belts before driving the vehicle. 1 -3 .

Owners Manual
Page 43
Hold the steering wheel and push the lever down. After adjustment, pull the lever up to the ideal position by moving the steering wheel. Adjust to secure the steering wheel. Adjust a ble c om pone nt s (se a t s, m irrors, st e e ring w he e l) St e e ring w he e l The steering wheel can be adjusted to a comfortable position. 1 -3 . CAUTION
Hold the steering wheel and push the lever down. After adjustment, pull the lever up to the ideal position by moving the steering wheel. Adjust to secure the steering wheel. Adjust a ble c om pone nt s (se a t s, m irrors, st e e ring w he e l) St e e ring w he e l The steering wheel can be adjusted to a comfortable position. 1 -3 . CAUTION
Owners Manual
Page 44
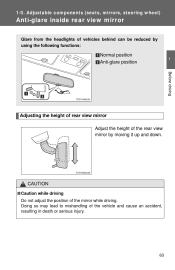
CAUTION 1 -3 . Adjust a ble c om pone nt s (se a t s, m irrors, st e e ring w he e l) Ant i-gla re inside re a r vie w m irror Glare from the headlights of vehicles behind can be reduced by using the following functions: Normal position Anti-glare position 1 Before driving Adjusting the height of rear view mirror Adjust the height of the rear view mirror by moving it up and down.
CAUTION 1 -3 . Adjust a ble c om pone nt s (se a t s, m irrors, st e e ring w he e l) Ant i-gla re inside re a r vie w m irror Glare from the headlights of vehicles behind can be reduced by using the following functions: Normal position Anti-glare position 1 Before driving Adjusting the height of rear view mirror Adjust the height of the rear view mirror by moving it up and down.

Owners Manual
Page 45
Left Right To adjust the mirror, press the switch. Vehicles with a manually adjustable type Adjust the mirror up, down, in or out by pushing the mirror surface. Up Right Down Left 64 Vehicles with a power-adjustable type To select a mirror to adjust, press the switch. 1 -3 . Adjust a ble c om pone nt s (se a t s, m irrors, st e e ring w he e l) Out side re a r vie w m irrors Mirror angle can be adjusted.
Left Right To adjust the mirror, press the switch. Vehicles with a manually adjustable type Adjust the mirror up, down, in or out by pushing the mirror surface. Up Right Down Left 64 Vehicles with a power-adjustable type To select a mirror to adjust, press the switch. 1 -3 . Adjust a ble c om pone nt s (se a t s, m irrors, st e e ring w he e l) Out side re a r vie w m irrors Mirror angle can be adjusted.

Owners Manual
Page 211
Canada: "Toyota Super Long Life Coolant" is pre-mixed with 50% coolant and 50% deionized water. Do-it -yourse lf m a int e na nc e Do-it -yourse lf se r vic e pre c a ut ions If you perform maintenance by yourself, be sure to follow the correct procedures as given in these ...amine, non-nitrite and non-borate coolant with 55% coolant and 45% deionized water. • Funnel (used only for adding engine coolant) • "Toyota Genuine Motor Oil" or equivalent • Rag or paper towel • Funnel (used only for adding engine oil) Battery condition (→P. 249) Brake fluid...
Canada: "Toyota Super Long Life Coolant" is pre-mixed with 50% coolant and 50% deionized water. Do-it -yourse lf m a int e na nc e Do-it -yourse lf se r vic e pre c a ut ions If you perform maintenance by yourself, be sure to follow the correct procedures as given in these ...amine, non-nitrite and non-borate coolant with 55% coolant and 45% deionized water. • Funnel (used only for adding engine coolant) • "Toyota Genuine Motor Oil" or equivalent • Rag or paper towel • Funnel (used only for adding engine oil) Battery condition (→P. 249) Brake fluid...

Owners Manual
Page 401
Adjust a ble c om pone nt s (se a t s, m irrors, st e e ring w he e l) Front se at s Seat position lever adjustment Seatback angle adjustment lever Vertical height adjustment lever (driver's side only) 1 Before driving CAUTION 1 -3 .
Adjust a ble c om pone nt s (se a t s, m irrors, st e e ring w he e l) Front se at s Seat position lever adjustment Seatback angle adjustment lever Vertical height adjustment lever (driver's side only) 1 Before driving CAUTION 1 -3 .

Owners Manual
Page 402
Insert the key into the hole on the center seat belt buckle to release tab (with hooked end), and allow the belt to retract. 1 -3 . Check that the security lock levers in the trunk are in unlock position. 38 Adjust a ble c om pone nt s (se a t s, m irrors, st e e ring w he e l) Re a r se at s (split re a r se at s only) The seatbacks of the rear seats can be folded down. Remove the seat belts from the seat belt guides.
Insert the key into the hole on the center seat belt buckle to release tab (with hooked end), and allow the belt to retract. 1 -3 . Check that the security lock levers in the trunk are in unlock position. 38 Adjust a ble c om pone nt s (se a t s, m irrors, st e e ring w he e l) Re a r se at s (split re a r se at s only) The seatbacks of the rear seats can be folded down. Remove the seat belts from the seat belt guides.

Owners Manual
Page 405
Adjust a ble c om pone nt s (se a t s, m irrors, st e e ring w he e l) H e a d re st ra int s Head restraints are provided for all seats. Before driving 1 Down Push the head restraints down while pushing the lock release button. Lock release button Rear seats Vertical adjustment Up Pull the head restraints up . Down Push the head restraints down while pushing the lock release button. Front seats Vertical adjustment Up Pull the head restraints up . Lock release button 1 -3 .
Adjust a ble c om pone nt s (se a t s, m irrors, st e e ring w he e l) H e a d re st ra int s Head restraints are provided for all seats. Before driving 1 Down Push the head restraints down while pushing the lock release button. Lock release button Rear seats Vertical adjustment Up Pull the head restraints up . Down Push the head restraints down while pushing the lock release button. Front seats Vertical adjustment Up Pull the head restraints up . Lock release button 1 -3 .

Owners Manual
Page 408
1 -3 . Adjust a ble c om pone nt s (se a t s, m irrors, st e e ring w he e l) Se at be lt s Make sure that all occupants are wearing their seat belts before driving the vehicle.
1 -3 . Adjust a ble c om pone nt s (se a t s, m irrors, st e e ring w he e l) Se at be lt s Make sure that all occupants are wearing their seat belts before driving the vehicle.

Owners Manual
Page 416
Hold the steering wheel and press the lever down. CAUTION After adjustment, pull the lever up to the ideal position by moving the steering wheel vertically. Adjust to secure the steering wheel. 1 -3 . Adjust a ble c om pone nt s (se a t s, m irrors, st e e ring w he e l) St e e ring w he e l The steering wheel can be adjusted to a comfortable position.
Hold the steering wheel and press the lever down. CAUTION After adjustment, pull the lever up to the ideal position by moving the steering wheel vertically. Adjust to secure the steering wheel. 1 -3 . Adjust a ble c om pone nt s (se a t s, m irrors, st e e ring w he e l) St e e ring w he e l The steering wheel can be adjusted to a comfortable position.
Owners Manual
Page 417
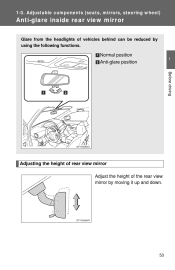
Normal position Anti-glare position 1 Before driving Adjusting the height of rear view mirror Adjust the height of vehicles behind can be reduced by moving it up and down. 53 1 -3 . Adjust a ble c om pone nt s (se a t s, m irrors, st e e ring w he e l) Ant i-gla re inside re a r vie w m irror Glare from the headlights of the rear view mirror by using the following functions.
Normal position Anti-glare position 1 Before driving Adjusting the height of rear view mirror Adjust the height of vehicles behind can be reduced by moving it up and down. 53 1 -3 . Adjust a ble c om pone nt s (se a t s, m irrors, st e e ring w he e l) Ant i-gla re inside re a r vie w m irror Glare from the headlights of the rear view mirror by using the following functions.

Owners Manual
Page 419
Before driving 1 Manually adjustable type Adjust the mirror up , down , in or out using the switch. 1 -3 . Power-adjustable type Select a mirror to adjust. (L: left or R: right) Adjust the mirror up , down , in or out using the switch or lever. Adjust a ble c om pone nt s (se a t s, m irrors, st e e ring w he e l) Out side re a r vie w m irrors Mirror angle can be adjusted using the lever. 55
Before driving 1 Manually adjustable type Adjust the mirror up , down , in or out using the switch. 1 -3 . Power-adjustable type Select a mirror to adjust. (L: left or R: right) Adjust the mirror up , down , in or out using the switch or lever. Adjust a ble c om pone nt s (se a t s, m irrors, st e e ring w he e l) Out side re a r vie w m irrors Mirror angle can be adjusted using the lever. 55

Owners Manual
Page 611
...for adding oil) • Fuse with long-life hybrid organic acid technology. Do-it -yourse lf m a int e na nc e Do-it -yourse lf se r vic e pre c a ut ions If you perform maintenance yourself, be sure to follow the correct procedures as original Battery condition (→P. 265) Brake fluid ... terminal clamp bolts) • Distilled water • FMVSS No.116 DOT 3 or SAE J1703 brake fluid • Rag or paper towel • "Toyota Super Long Life Coolant" or similar high quality ethylene glycol based non-silicate, nonamine, non-nitrite and non-borate coolant with same amperage rating as...
...for adding oil) • Fuse with long-life hybrid organic acid technology. Do-it -yourse lf m a int e na nc e Do-it -yourse lf se r vic e pre c a ut ions If you perform maintenance yourself, be sure to follow the correct procedures as original Battery condition (→P. 265) Brake fluid ... terminal clamp bolts) • Distilled water • FMVSS No.116 DOT 3 or SAE J1703 brake fluid • Rag or paper towel • "Toyota Super Long Life Coolant" or similar high quality ethylene glycol based non-silicate, nonamine, non-nitrite and non-borate coolant with same amperage rating as...

