

Owners Manual
Page 1
... in an accident. 6 Vehicle specifications Detailed vehicle information. 7 For owners Reporting safety defects for U.S. TABLE OF CONTENTS 1 Before driving Adjusting and operating features such as door locks, mirrors, and steering column. 2 When driving Driving, stopping and safe-driving information. 3 Interior features Air conditioning and audio systems, as well as other interior features for a comfortable...
... in an accident. 6 Vehicle specifications Detailed vehicle information. 7 For owners Reporting safety defects for U.S. TABLE OF CONTENTS 1 Before driving Adjusting and operating features such as door locks, mirrors, and steering column. 2 When driving Driving, stopping and safe-driving information. 3 Interior features Air conditioning and audio systems, as well as other interior features for a comfortable...

Owners Manual
Page 4
... a non-trivial crash situation occurs; These data can read data recorded by your vehicle were operating; no data are recorded by the EDR under normal driving conditions and no personal data (e.g., name, gender, age, and crash location) are recorded by an EDR, special equipment is needed. Whether or not the driver...
... a non-trivial crash situation occurs; These data can read data recorded by your vehicle were operating; no data are recorded by the EDR under normal driving conditions and no personal data (e.g., name, gender, age, and crash location) are recorded by an EDR, special equipment is needed. Whether or not the driver...
Owners Manual
Page 10
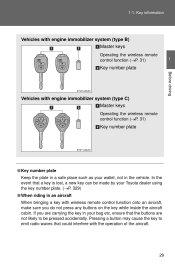
Key information Vehicles with engine immobilizer system (type B) Master keys Operating the wireless remote control function (→P. 31) 1 Key number plate Before driving Vehicles with engine immobilizer system (type C) Master keys Operating the wireless remote control function (→P. 31) Key number plate 1-1.
Key information Vehicles with engine immobilizer system (type B) Master keys Operating the wireless remote control function (→P. 31) 1 Key number plate Before driving Vehicles with engine immobilizer system (type C) Master keys Operating the wireless remote control function (→P. 31) Key number plate 1-1.

Owners Manual
Page 12
Pressing the button again within 3 seconds unlocks the other doors. 1 Before driving Type B Locks all the doors Unlocks all the doors Sounds the alarm (press and hold ) ∗: If equipped 31 Pressing the button again within 3 seconds ...
Pressing the button again within 3 seconds unlocks the other doors. 1 Before driving Type B Locks all the doors Unlocks all the doors Sounds the alarm (press and hold ) ∗: If equipped 31 Pressing the button again within 3 seconds ...

Owners Manual
Page 22
... door, it may cause hands to be caught and injured. Make sure that the back door is recommended. 1 Before driving 41 1-2. When installing an accessory part to the back door, using a genuine Toyota part is fully open or close the back door, and do not hang on the back door damper stay...
... door, it may cause hands to be caught and injured. Make sure that the back door is recommended. 1 Before driving 41 1-2. When installing an accessory part to the back door, using a genuine Toyota part is fully open or close the back door, and do not hang on the back door damper stay...

Owners Manual
Page 24
Adjust a ble c om pone nt s (se a t s, m irrors, st e e ring w he e l) Front se at s Driver's seat Seat position lever adjustment 1 Seatback angle adjustment lever Vertical height adjustment lever (if equipped) Before driving 43 1 -3 .
Adjust a ble c om pone nt s (se a t s, m irrors, st e e ring w he e l) Front se at s Driver's seat Seat position lever adjustment 1 Seatback angle adjustment lever Vertical height adjustment lever (if equipped) Before driving 43 1 -3 .

Owners Manual
Page 28
Adjust a ble c om pone nt s (se a t s, m irrors, st e e ring w he e l) Re a r se at s The seatbacks of the rear seats can be folded down. Center →P. 55 Outside Use the seat belt hangers to the lowest position. 47 Remove the outside head restraints. (→P. 51) Vehicles with a split rear seats Lower the center head restraint to prevent the belts from being tangled. Stow the rear seat belt buckles as shown. 1 Before driving Stow the seat belts. 1 -3 .
Adjust a ble c om pone nt s (se a t s, m irrors, st e e ring w he e l) Re a r se at s The seatbacks of the rear seats can be folded down. Center →P. 55 Outside Use the seat belt hangers to the lowest position. 47 Remove the outside head restraints. (→P. 51) Vehicles with a split rear seats Lower the center head restraint to prevent the belts from being tangled. Stow the rear seat belt buckles as shown. 1 Before driving Stow the seat belts. 1 -3 .

Owners Manual
Page 32
1 -3 . Up Pull the head restraint up. 1 Down Push the head restraint down while pushing the lock release button. Lock release button Before driving Adjust a ble c om pone nt s (se a t s, m irrors, st e e ring w he e l) H e a d re st ra int s Head restraints are provided for all seats.
1 -3 . Up Pull the head restraint up. 1 Down Push the head restraint down while pushing the lock release button. Lock release button Before driving Adjust a ble c om pone nt s (se a t s, m irrors, st e e ring w he e l) H e a d re st ra int s Head restraints are provided for all seats.

Owners Manual
Page 35
1 -3 . Adjust a ble c om pone nt s (se a t s, m irrors, st e e ring w he e l) Se at be lt s Make sure that all occupants are wearing their seat belts before driving the vehicle.
1 -3 . Adjust a ble c om pone nt s (se a t s, m irrors, st e e ring w he e l) Se at be lt s Make sure that all occupants are wearing their seat belts before driving the vehicle.

Owners Manual
Page 36
Both seat belt buckles must be correctly located and securely latched for use of the center seat belt. Make sure that the buckle is a 3-point type restraint with concave end (tab "B") A B 1 Before driving Matches the tab with hooked end (tab "A") Matches the tab with 2 buckles. Adjustable components (seats, mirrors, steering wheel) Rear center seat belt The rear center seat belt is securely latched ready for proper operation. 1-3.
Both seat belt buckles must be correctly located and securely latched for use of the center seat belt. Make sure that the buckle is a 3-point type restraint with concave end (tab "B") A B 1 Before driving Matches the tab with hooked end (tab "A") Matches the tab with 2 buckles. Adjustable components (seats, mirrors, steering wheel) Rear center seat belt The rear center seat belt is securely latched ready for proper operation. 1-3.
Owners Manual
Page 44
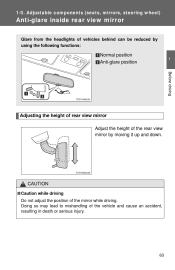
CAUTION Adjust a ble c om pone nt s (se a t s, m irrors, st e e ring w he e l) Ant i-gla re inside re a r vie w m irror Glare from the headlights of vehicles behind can be reduced by using the following functions: Normal position Anti-glare position 1 Before driving Adjusting the height of rear view mirror Adjust the height of the rear view mirror by moving it up and down. 1 -3 .
CAUTION Adjust a ble c om pone nt s (se a t s, m irrors, st e e ring w he e l) Ant i-gla re inside re a r vie w m irror Glare from the headlights of vehicles behind can be reduced by using the following functions: Normal position Anti-glare position 1 Before driving Adjusting the height of rear view mirror Adjust the height of the rear view mirror by moving it up and down. 1 -3 .

Owners Manual
Page 46
1-3. Adjustable components (seats, mirrors, steering wheel) Folding the mirrors Push the mirror back in the direction of the vehicle's rear. 1 Before driving
1-3. Adjustable components (seats, mirrors, steering wheel) Folding the mirrors Push the mirror back in the direction of the vehicle's rear. 1 Before driving

Owners Manual
Page 48
1 -4 . Use this switch to lock the passenger window switches. Operating the switch moves the windows as follows: Closing Opening One-touch opening or closing a passenger window. Window lock switch Press the switch down to prevent children from accidentally opening (driver's window only)* Before driving 1 *: Pushing the switch in the opposite direction will stop window travel partway. Ope ning a nd c losing t he w indow s Pow e r w indow s ∗ The power windows can be opened and closed using the switches.
1 -4 . Use this switch to lock the passenger window switches. Operating the switch moves the windows as follows: Closing Opening One-touch opening or closing a passenger window. Window lock switch Press the switch down to prevent children from accidentally opening (driver's window only)* Before driving 1 *: Pushing the switch in the opposite direction will stop window travel partway. Ope ning a nd c losing t he w indow s Pow e r w indow s ∗ The power windows can be opened and closed using the switches.

Owners Manual
Page 58
1 -6 . Do not remove under penalty of parts from stolen vehicles. T he ft de t e rre nt syst e m T he ft preve nt ion la be ls (exc e pt Ca na da ) These labels are attached to the vehicle to reduce vehicle theft by facilitating the tracing and recovery of law. 1 Before driving 77
1 -6 . Do not remove under penalty of parts from stolen vehicles. T he ft de t e rre nt syst e m T he ft preve nt ion la be ls (exc e pt Ca na da ) These labels are attached to the vehicle to reduce vehicle theft by facilitating the tracing and recovery of law. 1 Before driving 77

Owners Manual
Page 59
1 -7 . Sa fe t y inform a t ion Corre c t driving post ure Drive with a good posture as follows: Sit upright and well back in the seat. (→P. 43) Adjust the position of the seat forward or backward to ...
1 -7 . Sa fe t y inform a t ion Corre c t driving post ure Drive with a good posture as follows: Sit upright and well back in the seat. (→P. 43) Adjust the position of the seat forward or backward to ...

Owners Manual
Page 62
Safety information SRS side and curtain shield airbags SRS side airbags Can help protect the torso of occupants in the outer seats. 1-7. SRS curtain shield airbags Can help restrain the driver and front passenger. 1 Before driving 81 Other SRS airbags SRS seat cushion airbags Can help protect primarily the head of the front seat occupants.
Safety information SRS side and curtain shield airbags SRS side airbags Can help protect the torso of occupants in the outer seats. 1-7. SRS curtain shield airbags Can help restrain the driver and front passenger. 1 Before driving 81 Other SRS airbags SRS seat cushion airbags Can help protect primarily the head of the front seat occupants.

Owners Manual
Page 68
..., or the vehicle was involved in an accident that was not severe enough to cause the SRS side and curtain shield airbags to inflate. 1 Before driving ● The pad section of the steering wheel, dashboard near the front passenger airbag or lower portion of the instrument panel is scratched, cracked, or...
..., or the vehicle was involved in an accident that was not severe enough to cause the SRS side and curtain shield airbags to inflate. 1 Before driving ● The pad section of the steering wheel, dashboard near the front passenger airbag or lower portion of the instrument panel is scratched, cracked, or...

Owners Manual
Page 74
Sa fe t y inform a t ion Front pa sse nge r oc c upa nt cla ssific at ion syst e m Your vehicle is equipped with a front passenger occupant classification system. This system detects the conditions of the front passenger seat and activates or deactivates the devices for front passenger. 1 Before driving SRS warning light Front passenger's seat belt reminder light "AIR BAG OFF" indicator light "AIR BAG ON" indicator light 93 1 -7 .
Sa fe t y inform a t ion Front pa sse nge r oc c upa nt cla ssific at ion syst e m Your vehicle is equipped with a front passenger occupant classification system. This system detects the conditions of the front passenger seat and activates or deactivates the devices for front passenger. 1 Before driving SRS warning light Front passenger's seat belt reminder light "AIR BAG OFF" indicator light "AIR BAG ON" indicator light 93 1 -7 .

Owners Manual
Page 80
Safety information Forward facing - Convertible seat 1 Before driving Booster seat 1-7.
Safety information Forward facing - Convertible seat 1 Before driving Booster seat 1-7.

Owners Manual
Page 84
Safety information Installation with LATCH system Type A Widen the gap between the seat cushion and seatback slightly. 1-7. If the child restraint has a top tether strap, the top tether strap should be latched onto the top tether strap anchor. Latch the hooks of a lower connector system. 1 Before driving Canada only 103 For owners in Canada: The symbol on a child restraint system indicates the presence of the lower straps onto the LATCH anchors.
Safety information Installation with LATCH system Type A Widen the gap between the seat cushion and seatback slightly. 1-7. If the child restraint has a top tether strap, the top tether strap should be latched onto the top tether strap anchor. Latch the hooks of a lower connector system. 1 Before driving Canada only 103 For owners in Canada: The symbol on a child restraint system indicates the presence of the lower straps onto the LATCH anchors.
