

Owners Manual
Page 59
... protecting your vehicle, performing do-ityourself maintenance, and maintenance information 5 When trouble arises What to do if the vehicle needs to be towed, gets a flat tire, or is involved in an accident 6 Vehicle specifications Detailed vehicle information 7 For owners Reporting safety defects for Canadian owners Index Alphabetical listing of information contained...
... protecting your vehicle, performing do-ityourself maintenance, and maintenance information 5 When trouble arises What to do if the vehicle needs to be towed, gets a flat tire, or is involved in an accident 6 Vehicle specifications Detailed vehicle information 7 For owners Reporting safety defects for Canadian owners Index Alphabetical listing of information contained...

Owners Manual
Page 311
... the situations below, the system may not be able to correctly detect the surrounding brightness levels, and may be causing problems or distress to a flat tire, a trailer being switched between in an abnormal manner. The high beam and low beam are not aimed properly. 2-3.
... the situations below, the system may not be able to correctly detect the surrounding brightness levels, and may be causing problems or distress to a flat tire, a trailer being switched between in an abnormal manner. The high beam and low beam are not aimed properly. 2-3.

Owners Manual
Page 400
... following in your trailer as speed increases. Instability of the vehicle-trailer combination. 366 SIENNA_U (OM45477U) 2-5. Do not exceed the posted towing speed limit. ● Toyota recommends that the vehicle-trailer speed limit is lowest. Driving information Trailer towing tips Your vehicle will handle differently when towing a trailer. Exceeding speed limits...
... following in your trailer as speed increases. Instability of the vehicle-trailer combination. 366 SIENNA_U (OM45477U) 2-5. Do not exceed the posted towing speed limit. ● Toyota recommends that the vehicle-trailer speed limit is lowest. Driving information Trailer towing tips Your vehicle will handle differently when towing a trailer. Exceeding speed limits...

Owners Manual
Page 676
4-2. Maintenance Vehicle exterior Items Doors Engine hood Check points • Do the doors operate smoothly? • Does the engine hood lock system work properly? • There should not be any signs of fluid leakage after the vehicle has been parked. Fluid leaks Tires • Is the tire inflation pressure correct? • The tires should not be damaged or excessively worn. • Have the tires been rotated according to the maintenance schedule? • The wheel nuts should not be loose. 4 Maintenance and care CAUTION
4-2. Maintenance Vehicle exterior Items Doors Engine hood Check points • Do the doors operate smoothly? • Does the engine hood lock system work properly? • There should not be any signs of fluid leakage after the vehicle has been parked. Fluid leaks Tires • Is the tire inflation pressure correct? • The tires should not be damaged or excessively worn. • Have the tires been rotated according to the maintenance schedule? • The wheel nuts should not be loose. 4 Maintenance and care CAUTION
Owners Manual
Page 679
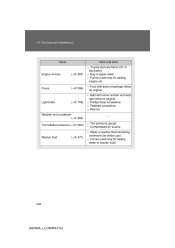
4-3. Do-it-yourself maintenance Items Parts and tools • "Toyota Genuine Motor Oil" or equivalent • Rag or paper towel • Funnel (used only for adding engine oil) • Fuse with same amperage rating... screwdriver • Wrench ⎯ Engine oil level (→P. 657) Fuses (→P. 696) Light bulbs (→P. 709) Radiator and condenser (→P. 664) Tire inflation pressure (→P. 683) • Tire pressure gauge • Compressed air source • Water or washer fluid containing antifreeze (for winter use) • Funnel (used only for adding water...
4-3. Do-it-yourself maintenance Items Parts and tools • "Toyota Genuine Motor Oil" or equivalent • Rag or paper towel • Funnel (used only for adding engine oil) • Fuse with same amperage rating... screwdriver • Wrench ⎯ Engine oil level (→P. 657) Fuses (→P. 696) Light bulbs (→P. 709) Radiator and condenser (→P. 664) Tire inflation pressure (→P. 683) • Tire pressure gauge • Compressed air source • Water or washer fluid containing antifreeze (for winter use) • Funnel (used only for adding water...

Owners Manual
Page 703
Do-it -yourse lf m a int e na nc e T ire s Replace or rotate tires in accordance with maintenance schedules and treadwear. 4 -3 .
Do-it -yourse lf m a int e na nc e T ire s Replace or rotate tires in accordance with maintenance schedules and treadwear. 4 -3 .
Owners Manual
Page 705
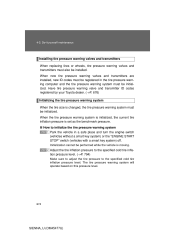
... installed, new ID codes must be registered in the tire pressure warning computer and the tire pressure warning system must be initialized. Have tire pressure warning valve and transmitter ID codes registered by your Toyota dealer. (→P. 676) Initializing the tire pressure warning system When the tire size is set as the benchmark pressure. 4-3. Do-it...
... installed, new ID codes must be registered in the tire pressure warning computer and the tire pressure warning system must be initialized. Have tire pressure warning valve and transmitter ID codes registered by your Toyota dealer. (→P. 676) Initializing the tire pressure warning system When the tire size is set as the benchmark pressure. 4-3. Do-it...

Owners Manual
Page 706
... a few minutes with a smart key system). 4-3. Do-it-yourself maintenance STEP 3 Turn the engine switch to the "ACC" or "LOCK" position. Press and hold the tire pressure warning reset switch until the tire pressure warning light blinks slowly 3 times.
... a few minutes with a smart key system). 4-3. Do-it-yourself maintenance STEP 3 Turn the engine switch to the "ACC" or "LOCK" position. Press and hold the tire pressure warning reset switch until the tire pressure warning light blinks slowly 3 times.
Owners Manual
Page 707
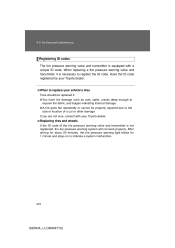
Have the ID code registered by your Toyota dealer. When replacing a tire pressure warning valve and transmitter, it -yourself maintenance Registering ID codes The tire pressure warning valve and transmitter is necessary to register the ID code. 4-3. Do-it is equipped with a unique ID code.
Have the ID code registered by your Toyota dealer. When replacing a tire pressure warning valve and transmitter, it -yourself maintenance Registering ID codes The tire pressure warning valve and transmitter is necessary to register the ID code. 4-3. Do-it is equipped with a unique ID code.

Owners Manual
Page 718
Otherwise, the tire may separate from the wheel or cause a loss of handling control. Do-it -yourse lf m a int e na nc e Whe e ls If a wheel is bent, cracked or heavily corroded, it should be replaced. 4 -3 .
Otherwise, the tire may separate from the wheel or cause a loss of handling control. Do-it -yourse lf m a int e na nc e Whe e ls If a wheel is bent, cracked or heavily corroded, it should be replaced. 4 -3 .
Owners Manual
Page 764
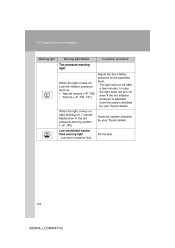
... light does not turn off • Natural causes → ( P. 738) even if the tire inflation • Flat tire → ( P. 745, 747) pressure is adjusted, have the system checked by your Toyota dealer. When the light comes on : The light will turn off after blinking for 1 minute:... Malfunction in an emergency Warning light Warning light/Details Correction procedure Tire pressure warning light Adjust the tire inflation pressure to the specified level. ...
... light does not turn off • Natural causes → ( P. 738) even if the tire inflation • Flat tire → ( P. 745, 747) pressure is adjusted, have the system checked by your Toyota dealer. When the light comes on : The light will turn off after blinking for 1 minute:... Malfunction in an emergency Warning light Warning light/Details Correction procedure Tire pressure warning light Adjust the tire inflation pressure to the specified level. ...

Owners Manual
Page 773
... approximately one or more tires or wheels on the vehicle that the replacement or alternate tires and wheels allow the TPMS (tire pressure warning system) to continue to detect or signal low tire pressure as the malfunction exists. TPMS (tire pressure warning system) malfunctions...a variety of reasons, including the installation of replacement or alternate tires or wheels on your vehicle to ensure that prevent the TPMS (tire pressure warning system) from functioning properly. The TPMS (tire pressure warning system) malfunction indicator is not operating properly. NOTICE ...
... approximately one or more tires or wheels on the vehicle that the replacement or alternate tires and wheels allow the TPMS (tire pressure warning system) to continue to detect or signal low tire pressure as the malfunction exists. TPMS (tire pressure warning system) malfunctions...a variety of reasons, including the installation of replacement or alternate tires or wheels on your vehicle to ensure that prevent the TPMS (tire pressure warning system) from functioning properly. The TPMS (tire pressure warning system) malfunction indicator is not operating properly. NOTICE ...

Owners Manual
Page 775
In this case, slow down and drive with run -flat tires) You can continue driving a vehicle with extra caution. St e ps t o t a k e in a n e m e rge nc y If you have a flat tire (vehicles w ith run -flat tires even if any tire goes flat. 5 -2 .
In this case, slow down and drive with run -flat tires) You can continue driving a vehicle with extra caution. St e ps t o t a k e in a n e m e rge nc y If you have a flat tire (vehicles w ith run -flat tires even if any tire goes flat. 5 -2 .

Owners Manual
Page 777
5 -2 . St e ps t o t a k e in a n e m e rge nc y If you have a flat tire (vehicles w ith standard tires) Remove the flat tire and replace it with the spare tire provided.
5 -2 . St e ps t o t a k e in a n e m e rge nc y If you have a flat tire (vehicles w ith standard tires) Remove the flat tire and replace it with the spare tire provided.

Owners Manual
Page 779
Taking out the spare tire STEP 1 Slide the front passenger's seat to the frontmost lock position and the right side second seat to take in an emergency STEP 4 Remove the wheel nut wrench. Open the right side sliding door and you will not interfere with the jack handle. STEP 2 5 When trouble arises 749 SIENNA_U (OM45477U) 5-2. Steps to the rearmost lock position so they will find the spare tire clamp bolt. Pull back the flap to find the flap on the floor.
Taking out the spare tire STEP 1 Slide the front passenger's seat to the frontmost lock position and the right side second seat to take in an emergency STEP 4 Remove the wheel nut wrench. Open the right side sliding door and you will not interfere with the jack handle. STEP 2 5 When trouble arises 749 SIENNA_U (OM45477U) 5-2. Steps to the rearmost lock position so they will find the spare tire clamp bolt. Pull back the flap to find the flap on the floor.

Owners Manual
Page 780
5-2. The tire will be lowered completely to take in an emergency STEP 3 Attach the adapter socket over the spare tire clamp bolt. STEP 4 Take the spare tire out from underneath the vehicle and remove the holding bracket. 750 SIENNA_U (OM45477U) Connect the jack handle and the adapter socket. Steps to the ground. Turn the jack handle.
5-2. The tire will be lowered completely to take in an emergency STEP 3 Attach the adapter socket over the spare tire clamp bolt. STEP 4 Take the spare tire out from underneath the vehicle and remove the holding bracket. 750 SIENNA_U (OM45477U) Connect the jack handle and the adapter socket. Steps to the ground. Turn the jack handle.

Owners Manual
Page 781
5-2. Steps to take in an emergency Replacing a flat tire STEP 1 Chock the tires. Flat tire Front Left-hand side Right-hand side Left-hand side Right-hand side Wheel chock positions Behind the rear right-hand side tire Behind the rear left-hand side tire In front of the front right-hand side tire In front of the front left-hand side tire Rear STEP 2 Slightly loosen the wheel nuts (one turn). 5 When trouble arises 751 SIENNA_U (OM45477U)
5-2. Steps to take in an emergency Replacing a flat tire STEP 1 Chock the tires. Flat tire Front Left-hand side Right-hand side Left-hand side Right-hand side Wheel chock positions Behind the rear right-hand side tire Behind the rear left-hand side tire In front of the front right-hand side tire In front of the front left-hand side tire Rear STEP 2 Slightly loosen the wheel nuts (one turn). 5 When trouble arises 751 SIENNA_U (OM45477U)

Owners Manual
Page 782
Steps to avoid scratching the wheel surface. 752 SIENNA_U (OM45477U) When resting the tire on the ground, place the tire so that the wheel design faces up to take in an emergency STEP 3 Turn the tire jack portion "A" by hand until the tire is in contact with the jack point. STEP 5 Remove all the wheel nuts and the tire. STEP 4 Raise the vehicle until the notch of the jack is slightly raised off the ground. 5-2.
Steps to avoid scratching the wheel surface. 752 SIENNA_U (OM45477U) When resting the tire on the ground, place the tire so that the wheel design faces up to take in an emergency STEP 3 Turn the tire jack portion "A" by hand until the tire is in contact with the jack point. STEP 5 Remove all the wheel nuts and the tire. STEP 4 Raise the vehicle until the notch of the jack is slightly raised off the ground. 5-2.

Owners Manual
Page 783
STEP 2 Tapered portion Install the tire and loosely tighten each wheel nut by hand by approximately the same amount. Tighten the wheel nuts until the tapered portion comes into loose contact with the disc wheel seat. Disc wheel seat STEP 3 Lower the vehicle. 5 When trouble arises 753 SIENNA_U (OM45477U) 5-2. Steps to come off. If foreign matter is on the wheel contact surface, the wheel nuts may loosen while the vehicle is in motion, causing the tire to take in an emergency Installing the spare tire STEP 1 Remove any dirt or foreign matter from the wheel contact surface.
STEP 2 Tapered portion Install the tire and loosely tighten each wheel nut by hand by approximately the same amount. Tighten the wheel nuts until the tapered portion comes into loose contact with the disc wheel seat. Disc wheel seat STEP 3 Lower the vehicle. 5 When trouble arises 753 SIENNA_U (OM45477U) 5-2. Steps to come off. If foreign matter is on the wheel contact surface, the wheel nuts may loosen while the vehicle is in motion, causing the tire to take in an emergency Installing the spare tire STEP 1 Remove any dirt or foreign matter from the wheel contact surface.

Owners Manual
Page 784
Steps to take in an emergency STEP 4 Firmly tighten each wheel nut two or three times in the order shown in the tire bag. 754 SIENNA_U (OM45477U) Tightening torque: 76 ft• lbf (103 N• m, 10.5 kgf• m) STEP 5 Stow the flat tire, tire jack and all tools. STEP 2 Place tire standing up in rear tub, after putting the tire in the illustration. Stowing the flat tire STEP 1 Remove clasps and strap. 5-2.
Steps to take in an emergency STEP 4 Firmly tighten each wheel nut two or three times in the order shown in the tire bag. 754 SIENNA_U (OM45477U) Tightening torque: 76 ft• lbf (103 N• m, 10.5 kgf• m) STEP 5 Stow the flat tire, tire jack and all tools. STEP 2 Place tire standing up in rear tub, after putting the tire in the illustration. Stowing the flat tire STEP 1 Remove clasps and strap. 5-2.


