
Owners Manual
Page 4
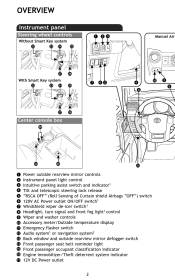
...") switch 120V AC Power outlet ON/OFF switch1 Windshield wiper de-icer switch1 Headlight, turn signal and front fog light1 control Wiper and washer controls Accessory meter/Outside temperature display Emergency flasher switch Audio system1 or navigation system2 Back window and outside rearview mirror defogger switch Front passenger seat belt reminder...
...") switch 120V AC Power outlet ON/OFF switch1 Windshield wiper de-icer switch1 Headlight, turn signal and front fog light1 control Wiper and washer controls Accessory meter/Outside temperature display Emergency flasher switch Audio system1 or navigation system2 Back window and outside rearview mirror defogger switch Front passenger seat belt reminder...

Owners Manual
Page 9
... door lock/unlock/open Unlock Lock Open Push Push Push Carry remote to lock/unlock/open NOTE: Doors may also be in succession from: ACCESSORY ON OFF Locking Accessories such as the radio will change the operation mode in Park and brake pedal depressed. Smart Key system (if equipped) Start function OVERVIEW...
... door lock/unlock/open Unlock Lock Open Push Push Push Carry remote to lock/unlock/open NOTE: Doors may also be in succession from: ACCESSORY ON OFF Locking Accessories such as the radio will change the operation mode in Park and brake pedal depressed. Smart Key system (if equipped) Start function OVERVIEW...

Owners Manual
Page 25
..." position to enjoy music played on , selects an audio source The Bluetooth® audio system enables you to be in the Owner's Manual for car accessories. Bluetooth® audio (if equipped) Audio unit Microphone OVERVIEW Steering wheel audio switches Volume Selects a track and album Turns the power on a portable digital audio...
..." position to enjoy music played on , selects an audio source The Bluetooth® audio system enables you to be in the Owner's Manual for car accessories. Bluetooth® audio (if equipped) Audio unit Microphone OVERVIEW Steering wheel audio switches Volume Selects a track and album Turns the power on a portable digital audio...

Owners Manual
Page 28
...) switch (vehicles with a smart key system) ...Automatic transmission ...Turn signal lever ...Parking brake ...Horn...2-2. Instrument cluster Gauges and meters ...182 Indicators and warning lights ...189 Accessory meter...194 154 164 167 173 179 180 181 2 S. Safety information Correct driving posture ...SRS airbags ...Front passenger occupant classification system...Child restraint systems ...Installing...
...) switch (vehicles with a smart key system) ...Automatic transmission ...Turn signal lever ...Parking brake ...Horn...2-2. Instrument cluster Gauges and meters ...182 Indicators and warning lights ...189 Accessory meter...194 154 164 167 173 179 180 181 2 S. Safety information Correct driving posture ...SRS airbags ...Front passenger occupant classification system...Child restraint systems ...Installing...

Owners Manual
Page 40
Pictorial index Instrument panel Headlight switch P. 198 Turn signal lever P. 179 Fog light switch∗ P. 204 Gauges and meters P. 182 Windshield wiper and washer switch P. 205 Rear window wiper and washer switch P. 207 Accessory meter P. 194 Compass P. 450 Clock P. 431 Outside temperature display P. 433 Emergency flasher switch P. 554 Glove box P. 417 CTHPIAS059 USB port∗ P. 348 Shift lever P. 173 Parking brake pedal P. 180 Hood lock release lever P. 494 Bottle holders P. 427 14 Power outlets P. 436 Audio system∗ P. 313 Navigation system*1
Pictorial index Instrument panel Headlight switch P. 198 Turn signal lever P. 179 Fog light switch∗ P. 204 Gauges and meters P. 182 Windshield wiper and washer switch P. 205 Rear window wiper and washer switch P. 207 Accessory meter P. 194 Compass P. 450 Clock P. 431 Outside temperature display P. 433 Emergency flasher switch P. 554 Glove box P. 417 CTHPIAS059 USB port∗ P. 348 Shift lever P. 173 Parking brake pedal P. 180 Hood lock release lever P. 494 Bottle holders P. 427 14 Power outlets P. 436 Audio system∗ P. 313 Navigation system*1

Owners Manual
Page 50
...should not be covered under the vehicle for equipment not installed on your Toyota vehicle. Therefore, you may find some explanations for several minutes. Noise from your Toyota A wide variety of equipment. Accessories, spare parts and modification of your vehicle in terms of non-genuine ...spare parts and accessories for any time without notice. Modification with non-genuine Toyota products. However, because of the Toyota policy of continual product improvement, we reserve the right to make changes at the time...
...should not be covered under the vehicle for equipment not installed on your Toyota vehicle. Therefore, you may find some explanations for several minutes. Noise from your Toyota A wide variety of equipment. Accessories, spare parts and modification of your vehicle in terms of non-genuine ...spare parts and accessories for any time without notice. Modification with non-genuine Toyota products. However, because of the Toyota policy of continual product improvement, we reserve the right to make changes at the time...

Owners Manual
Page 64
... handle with the electronic key still inside the vehicle. Correction procedure 1 Before driving Exterior alarm sounds once for 10 seconds An attempt was not in ACCESSORY mode.) Retrieve the electronic key from the vehicle and lock the doors again. Interior alarm pings repeatedly Turn the "ENGINE START STOP" switch off and... The following table describes circumstances and correction procedures when only alarms are sounded. The "ENGINE START STOP" switch was open . Shift the shift lever to ACCESSORY mode while the driver's door was turned to P.
... handle with the electronic key still inside the vehicle. Correction procedure 1 Before driving Exterior alarm sounds once for 10 seconds An attempt was not in ACCESSORY mode.) Retrieve the electronic key from the vehicle and lock the doors again. Interior alarm pings repeatedly Turn the "ENGINE START STOP" switch off and... The following table describes circumstances and correction procedures when only alarms are sounded. The "ENGINE START STOP" switch was open . Shift the shift lever to ACCESSORY mode while the driver's door was turned to P.

Owners Manual
Page 84
... door. If the back door handle is opened fully. from being caught. 1 Before driving CTH12AS035 CTH12AS037 ● Do not pull on an incline than genuine Toyota parts to press it is not opened . 59 Make sure that the back door is about to prevent your fingers etc. It is fully open...; The back door may cause hands to be caught or the back door damper stay to break, causing an accident. ● Do not attach any accessories other than on the back door damper stay. 1-2.
... door. If the back door handle is opened fully. from being caught. 1 Before driving CTH12AS035 CTH12AS037 ● Do not pull on an incline than genuine Toyota parts to press it is not opened . 59 Make sure that the back door is about to prevent your fingers etc. It is fully open...; The back door may cause hands to be caught or the back door damper stay to break, causing an accident. ● Do not attach any accessories other than on the back door damper stay. 1-2.

Owners Manual
Page 131
CTH16AS004 The indicator light stops flashing after the "ENGINE START STOP" switch has been turned to ACCESSORY or IGNITION ON mode to indicate that the system has been canceled. 106 The indicator light stops flashing after the registered key has been inserted ...
CTH16AS004 The indicator light stops flashing after the "ENGINE START STOP" switch has been turned to ACCESSORY or IGNITION ON mode to indicate that the system has been canceled. 106 The indicator light stops flashing after the registered key has been inserted ...

Owners Manual
Page 193
... START STOP" switch is stopped with the shift lever in amber and then press the "ENGINE START STOP" switch once. Shift the shift lever to ACCESSORY mode. 2-1.
... START STOP" switch is stopped with the shift lever in amber and then press the "ENGINE START STOP" switch once. Shift the shift lever to ACCESSORY mode. 2-1.

Owners Manual
Page 218
"MODE/ "SET/ " button " button Trip information (→P. 195) Displays driving range and average fuel consumption Outside temperature display (→P. 433) Compass (→P. 450) Clock (→P. 431) H (Hour) button (→P. 431) M (Minute) button (→P. 431) Multi-terrain Select display (→P. 245) Automatically displayed when using Multi-terrain Select 194 Instrument cluster Accessory meter The accessory meter presents the driver with a variety of drivingrelated data including the current outside air temperature. 2-2.
"MODE/ "SET/ " button " button Trip information (→P. 195) Displays driving range and average fuel consumption Outside temperature display (→P. 433) Compass (→P. 450) Clock (→P. 431) H (Hour) button (→P. 431) M (Minute) button (→P. 431) Multi-terrain Select display (→P. 245) Automatically displayed when using Multi-terrain Select 194 Instrument cluster Accessory meter The accessory meter presents the driver with a variety of drivingrelated data including the current outside air temperature. 2-2.

Owners Manual
Page 220
" button. " or "SET/ Vehicles without Multi-terrain Select Vehicles with Multi-terrain Select STEP 4 Press and hold the "MODE/ Press the "MODE/ " button. 2-2. STEP 1 STEP 2 STEP 3 Turn the headlight switch off. Instrument cluster Accessory meter light control The daytime brightness of the accessory meter can be adjusted. Press and hold the "SET/ " button. 196
" button. " or "SET/ Vehicles without Multi-terrain Select Vehicles with Multi-terrain Select STEP 4 Press and hold the "MODE/ Press the "MODE/ " button. 2-2. STEP 1 STEP 2 STEP 3 Turn the headlight switch off. Instrument cluster Accessory meter light control The daytime brightness of the accessory meter can be adjusted. Press and hold the "SET/ " button. 196

Owners Manual
Page 269
Additionally, guidance messages such as transfer mode selection advice are displayed on the accessory meter to enhance off-road drivability. 2-4. Using other driving systems Multi-terrain Select∗ The Multi-terrain Select system has 4 terrain modes. When a terrain mode is selected in accordance with terrain conditions, engine power and active traction control system is controlled to assist the driver in operating the vehicle. 2 When driving CTH24AS025U "ON/OFF" switch Mode selector dial Mode indicators Multi-terrain Select indicator Accessory meter ∗: If equipped 245
Additionally, guidance messages such as transfer mode selection advice are displayed on the accessory meter to enhance off-road drivability. 2-4. Using other driving systems Multi-terrain Select∗ The Multi-terrain Select system has 4 terrain modes. When a terrain mode is selected in accordance with terrain conditions, engine power and active traction control system is controlled to assist the driver in operating the vehicle. 2 When driving CTH24AS025U "ON/OFF" switch Mode selector dial Mode indicators Multi-terrain Select indicator Accessory meter ∗: If equipped 245

Owners Manual
Page 272
Follow the instructions displayed on the accessory meter. The applicable road conditions will be operated. STEP 2 Turn the dial to select the desired mode. If the mode indicator flashes, Multi-terrain Select ... present mode. The indicator of the selected mode will come on and the applicable road conditions will come on the accessory meter. All the mode indicators will be displayed on the accessory meter and check that the mode indicator stops flashing. (→P. 249) 248 Using other driving systems Selecting modes STEP 1 Press...
Follow the instructions displayed on the accessory meter. The applicable road conditions will be operated. STEP 2 Turn the dial to select the desired mode. If the mode indicator flashes, Multi-terrain Select ... present mode. The indicator of the selected mode will come on and the applicable road conditions will come on the accessory meter. All the mode indicators will be displayed on the accessory meter and check that the mode indicator stops flashing. (→P. 249) 248 Using other driving systems Selecting modes STEP 1 Press...

Owners Manual
Page 273
... shifting the front-wheel control lever to H4 or L4. Indicates that the rear differential is operating. Using other driving systems Messages displayed on the accessory meter Depending on switch operation, one of the following messages may not successfully change. Drive the vehicle forward or backward a short distance. - 249 ...WHEN Multi-terrain Select ACTIVATED (When pressing the VSC off switch or "ATRAC" switch) Details Indicates that the transfer mode may appear on the accessory meter to L4. Indicates that the transfer mode needs to be changed to H4 or L4.
... shifting the front-wheel control lever to H4 or L4. Indicates that the rear differential is operating. Using other driving systems Messages displayed on the accessory meter Depending on switch operation, one of the following messages may not successfully change. Drive the vehicle forward or backward a short distance. - 249 ...WHEN Multi-terrain Select ACTIVATED (When pressing the VSC off switch or "ATRAC" switch) Details Indicates that the transfer mode may appear on the accessory meter to L4. Indicates that the transfer mode needs to be changed to H4 or L4.

Owners Manual
Page 398
... Bluetooth® audio system STEP 3 Press the talk switch and say "List audio players". Vehicles with smart key system: If "From car" is in either ACCESSORY or IGNITION ON mode. STEP 2 Select the name of the portable player to be automatically connected whenever the engine switch is selected, the portable player...
... Bluetooth® audio system STEP 3 Press the talk switch and say "List audio players". Vehicles with smart key system: If "From car" is in either ACCESSORY or IGNITION ON mode. STEP 2 Select the name of the portable player to be automatically connected whenever the engine switch is selected, the portable player...

Owners Manual
Page 435
...) Shift lever light (when the engine switch is in the "ACC" or "ON" position [without a smart key system] or "ENGINE START STOP" switch is in ACCESSORY or IGNITION ON mode [with a smart key system]) Inside door handle lights (if equipped) Outer foot lights (if equipped) Engine switch light (vehicles without a smart...
...) Shift lever light (when the engine switch is in the "ACC" or "ON" position [without a smart key system] or "ENGINE START STOP" switch is in ACCESSORY or IGNITION ON mode [with a smart key system]) Inside door handle lights (if equipped) Outer foot lights (if equipped) Engine switch light (vehicles without a smart...

Owners Manual
Page 458
Other interior features Power outlets (12V DC) The power outlet can be used for 12 V accessories that run on less than 10 A. 3-7. Center panel CTH37AS006 436
Other interior features Power outlets (12V DC) The power outlet can be used for 12 V accessories that run on less than 10 A. 3-7. Center panel CTH37AS006 436

Owners Manual
Page 472
"MODE/ "SET/ " button " button Direction display 3-7. Other interior features Compass The compass on the accessory meter display indicates the direction in which the vehicle is heading.
"MODE/ "SET/ " button " button Direction display 3-7. Other interior features Compass The compass on the accessory meter display indicates the direction in which the vehicle is heading.

Owners Manual
Page 474
...Press and hold the "MODE/ " button. A number (1 to 15) will appear on the display. When the parking lights are off : In accessory meter light control mode (→P. 196), press and hold the "MODE/ " button. A number (1 to 15) will appear on the display. 452 Change the... by doing the following. Vehicles without Multi-terrain Select Vehicles with Multi-terrain Select When the parking lights are off : In accessory meter light control mode (→P. 196), press and hold the "MODE/ " button. 3-7. Other interior features Deviation calibration STEP 1 STEP 2 Stop ...
...Press and hold the "MODE/ " button. A number (1 to 15) will appear on the display. When the parking lights are off : In accessory meter light control mode (→P. 196), press and hold the "MODE/ " button. A number (1 to 15) will appear on the display. 452 Change the... by doing the following. Vehicles without Multi-terrain Select Vehicles with Multi-terrain Select When the parking lights are off : In accessory meter light control mode (→P. 196), press and hold the "MODE/ " button. 3-7. Other interior features Deviation calibration STEP 1 STEP 2 Stop ...