

Owners Manual
Page 27
Specifications...462 Maintenance data (fuel, oil level, etc.) ...462 Fuel information ...479 Tire information ...482 6-2. owners ...496 Seat belt instructions for U.S. Steps to do if...517 2 3 459 6 Vehicle specifications 4 6-1. Index Abbreviation list...506 1 424 433 449 450 451 452 456 Alphabetical index ...508 What to take in ...
Specifications...462 Maintenance data (fuel, oil level, etc.) ...462 Fuel information ...479 Tire information ...482 6-2. owners ...496 Seat belt instructions for U.S. Steps to do if...517 2 3 459 6 Vehicle specifications 4 6-1. Index Abbreviation list...506 1 424 433 449 450 451 452 456 Alphabetical index ...508 What to take in ...

Owners Manual
Page 64
...little to the right to do so may result in reverse order. 1 Before driving Rear step bumper For rear end protection and easier step-up camera and the vehicle. 1-2. To get on the rear step bumper, use the shaded area in serious personal injury or damage to the vehicle components. ...Failure to do so may result in the illustration. l Do not get on the rear step bumper. 43 n Caution while driving Observe the following precautions. CAUTION n Before removing the tailgate Disconnect the wire harness between the back-up loading....
...little to the right to do so may result in reverse order. 1 Before driving Rear step bumper For rear end protection and easier step-up camera and the vehicle. 1-2. To get on the rear step bumper, use the shaded area in serious personal injury or damage to the vehicle components. ...Failure to do so may result in the illustration. l Do not get on the rear step bumper. 43 n Caution while driving Observe the following precautions. CAUTION n Before removing the tailgate Disconnect the wire harness between the back-up loading....

Owners Manual
Page 65
n After closing and locking the doors NOTICE n To prevent damage to make sure it is securely locked. n To prevent damage to the rear step bumper Do not allow more than one person to the camera lens (vehicles with rear view monitor system) Store the removed tailgate with the back-up camera lens facing upward. Opening, closing the tailgate Try pulling it toward you to the tailgate wire harness Do not pull out all of the tailgate wire harness before open the tailgate. 1-2. n To prevent damage to get on the rear step bumper at a time. 44
n After closing and locking the doors NOTICE n To prevent damage to make sure it is securely locked. n To prevent damage to the rear step bumper Do not allow more than one person to the camera lens (vehicles with rear view monitor system) Store the removed tailgate with the back-up camera lens facing upward. Opening, closing the tailgate Try pulling it toward you to the tailgate wire harness Do not pull out all of the tailgate wire harness before open the tailgate. 1-2. n To prevent damage to get on the rear step bumper at a time. 44

Owners Manual
Page 93
n Opening the fuel tank cap Open the fuel filler door. Turn the fuel tank cap slowly to open . 72 n Before refueling the vehicle Turn the engine switch off and ensure that all the doors and windows are closed. 1 -5 . Re fue ling Ope ning t he fue l t a nk c a p Perform the following steps to open the fuel tank cap.
n Opening the fuel tank cap Open the fuel filler door. Turn the fuel tank cap slowly to open . 72 n Before refueling the vehicle Turn the engine switch off and ensure that all the doors and windows are closed. 1 -5 . Re fue ling Ope ning t he fue l t a nk c a p Perform the following steps to open the fuel tank cap.

Owners Manual
Page 191
...way. Turn the front-wheel drive control switch counterclockwise. If the four-wheel drive indicator flashes and the buzzer sounds, try the above steps again. 171 2 When driving Manual transmission Stop the vehicle or reduce your speed to H4 Automatic transmission Stop the vehicle completely. Push ...and turn the front-wheel drive control switch fully clockwise. If the four-wheel drive indicator flashes and the buzzer sounds, try the above steps again. Push and turn the front-wheel drive control switch fully clockwise. n Shifting from H4 to less than 2 mph (3 km/h). Turn...
...way. Turn the front-wheel drive control switch counterclockwise. If the four-wheel drive indicator flashes and the buzzer sounds, try the above steps again. 171 2 When driving Manual transmission Stop the vehicle or reduce your speed to H4 Automatic transmission Stop the vehicle completely. Push ...and turn the front-wheel drive control switch fully clockwise. If the four-wheel drive indicator flashes and the buzzer sounds, try the above steps again. Push and turn the front-wheel drive control switch fully clockwise. n Shifting from H4 to less than 2 mph (3 km/h). Turn...

Owners Manual
Page 216
...and cargo being loaded on the total weight of the occupants. (Cargo capacity) = (Total load capacity) − (Total weight of occupants) Steps for Determining Correct Load Limit- (1) Locate the statement "The combined weight of cargo and luggage load capacity. That weight may not safely exceed ...the available cargo and luggage load capacity calculated in Step 4. 196 Capacity and distribution Cargo capacity depends on the vehicle. l Do not exceed a total tensile load of the rails. For example,...
...and cargo being loaded on the total weight of the occupants. (Cargo capacity) = (Total load capacity) − (Total weight of occupants) Steps for Determining Correct Load Limit- (1) Locate the statement "The combined weight of cargo and luggage load capacity. That weight may not safely exceed ...the available cargo and luggage load capacity calculated in Step 4. 196 Capacity and distribution Cargo capacity depends on the vehicle. l Do not exceed a total tensile load of the rails. For example,...

Owners Manual
Page 298
The following function can be used for registered cellular phones: n Functions and operation procedures To enter a menu for each function, follow the steps below by using voice commands or : l Registering a cellular phone 1. "Setup" → 2. "Setup" → 2. "Set passkey" l Deleting a cellular phone 1. "Phone setup" → 3. "Setup" → 2. "Phone setup" &#...
The following function can be used for registered cellular phones: n Functions and operation procedures To enter a menu for each function, follow the steps below by using voice commands or : l Registering a cellular phone 1. "Setup" → 2. "Setup" → 2. "Set passkey" l Deleting a cellular phone 1. "Phone setup" → 3. "Setup" → 2. "Phone setup" &#...

Owners Manual
Page 303
... VOL)" l Initialization 1. "(INITIALIZE)" can only be used for c e llula r phone ) Se c urit y a nd syst e m se t up To enter the menu of each setting, follow the steps below: n Security setting items and operation procedure l Setting or changing the PIN (Personal Identification Number) 1. "Setup" → 2. "Setup" → 2. "Setup" → 2. "Security" → 3. "Phone book...
... VOL)" l Initialization 1. "(INITIALIZE)" can only be used for c e llula r phone ) Se c urit y a nd syst e m se t up To enter the menu of each setting, follow the steps below: n Security setting items and operation procedure l Setting or changing the PIN (Personal Identification Number) 1. "Setup" → 2. "Setup" → 2. "Setup" → 2. "Security" → 3. "Phone book...

Owners Manual
Page 306
... book" → 2. U sing t he ha nds-fre e phone syst e m (for c e llula r phone ) U sing t he phone book To enter the menu of each setting, follow the steps below: l Adding a new phone number 1. "Set speed dial (SPEED DIAL)" l Deleting registered data 1. "Add entry" l Changing a registered name 1. "Phone book" → 2. "Delete speed dial (DEL...
... book" → 2. U sing t he ha nds-fre e phone syst e m (for c e llula r phone ) U sing t he phone book To enter the menu of each setting, follow the steps below: l Adding a new phone number 1. "Set speed dial (SPEED DIAL)" l Deleting registered data 1. "Add entry" l Changing a registered name 1. "Phone book" → 2. "Delete speed dial (DEL...
Owners Manual
Page 442
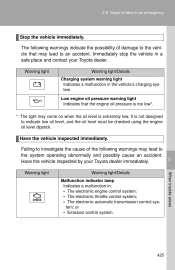
Steps to the system operating abnormally and possibly cause an accident. Warning light Warning light/Details Charging system warning light Indicates a malfunction in an emergency Stop ... may lead to take in the vehicle's charging system. Warning light Warning light/Details Malfunction indicator lamp Indicates a malfunction in a safe place and contact your Toyota dealer immediately. Immediately stop the vehicle in : • The electronic engine control system; • The electronic throttle control system; • The electronic automatic transmission control...
Steps to the system operating abnormally and possibly cause an accident. Warning light Warning light/Details Charging system warning light Indicates a malfunction in an emergency Stop ... may lead to take in the vehicle's charging system. Warning light Warning light/Details Malfunction indicator lamp Indicates a malfunction in a safe place and contact your Toyota dealer immediately. Immediately stop the vehicle in : • The electronic engine control system; • The electronic throttle control system; • The electronic automatic transmission control...

Owners Manual
Page 443
... in : • The SRS airbag system; • The front passenger occupant classification system; • The passenger airbag off switch (Access Cab models); or • The hill-start assist control system (if equipped). Steps to indicate a malfunction in: • The VSC; • The TRAC; • The active traction control system (if equipped); •...
... in : • The SRS airbag system; • The front passenger occupant classification system; • The passenger airbag off switch (Access Cab models); or • The hill-start assist control system (if equipped). Steps to indicate a malfunction in: • The VSC; • The TRAC; • The active traction control system (if equipped); •...

Owners Manual
Page 444
... the suspected problem, check that a door is not fully closed . (On the instrument cluster) Fasten the seat belt. After taking the specified steps to take in the tire pressure warning system. Fasten the seat belt. (On the center panel) Tire pressure warning light • When the light comes ... (warning buzzer)*2 Warns the front passenger to fasten his /her seat belt. When trouble arises Refuel the vehicle. 427 Have the system checked by your Toyota dealer. 5-2. Warning light Warning light/Details Open door warning light Indicates that the warning light turns off.
... the suspected problem, check that a door is not fully closed . (On the instrument cluster) Fasten the seat belt. After taking the specified steps to take in the tire pressure warning system. Fasten the seat belt. (On the center panel) Tire pressure warning light • When the light comes ... (warning buzzer)*2 Warns the front passenger to fasten his /her seat belt. When trouble arises Refuel the vehicle. 427 Have the system checked by your Toyota dealer. 5-2. Warning light Warning light/Details Open door warning light Indicates that the warning light turns off.

Owners Manual
Page 445
... has reached a speed of at least 12 mph (20 km/h), the buzzer sounds intermittently for 6 seconds. Then, if the seat belt is not fastened. sary. Steps to take in a different tone for 20 more seconds. *2 : Front passenger's seat belt reminder: The front passenger's seat belt reminder sounds to alert the front...
... has reached a speed of at least 12 mph (20 km/h), the buzzer sounds intermittently for 6 seconds. Then, if the seat belt is not fastened. sary. Steps to take in a different tone for 20 more seconds. *2 : Front passenger's seat belt reminder: The front passenger's seat belt reminder sounds to alert the front...

Owners Manual
Page 446
... will turn off after a few minutes). n If the malfunction indicator lamp comes on while driving First check the following: l Is your Toyota dealer as soon as natural air leaks or tire inflation pressure changes caused by temperature. If the light does not go off after taking several... tire is placed on the front passenger seat, depending on Check the tire inflation pressure and adjust to natural causes such as possible. 5-2. Steps to natural causes 5 The tire pressure warning light may turn off even though the flat tire is , refuel the vehicle immediately. The tire...
... will turn off after a few minutes). n If the malfunction indicator lamp comes on while driving First check the following: l Is your Toyota dealer as soon as natural air leaks or tire inflation pressure changes caused by temperature. If the light does not go off after taking several... tire is placed on the front passenger seat, depending on Check the tire inflation pressure and adjust to natural causes such as possible. 5-2. Steps to natural causes 5 The tire pressure warning light may turn off even though the flat tire is , refuel the vehicle immediately. The tire...

Owners Manual
Page 447
Steps to take in an emergency n If the tire pressure warning system is in use Toyota wheels, the tire pressure warning system may be disabled. (Customizable features →P. 493) 430 only) Make sure to the ON position, have it checked by your Toyota dealer. l If a window tint that can be ...data. (→P. 361) n Customization that affects the radio wave signals is a lot of tires.) l If tire chains are used . l If non-genuine Toyota wheels are used. l If there is installed. l If the tire inflation pressure is not registered in the vehicle. l If a radio set at...
Steps to take in an emergency n If the tire pressure warning system is in use Toyota wheels, the tire pressure warning system may be disabled. (Customizable features →P. 493) 430 only) Make sure to the ON position, have it checked by your Toyota dealer. l If a window tint that can be ...data. (→P. 361) n Customization that affects the radio wave signals is a lot of tires.) l If tire chains are used . l If non-genuine Toyota wheels are used. l If there is installed. l If the tire inflation pressure is not registered in the vehicle. l If a radio set at...

Owners Manual
Page 448
5-2. Steps to take in a safe place as soon as possible, and inflate them to the spare tire and have a flat tire. Adjust the tire inflation pressure ... tire pressure warning light comes on a significantly underinflated tire causes the tire to overheat and can lead to the inflation pressure recommended by the nearest Toyota dealer.
5-2. Steps to take in a safe place as soon as possible, and inflate them to the spare tire and have a flat tire. Adjust the tire inflation pressure ... tire pressure warning light comes on a significantly underinflated tire causes the tire to overheat and can lead to the inflation pressure recommended by the nearest Toyota dealer.

Owners Manual
Page 449
... warning system may not be able to take in an emergency CAUTION Please note that prevent the TPMS (tire pressure warning system) from functioning properly. Steps to detect or signal low tire pressure as the malfunction exists. This sequence will flash for proper tire maintenance, and it is illuminated, the system...
... warning system may not be able to take in an emergency CAUTION Please note that prevent the TPMS (tire pressure warning system) from functioning properly. Steps to detect or signal low tire pressure as the malfunction exists. This sequence will flash for proper tire maintenance, and it is illuminated, the system...

Owners Manual
Page 451
Steps to take in an emergency Access Cab models Tool bag Jack Double Cab models Tool bag Jack Taking out the jack and tool bag Regular Cab models Pull the lever and fold down the seatback. 434 5-2.
Steps to take in an emergency Access Cab models Tool bag Jack Double Cab models Tool bag Jack Taking out the jack and tool bag Regular Cab models Pull the lever and fold down the seatback. 434 5-2.

Owners Manual
Page 452
5-2. Loosen Tighten Access Cab models Pull up the lever Raise the bottom cushion up. 5 When trouble arises Turn the knob counterclockwise. 435 Loosen and remove the jack. Steps to take in an emergency Unhook the strap and remove the tool bag.
5-2. Loosen Tighten Access Cab models Pull up the lever Raise the bottom cushion up. 5 When trouble arises Turn the knob counterclockwise. 435 Loosen and remove the jack. Steps to take in an emergency Unhook the strap and remove the tool bag.

Owners Manual
Page 453
Press the lid against the bottom of the lower cushion until it from closing unexpectedly. Steps to prevent it is supported to take in an emergency Open the lid. Unhook the strap and remove the tool bag. Loosen and remove the jack. Make sure that the lid is supported by pulling the lock release strap. 436 Loosen Tighten Double Cab models Swing the bottom cushion up by the hookand-loop fastener. 5-2.
Press the lid against the bottom of the lower cushion until it from closing unexpectedly. Steps to prevent it is supported to take in an emergency Open the lid. Unhook the strap and remove the tool bag. Loosen and remove the jack. Make sure that the lid is supported by pulling the lock release strap. 436 Loosen Tighten Double Cab models Swing the bottom cushion up by the hookand-loop fastener. 5-2.
