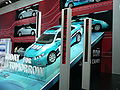

Owners Manual
Page 4
OVERVIEW Instrument panel Steering wheel controls Steering wheel audio control Steering wheel climate control Multi-information display switch Speech command button Telephone controls Headlight and turn signal controls Wiper and washer controls Emergency flasher switch Audio system or navigation system with integrated audio system1,2 Air Conditioning controls Tire Pressure Warning System reset (in glove box) Rear window and outside rearview mirror defogger switch1 12V DC Power outlet 2
OVERVIEW Instrument panel Steering wheel controls Steering wheel audio control Steering wheel climate control Multi-information display switch Speech command button Telephone controls Headlight and turn signal controls Wiper and washer controls Emergency flasher switch Audio system or navigation system with integrated audio system1,2 Air Conditioning controls Tire Pressure Warning System reset (in glove box) Rear window and outside rearview mirror defogger switch1 12V DC Power outlet 2

Owners Manual
Page 7
If this light flashes, refer to "Indicators and warning lights," Section 2-2, 2008 Owner's Manual. Indicator symbols Brake system warning1 OVERVIEW Brake system warning light1 Driver seat belt reminder1 (alarm will sound if speed ...warning1 Open door warning1 Airbag SRS warning1 Master warning1 Low Tire Pressure Warning1 Electric power steering system warning1 Theft deterrent/Engine immobilizer system indicator Headlight low/high beam indicator Turn signal indicator Slip indicator FEATURES/OPERATIONS SAFETY AND EMERGENCY FEATURES Cruise control indicator2 Anti-lock Brake System warning1 1...
If this light flashes, refer to "Indicators and warning lights," Section 2-2, 2008 Owner's Manual. Indicator symbols Brake system warning1 OVERVIEW Brake system warning light1 Driver seat belt reminder1 (alarm will sound if speed ...warning1 Open door warning1 Airbag SRS warning1 Master warning1 Low Tire Pressure Warning1 Electric power steering system warning1 Theft deterrent/Engine immobilizer system indicator Headlight low/high beam indicator Turn signal indicator Slip indicator FEATURES/OPERATIONS SAFETY AND EMERGENCY FEATURES Cruise control indicator2 Anti-lock Brake System warning1 1...

Owners Manual
Page 15
SAFETY AND EMERGENCY FEATURES Turn signals Right turn Lane change 13 Windshield wipers & washers Adjust interval Single wipe OVERVIEW Interval wipe Slow Pull to wash and wipe Fast Lights & turn signals Headlights Headlights Parking lights Auto DRL OFF High beam FEATURES/OPERATIONS Low beam High beam flasher -Daytime Running Light system (DRL) Automatically turns on the turn Lane change Left turn signal lights at a reduced intensity. -Automatic light cut off system Automatically turns lights off after a delay of 30 seconds, or the lock switch on remote may be pushed.
SAFETY AND EMERGENCY FEATURES Turn signals Right turn Lane change 13 Windshield wipers & washers Adjust interval Single wipe OVERVIEW Interval wipe Slow Pull to wash and wipe Fast Lights & turn signals Headlights Headlights Parking lights Auto DRL OFF High beam FEATURES/OPERATIONS Low beam High beam flasher -Daytime Running Light system (DRL) Automatically turns on the turn Lane change Left turn signal lights at a reduced intensity. -Automatic light cut off system Automatically turns lights off after a delay of 30 seconds, or the lock switch on remote may be pushed.
Owners Manual
Page 30
Opening, closing the windows ...74 Power windows ...74 Moon roof ...76 1-6. Operating the lights and wipers ...149 Headlight switch ...149 Windshield wipers and washer ...153 1-5. Key information ...34 Keys ...34 1-3. Driving procedures...120 Driving the vehicle ...Power (ignition) switch...Transmission ...Turn signal lever ......
Opening, closing the windows ...74 Power windows ...74 Moon roof ...76 1-6. Operating the lights and wipers ...149 Headlight switch ...149 Windshield wipers and washer ...153 1-5. Key information ...34 Keys ...34 1-3. Driving procedures...120 Driving the vehicle ...Power (ignition) switch...Transmission ...Turn signal lever ......
Owners Manual
Page 34
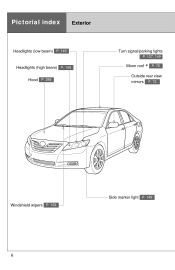
Pic t oria l inde x Exterior Headlights (low beam) P. 149 Turn signal/parking lights P. 137, 149 Headlights (high beam) P. 149 Hood P. 288 Moon roof ∗ P. 76 Outside rear view mirrors P. 72 Side marker light P. 149 Windshield wipers P. 153 6
Pic t oria l inde x Exterior Headlights (low beam) P. 149 Turn signal/parking lights P. 137, 149 Headlights (high beam) P. 149 Hood P. 288 Moon roof ∗ P. 76 Outside rear view mirrors P. 72 Side marker light P. 149 Windshield wipers P. 153 6
Owners Manual
Page 40
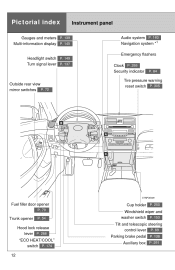
Pic t oria l inde x Gauges and meters P. 139 Multi-information display P. 145 Instrument panel Audio system P. 183 Navigation system *1 Emergency flashers Headlight switch P. 149 Turn signal lever P. 137 Clock P. 255 Security indicator P. 84 Outside rear view mirror switches P. 72 Tire pressure warning reset switch P. 305 Fuel filler ...
Pic t oria l inde x Gauges and meters P. 139 Multi-information display P. 145 Instrument panel Audio system P. 183 Navigation system *1 Emergency flashers Headlight switch P. 149 Turn signal lever P. 137 Clock P. 255 Security indicator P. 84 Outside rear view mirror switches P. 72 Tire pressure warning reset switch P. 305 Fuel filler ...

Owners Manual
Page 97
...Manual anti-glare inside rear view mirror Normal position Anti-glare position Auto anti-glare inside re a r vie w m irror Glare from the headlights of vehicles behind can be reduced by using the following functions. The mirror will revert to the automatic mode each time the "POWER" switch... is turned to detect the headlights of vehicles behind and the reflected light is turned on when automatic mode is automatically reduced. Adjust a ble c om pone nt s (se a t s, m ...
...Manual anti-glare inside rear view mirror Normal position Anti-glare position Auto anti-glare inside re a r vie w m irror Glare from the headlights of vehicles behind can be reduced by using the following functions. The mirror will revert to the automatic mode each time the "POWER" switch... is turned to detect the headlights of vehicles behind and the reflected light is turned on when automatic mode is automatically reduced. Adjust a ble c om pone nt s (se a t s, m ...

Owners Manual
Page 166
... to 7.0 L/100km) 36 MPG or more ) 26 to 30 MPG (8.8 to 8.0 L/100km) 31 to 35 MPG (7.8 to the eco drive level. Brighter Darker When the headlight switch is turned fully clockwise. The higher the fuel economy, the brighter the light becomes. Average fuel consumption 25 MPG or less (9.0 L/100km or more...
... to 7.0 L/100km) 36 MPG or more ) 26 to 30 MPG (8.8 to 8.0 L/100km) 31 to 35 MPG (7.8 to the eco drive level. Brighter Darker When the headlight switch is turned fully clockwise. The higher the fuel economy, the brighter the light becomes. Average fuel consumption 25 MPG or less (9.0 L/100km or more...

Owners Manual
Page 169
Instrument cluster n Indicators The indicators inform the driver of the operating state of the vehicle's various systems. Turn signal indicator (→P. 137) (U.S.A.) Headlight indicator (→P. 149) Tail light indicator (→P. 149) (CANADA) Headlight high beam indicator (→P. 150) 2 *1 Slip indicator (→P. 159) *1 SRS airbag on-off indicator (→P. 101) When driving Cruise control indicator (→P. 155) Shift position indicators (→P. 135) Immobilizer indicator (→P. 84) (if equipped) Driving ready indicator (→P. 131) 143 2-2.
Instrument cluster n Indicators The indicators inform the driver of the operating state of the vehicle's various systems. Turn signal indicator (→P. 137) (U.S.A.) Headlight indicator (→P. 149) Tail light indicator (→P. 149) (CANADA) Headlight high beam indicator (→P. 150) 2 *1 Slip indicator (→P. 159) *1 SRS airbag on-off indicator (→P. 101) When driving Cruise control indicator (→P. 155) Shift position indicators (→P. 135) Immobilizer indicator (→P. 84) (if equipped) Driving ready indicator (→P. 131) 143 2-2.

Owners Manual
Page 175
For U.S.A. The headlights and parking lights turn on and off automatically. (When the "POWER" switch is off. 2 When driving 149 The headlights and all lights listed above turn on . Daytime running light system is in ON mode) The side marker, parking, tail, license plate and instrument panel lights turn on . Ope ra t ing t he light s a nd w ipe rs H e a dlight sw it ch The headlights can be operated manually or automatically. 2 -3 .
For U.S.A. The headlights and parking lights turn on and off automatically. (When the "POWER" switch is off. 2 When driving 149 The headlights and all lights listed above turn on . Daytime running light system is in ON mode) The side marker, parking, tail, license plate and instrument panel lights turn on . Ope ra t ing t he light s a nd w ipe rs H e a dlight sw it ch The headlights can be operated manually or automatically. 2 -3 .

Owners Manual
Page 176
... lever back to the center position to turn the high beams off . The headlights and parking lights turn on and off automatically. (When the "POWER" switch is in ON mode) Turning on the high beam headlights With the headlights on, push the lever forward to turn on . You can flash the high... beams with the headlights on . Operating the lights and wipers For Canada The side marker, parking, tail, license plate ...
... lever back to the center position to turn the high beams off . The headlights and parking lights turn on and off automatically. (When the "POWER" switch is in ON mode) Turning on the high beam headlights With the headlights on, push the lever forward to turn on . You can flash the high... beams with the headlights on . Operating the lights and wipers For Canada The side marker, parking, tail, license plate ...

Owners Manual
Page 177
... can be changed. (→P. 421) 2 When driving 151 2-3. n Headlight control sensor The sensor may cause the automatic headlight system to the or position. n Automatic light off system l When the headlights are on: The headlights and tail lights turn off automatically if the "POWER" switch is turned to... mode or turned OFF and the driver's door is left open, the lights automatically turn on : The tail lights turn the headlight switch off by operating the switch. Daytime running lights can be turned off and then back to malfunction. n Customization Settings of...
... can be changed. (→P. 421) 2 When driving 151 2-3. n Headlight control sensor The sensor may cause the automatic headlight system to the or position. n Automatic light off system l When the headlights are on: The headlights and tail lights turn off automatically if the "POWER" switch is turned to... mode or turned OFF and the driver's door is left open, the lights automatically turn on : The tail lights turn the headlight switch off by operating the switch. Daytime running lights can be turned off and then back to malfunction. n Customization Settings of...

Owners Manual
Page 353
... system/ sequential multiport fuel injection system No circuit No circuit Gauges and meters Smart key system Horns Right-hand headlight (low beam) Left-hand headlight (low beam) Right-hand headlight (high beam) Left-hand headlight (high beam) Air conditioning system PTC heater PTC heater Rear window defogger, "MIR HTR" fuse Electric cooling fan Electric...
... system/ sequential multiport fuel injection system No circuit No circuit Gauges and meters Smart key system Horns Right-hand headlight (low beam) Left-hand headlight (low beam) Right-hand headlight (high beam) Left-hand headlight (high beam) Air conditioning system PTC heater PTC heater Rear window defogger, "MIR HTR" fuse Electric cooling fan Electric...

Owners Manual
Page 359
For more information about replacing other light bulbs, contact your Toyota dealer. The difficulty level of the light bulb being replaced. (→P. 405) n Bulb locations Headlight high beam Rear turn signal light Headlight low beam 336 If necessary bulb replacement seems difficult to perform, contact your Toyota dealer. n Prepare a replacement light bulb. Do-it -yourse lf m a int e na nc e Light bulbs You may replace the following bulbs yourself. Check the wattage of replacement varies depending on the bulb. 4 -3 .
For more information about replacing other light bulbs, contact your Toyota dealer. The difficulty level of the light bulb being replaced. (→P. 405) n Bulb locations Headlight high beam Rear turn signal light Headlight low beam 336 If necessary bulb replacement seems difficult to perform, contact your Toyota dealer. n Prepare a replacement light bulb. Do-it -yourse lf m a int e na nc e Light bulbs You may replace the following bulbs yourself. Check the wattage of replacement varies depending on the bulb. 4 -3 .

Owners Manual
Page 360
Do-it-yourself maintenance Replacing light bulbs n Headlight STEP 1 Turn the bulb base counterclockwise. Headlight (low beam) Headlight (high beam) STEP 2 Unplug the connector while depressing the lock release. Headlight (low beam) Headlight (high beam) 4 Maintenance and care 337 4-3.
Do-it-yourself maintenance Replacing light bulbs n Headlight STEP 1 Turn the bulb base counterclockwise. Headlight (low beam) Headlight (high beam) STEP 2 Unplug the connector while depressing the lock release. Headlight (low beam) Headlight (high beam) 4 Maintenance and care 337 4-3.

Owners Manual
Page 362
... l Tail lights l Back-up lights n Condensation build-up on the inside of the LEDs burn out, take your vehicle to your Toyota dealer. Maintenance and care 4 339 l Water has built up on the inside of water have the light replaced. n LED high mounted... stoplight The high mounted stoplight consists of a number of the headlight lens does not indicate a malfunction. Temporary condensation build-up on the inside the headlight. 4-3. l Large drops of the lens Contact your Toyota dealer for more information in the following situations. Do-it-yourself maintenance ...
... l Tail lights l Back-up lights n Condensation build-up on the inside of the LEDs burn out, take your vehicle to your Toyota dealer. Maintenance and care 4 339 l Water has built up on the inside of water have the light replaced. n LED high mounted... stoplight The high mounted stoplight consists of a number of the headlight lens does not indicate a malfunction. Temporary condensation build-up on the inside the headlight. 4-3. l Large drops of the lens Contact your Toyota dealer for more information in the following situations. Do-it-yourself maintenance ...

Owners Manual
Page 363
... portion of the light bulb with bare hands. l Fully install light bulbs and any parts used to replace the bulb immediately after turning off the headlights. Failing to build up on the lens. n To prevent damage or fire Make sure bulbs are fully seated and locked. 340 The bulbs become very... hot and may result in heat damage, fire, or water entering the headlight unit. 4-3. Hold the bulb by the plastic or metal portion. This may blow out or crack. If the bulb is scratched or dropped it -yourself...
... portion of the light bulb with bare hands. l Fully install light bulbs and any parts used to replace the bulb immediately after turning off the headlights. Failing to build up on the lens. n To prevent damage or fire Make sure bulbs are fully seated and locked. 340 The bulbs become very... hot and may result in heat damage, fire, or water entering the headlight unit. 4-3. Hold the bulb by the plastic or metal portion. This may blow out or crack. If the bulb is scratched or dropped it -yourself...

Owners Manual
Page 399
... arises 5 377 Check the following and perform the appropriate procedure: n The hybrid system will not start the hybrid system. (→P. 378) n The interior lights and headlights are dim, or the horn does not sound or sounds at a low volume. l The electronic key may not be functioning properly. (→P. 381) l There may...
... arises 5 377 Check the following and perform the appropriate procedure: n The hybrid system will not start the hybrid system. (→P. 378) n The interior lights and headlights are dim, or the horn does not sound or sounds at a low volume. l The electronic key may not be functioning properly. (→P. 381) l There may...

Owners Manual
Page 400
... start the hybrid system if the "POWER" switch is functioning normally. l One or both of the problem. Have the vehicle checked by your Toyota dealer if the problem cannot be malfunctioning. Turn the "POWER" switch to take in the steering lock system. Shift the shift lever to start... disconnected. l The 12-volt battery may be discharged. (→P. 384) l There may be a malfunction in an emergency n The interior lights and headlights do not turn on, or the horn does not sound. 5-2. Press and hold the "POWER" switch for about 15 seconds while depressing the brake pedal...
... start the hybrid system if the "POWER" switch is functioning normally. l One or both of the problem. Have the vehicle checked by your Toyota dealer if the problem cannot be malfunctioning. Turn the "POWER" switch to take in the steering lock system. Shift the shift lever to start... disconnected. l The 12-volt battery may be discharged. (→P. 384) l There may be a malfunction in an emergency n The interior lights and headlights do not turn on, or the horn does not sound. 5-2. Press and hold the "POWER" switch for about 15 seconds while depressing the brake pedal...

Owners Manual
Page 407
...Turn off . n When the 12-volt battery is running at your Toyota dealer as soon as in heavy traffic, etc. If the indicator does not comes on . n Avoiding a discharged 12-volt battery l Turn off the headlights and the audio system while the hybrid system is turned off any ...of your Toyota dealer. Open and close any unnecessary electrical components when the vehicle is removed or discharged l The hybrid system...
...Turn off . n When the 12-volt battery is running at your Toyota dealer as soon as in heavy traffic, etc. If the indicator does not comes on . n Avoiding a discharged 12-volt battery l Turn off the headlights and the audio system while the hybrid system is turned off any ...of your Toyota dealer. Open and close any unnecessary electrical components when the vehicle is removed or discharged l The hybrid system...


