Owners Manual
Page 3
... the Owner's Manual for instructions and more information. 2 Visit your Toyota dealer for information on customizing this feature. 3 HomeLink® is a registered trademark of Johnson Controls, Inc. 1 INDEX Item Page no. OVERVIEW Engine maintenance Fuel tank door release and cap Hood release Indicator symbols Instrument cluster Instrument panel Keyless entry1 Light control...
... the Owner's Manual for instructions and more information. 2 Visit your Toyota dealer for information on customizing this feature. 3 HomeLink® is a registered trademark of Johnson Controls, Inc. 1 INDEX Item Page no. OVERVIEW Engine maintenance Fuel tank door release and cap Hood release Indicator symbols Instrument cluster Instrument panel Keyless entry1 Light control...

Owners Manual
Page 6
... illuminate. Pull up Locking operation Unlocking operation Push ONCE: Driver door TWICE: All doors Turn to the Owner's Manual for safety. *Master/Black key only Hood release SAFETY AND EMERGENCY FEATURES Trunk lid operation Push and hold Alarm operation Push and hold Pull Pull up Turn Light control-Instrument panel Brightness..., all doors will not dim when the headlights are turned on. OVERVIEW Fuel tank door release and cap Driver seat Pull up latch and raise hood 6 7
... illuminate. Pull up Locking operation Unlocking operation Push ONCE: Driver door TWICE: All doors Turn to the Owner's Manual for safety. *Master/Black key only Hood release SAFETY AND EMERGENCY FEATURES Trunk lid operation Push and hold Alarm operation Push and hold Pull Pull up Turn Light control-Instrument panel Brightness..., all doors will not dim when the headlights are turned on. OVERVIEW Fuel tank door release and cap Driver seat Pull up latch and raise hood 6 7

Owners Manual
Page 16
... shift lever 17. Center vents 5. Portable ashtray 13. Power outlet 14. Power rear view mirror control switches 19. Instrument panel overview "View A (coupe) 1. Instrument cluster 4. Hood lock release lever 20. Side vents 3. Garage door opener 8. Cup holder 15. Side defroster outlets 2. Power door lock switches 10. Power window switches 11. Headlight...
... shift lever 17. Center vents 5. Portable ashtray 13. Power outlet 14. Power rear view mirror control switches 19. Instrument panel overview "View A (coupe) 1. Instrument cluster 4. Hood lock release lever 20. Side vents 3. Garage door opener 8. Cup holder 15. Side defroster outlets 2. Power door lock switches 10. Power window switches 11. Headlight...

Owners Manual
Page 17
... 14. Headlight beam level control dial 17. All window control switch 18. Power outlet 13. Garage door opener 5. Portable ashtray 12. Power window switches 10. Hood lock release lever 21. Glove box 11. "View A (convertible) 1. Side defroster outlets 2. Center vents 7. Power door lock switches 9. Parking brake lever 15. Automatic transmission selector...
... 14. Headlight beam level control dial 17. All window control switch 18. Power outlet 13. Garage door opener 5. Portable ashtray 12. Power window switches 10. Hood lock release lever 21. Glove box 11. "View A (convertible) 1. Side defroster outlets 2. Center vents 7. Power door lock switches 9. Parking brake lever 15. Automatic transmission selector...

Owners Manual
Page 25
SECTION Keys and Doors 1− 2 12 14 16 21 24 28 30 30 32 34 36 OPERATION OF INSTRUMENTS AND CONTROLS Keys ...Engine immobilizer system ...Wireless remote control ...Side doors ...Power windows ...Trunk lid ...Hood ...Theft deterrent system ...Fuel tank cap ...Electric moon roof ...Convertible top ... 11
SECTION Keys and Doors 1− 2 12 14 16 21 24 28 30 30 32 34 36 OPERATION OF INSTRUMENTS AND CONTROLS Keys ...Engine immobilizer system ...Wireless remote control ...Side doors ...Power windows ...Trunk lid ...Hood ...Theft deterrent system ...Fuel tank cap ...Electric moon roof ...Convertible top ... 11

Owners Manual
Page 27
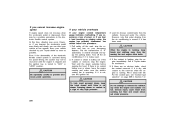
... keys of other vehicles) and do not use the key with your hand to high temperatures for a long period, such as on the dashboard and hood under direct sunlight. z Do not cover the key grip with other transponder keys around (including keys of other vehicles) from the ring or while gripping...
... keys of other vehicles) and do not use the key with your hand to high temperatures for a long period, such as on the dashboard and hood under direct sunlight. z Do not cover the key grip with other transponder keys around (including keys of other vehicles) from the ring or while gripping...

Owners Manual
Page 44
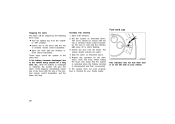
... light. 30 To deter vehicle theft, the system is locked. Hood Theft deterrent system To open unexpectedly while driving and an accident may occur. The hood will spring up the auxiliary catch lever and lift the hood. Pull the hood lock release lever. In front of the doors, trunk or... hood is forcibly unlocked or the battery terminal is disconnected and then reconnected when...
... light. 30 To deter vehicle theft, the system is locked. Hood Theft deterrent system To open unexpectedly while driving and an accident may occur. The hood will spring up the auxiliary catch lever and lift the hood. Pull the hood lock release lever. In front of the doors, trunk or... hood is forcibly unlocked or the battery terminal is disconnected and then reconnected when...

Owners Manual
Page 45
...there is any of the doors are forcibly unlocked or opened, or if the trunk or hood is forcibly opened with the wireless remote control transmitter. Close and lock both doors, trunk and hood are unlocked with your vehicle. 31 After one minute, the alarm will automatically stop and the... Never leave anyone in "Activating the system". The alarm will activate the system. If the tail lights come on when both doors, trunk and hood. The system will start flashing when the key is removed from the inside will activate again under the following ways. When the system is set...
...there is any of the doors are forcibly unlocked or opened, or if the trunk or hood is forcibly opened with the wireless remote control transmitter. Close and lock both doors, trunk and hood are unlocked with your vehicle. 31 After one minute, the alarm will automatically stop and the... Never leave anyone in "Activating the system". The alarm will activate the system. If the tail lights come on when both doors, trunk and hood. The system will start flashing when the key is removed from the inside will activate again under the following ways. When the system is set...
Owners Manual
Page 46
... doors should activate the alarm. 4. The system should be stopped by your vehicle. 32 When testing the hood, also check that the fuel filler door is on the left side of your Toyota dealer. D Open the trunk with the key or wireless remote control transmitter. Open both windows. 2. If...to "ON" position. Repeat this happens, immediately unlock any door from the "LOCK" to the vehicle being unused for the other doors, trunk and hood. D Turn the ignition key from the inside. Stop the alarm as described above . 5. D Unlock any of the doors with the key or wireless...
... doors should activate the alarm. 4. The system should be stopped by your vehicle. 32 When testing the hood, also check that the fuel filler door is on the left side of your Toyota dealer. D Open the trunk with the key or wireless remote control transmitter. Open both windows. 2. If...to "ON" position. Repeat this happens, immediately unlock any door from the "LOCK" to the vehicle being unused for the other doors, trunk and hood. D Turn the ignition key from the inside. Stop the alarm as described above . 5. D Unlock any of the doors with the key or wireless...
Owners Manual
Page 310
... and steam blown out under the vehicle. You should follow this time, vibration may be recovered until the steam subsides before opening the hood. Do not attempt to prevent erroneous pedal operation. Have your vehicle checked by your vehicle at low speeds. However, note that water ...draining from the air conditioning is being used . Call a Toyota dealer for obvious coolant leaks from the radiator, hoses,and under pressure. 296 Turn off . 3. If there are hot. If you cannot increase...
... and steam blown out under the vehicle. You should follow this time, vibration may be recovered until the steam subsides before opening the hood. Do not attempt to prevent erroneous pedal operation. Have your vehicle checked by your vehicle at low speeds. However, note that water ...draining from the air conditioning is being used . Call a Toyota dealer for obvious coolant leaks from the radiator, hoses,and under pressure. 296 Turn off . 3. If there are hot. If you cannot increase...

Owners Manual
Page 338
... indicators and warning buzzers function properly. Fluid leaks Check underneath for leaking fuel, oil, water or other lights are all brakes released. Doors and engine hood Check that the belt webbings not cut, frayed, worn or damaged. Clutch pedal Check the pedal for changes in the sound of the selector lever... vehicle is held securely with only the parking brake applied. On a safe incline, check that , on page 260 in any position. Make sure the engine hood secondary latch secures the hood from time to one side when applied.
... indicators and warning buzzers function properly. Fluid leaks Check underneath for leaking fuel, oil, water or other lights are all brakes released. Doors and engine hood Check that the belt webbings not cut, frayed, worn or damaged. Clutch pedal Check the pedal for changes in the sound of the selector lever... vehicle is held securely with only the parking brake applied. On a safe incline, check that , on page 260 in any position. Make sure the engine hood secondary latch secures the hood from time to one side when applied.

Owners Manual
Page 346
... spark plugs by the jack. z Do not drive with jack improperly positioned will cause engine damage, loss of the specified type. z When closing the engine hood, check to reduce the possibility of death or serious injury: D Follow jacking instructions. CAUTION When jacking, be damaged. Raising the vehicle with the air cleaner...
... spark plugs by the jack. z Do not drive with jack improperly positioned will cause engine damage, loss of the specified type. z When closing the engine hood, check to reduce the possibility of death or serious injury: D Follow jacking instructions. CAUTION When jacking, be damaged. Raising the vehicle with the air cleaner...

Owners Manual
Page 371
... discharge bulbs H11 halogen bulbs HIR1 halogen bulbs Wedge base bulbs (clear) Wedge base bulb (amber) Single end bulbs Double end bulbs 357 Open the hood. Turn the bulb cover counterclockwise and remove it. 35 - -Low beam headlights (except discharge headlights) Light bulbs Headlights (low) With discharge headlights Without discharge headlights...
... discharge bulbs H11 halogen bulbs HIR1 halogen bulbs Wedge base bulbs (clear) Wedge base bulb (amber) Single end bulbs Double end bulbs 357 Open the hood. Turn the bulb cover counterclockwise and remove it. 35 - -Low beam headlights (except discharge headlights) Light bulbs Headlights (low) With discharge headlights Without discharge headlights...

Owners Manual
Page 373
Aiming is tight, wiggle it clockwise. Open the hood. If the connector is not necessary after replacing the bulb. -High beam headlights 5. When aiming adjustment is necessary, contact your Toyota dealer. 1. Unplug the connector while depressing the lock release. The above illustration shows the left −hand headlight. 2. Install the bulb cover and turn it . Turn the bulb base counterclockwise to the front of the vehicle as shown. 359
Aiming is tight, wiggle it clockwise. Open the hood. If the connector is not necessary after replacing the bulb. -High beam headlights 5. When aiming adjustment is necessary, contact your Toyota dealer. 1. Unplug the connector while depressing the lock release. The above illustration shows the left −hand headlight. 2. Install the bulb cover and turn it . Turn the bulb base counterclockwise to the front of the vehicle as shown. 359
