
Owners Manual
Page 15
... control system off) switch 17. "View B 1. Headlight, turn signal and front fog light switches 4. Power rear view mirror control switches 2. Ignition switch 14. Air conditioning controls 6. Front passenger's seat belt reminder light/front passenger occupant classification indicator ...light 10. Instrument panel light control dial 3. Wiper and washer switches 5. Engine immobilizer system/Toyota vehicle intrusion protection system indicator light 3 Cruise control switch 15. Tilt steering lock release lever 16. Rear window defogger...
... control system off) switch 17. "View B 1. Headlight, turn signal and front fog light switches 4. Power rear view mirror control switches 2. Ignition switch 14. Air conditioning controls 6. Front passenger's seat belt reminder light/front passenger occupant classification indicator ...light 10. Instrument panel light control dial 3. Wiper and washer switches 5. Engine immobilizer system/Toyota vehicle intrusion protection system indicator light 3 Cruise control switch 15. Tilt steering lock release lever 16. Rear window defogger...

Owners Manual
Page 97
SECTION Steering wheel and Mirrors 1− 4 86 86 88 88 89 OPERATION OF INSTRUMENTS AND CONTROLS Tilt steering wheel ...Outside rear view mirrors ...Anti−glare inside rear view mirror ...Auto anti−glare inside rear view mirror ...Sun visors ... 85
SECTION Steering wheel and Mirrors 1− 4 86 86 88 88 89 OPERATION OF INSTRUMENTS AND CONTROLS Tilt steering wheel ...Outside rear view mirrors ...Anti−glare inside rear view mirror ...Auto anti−glare inside rear view mirror ...Sun visors ... 85

Owners Manual
Page 98
... vehicle and an accident may occur resulting in the mirror. Adjust the mirror so that you can just see the side of any object seen in a flat mirror. 86 Tilt steering wheel CAUTION Outside rear view mirrors- Any object seen in a convex mirror will look smaller and farther away than when seen ...in the outside rear view mirror on the passenger's side because it up and down the ...
... vehicle and an accident may occur resulting in the mirror. Adjust the mirror so that you can just see the side of any object seen in a flat mirror. 86 Tilt steering wheel CAUTION Outside rear view mirrors- Any object seen in a convex mirror will look smaller and farther away than when seen ...in the outside rear view mirror on the passenger's side because it up and down the ...

Owners Manual
Page 99
... "ACC" or "ON" position. 87 Use a spray de−icer to "L" (left) or "R" (right). 2. Mirrors can be adjusted Push the switch to free the mirror. -Power rear view mirror control CAUTION Do not adjust the mirror while the vehicle is in death or serious injuries. NOTICE If ice should jam the... mirror, do not operate the control or scrape the mirror face. Control switch-To move the mirror Push the switch in ...
... "ACC" or "ON" position. 87 Use a spray de−icer to "L" (left) or "R" (right). 2. Mirrors can be adjusted Push the switch to free the mirror. -Power rear view mirror control CAUTION Do not adjust the mirror while the vehicle is in death or serious injuries. NOTICE If ice should jam the... mirror, do not operate the control or scrape the mirror face. Control switch-To move the mirror Push the switch in ...

Owners Manual
Page 100
...clarity at position 2 Remember that the function is moving. To reduce glare from the headlights of the vehicle behind you during night driving. This mirror is designed to reduce glare from the headlights of the vehicle behind you during night driving, operate the lever on . 88 When the ignition...key is inserted and turned on, the inside rear view mirror CAUTION Do not adjust the mirror while the vehicle is on the lower edge of your vehicle in the mirror. Auto anti−glare inside rear view mirror Adjust the mirror so that you that by reducing glare you can just ...
...clarity at position 2 Remember that the function is moving. To reduce glare from the headlights of the vehicle behind you during night driving. This mirror is designed to reduce glare from the headlights of the vehicle behind you during night driving, operate the lever on . 88 When the ignition...key is inserted and turned on, the inside rear view mirror CAUTION Do not adjust the mirror while the vehicle is on the lower edge of your vehicle in the mirror. Auto anti−glare inside rear view mirror Adjust the mirror so that you that by reducing glare you can just ...

Owners Manual
Page 101
... finger or a piece of headlights. To block out glare, move the sun visor. If glare comes from the headlights of anti− glare mirror sensors located on the automatic function again, push and release the " " switch. To block out glare from the hook and swing it from ...the front-Swing down the sun visor (position 1). The indicator light will turn off . To ensure correct functioning of the vehicle behind you , the mirror surface darkens slightly to darken in the best condition. To turn off the automatic function, push and release the " " switch. Vehicles without SRS ...
... finger or a piece of headlights. To block out glare, move the sun visor. If glare comes from the headlights of anti− glare mirror sensors located on the automatic function again, push and release the " " switch. To block out glare from the hook and swing it from ...the front-Swing down the sun visor (position 1). The indicator light will turn off . To ensure correct functioning of the vehicle behind you , the mirror surface darkens slightly to darken in the best condition. To turn off the automatic function, push and release the " " switch. Vehicles without SRS ...

Owners Manual
Page 102
-Vanity mirrors CAUTION Do not slide the sun visor when the visor is in the position 1. Driver's side Front passenger's side 90 Driver's side only-To use the vanity mirror, open the cover. It can cover the anti−glare inside rear view mirror and obstruct the rear view.
-Vanity mirrors CAUTION Do not slide the sun visor when the visor is in the position 1. Driver's side Front passenger's side 90 Driver's side only-To use the vanity mirror, open the cover. It can cover the anti−glare inside rear view mirror and obstruct the rear view.

Owners Manual
Page 177
...on or near a large vehicle, etc.). D The vehicle is magnetized. (There is a magnet or a metal object on the inside rear view mirror.) D The battery has been disconnected. D The compass does not adjust while the vehicle is turned on when the ignition switch is stopped. The... below to interference by artificial magnetic fields (underground parking, under a steel tower, between buildings, roof parking, near a crossing, near the inside rear view mirror. D The vehicle is turned off . To the off immediately after turning. Displays N NE E SE S SW W NW The direction is subject to ...
...on or near a large vehicle, etc.). D The vehicle is magnetized. (There is a magnet or a metal object on the inside rear view mirror.) D The battery has been disconnected. D The compass does not adjust while the vehicle is turned on when the ignition switch is stopped. The... below to interference by artificial magnetic fields (underground parking, under a steel tower, between buildings, roof parking, near a crossing, near the inside rear view mirror. D The vehicle is turned off . To the off immediately after turning. Displays N NE E SE S SW W NW The direction is subject to ...

Owners Manual
Page 178
The angle of deviation varies according to select the number of the zone where the vehicle is in the inside rear view mirror of the vehicle. To adjust this may cause malfunction of the vehicle. Doing this deviation, stop the vehicle, then push and hold the both personal ... THE COMPASS (deviation calibration) The direction display on the display. NOTICE Do not put magnets or a metal object on or near the inside rear view mirror. Then push the right side or left side personal light switch, referring to the following map to the geographic position of the compass sensor. 166...
The angle of deviation varies according to select the number of the zone where the vehicle is in the inside rear view mirror of the vehicle. To adjust this may cause malfunction of the vehicle. Doing this deviation, stop the vehicle, then push and hold the both personal ... THE COMPASS (deviation calibration) The direction display on the display. NOTICE Do not put magnets or a metal object on or near the inside rear view mirror. Then push the right side or left side personal light switch, referring to the following map to the geographic position of the compass sensor. 166...
Owners Manual
Page 220
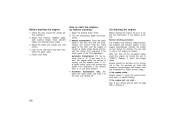
... hold it , using the correct procedure given in "(a) Before cranking". You can start " on page 222 in idle. Adjust the inside and outside rear view mirrors. 4. Engine should be sure to start ...See "If your engine automatically controls the proper air−fuel mixture for starting the engine, be warmed up...
... hold it , using the correct procedure given in "(a) Before cranking". You can start " on page 222 in idle. Adjust the inside and outside rear view mirrors. 4. Engine should be sure to start ...See "If your engine automatically controls the proper air−fuel mixture for starting the engine, be warmed up...
Owners Manual
Page 228
..., state/ provincial or local regulations. Pay attention to the rear from traffic until you have plenty of the turn . If not, install the rear view mirrors required for towing purpose. Also, just turn to prepare yourself for this by keeping engine rpm low and not racing the engine. Steer straight ahead... area away from time to time to avoid the necessity of speed, allow at a time, avoiding sharp or prolonged turning. D Check that your rear view mirrors conform to −vehicle distance should be increased when towing a trailer. D Be careful when passing other vehicles.
..., state/ provincial or local regulations. Pay attention to the rear from traffic until you have plenty of the turn . If not, install the rear view mirrors required for towing purpose. Also, just turn to prepare yourself for this by keeping engine rpm low and not racing the engine. Steer straight ahead... area away from time to time to avoid the necessity of speed, allow at a time, avoiding sharp or prolonged turning. D Check that your rear view mirrors conform to −vehicle distance should be increased when towing a trailer. D Be careful when passing other vehicles.
Owners Manual
Page 299
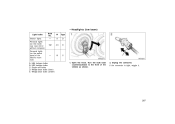
Turn the bulb base counterclockwise to the front of the electric moon roof) A: B: C: D: E: Bulb No. - Unplug the connector. W 8 Type D 192 4.3 D - 10 C HB4 halogen bulbs HB3 halogen bulbs Single end bulbs Wedge base bulbs (clear) Wedge base bulbs (amber) 1. -Headlights (low beam) Light bulbs Interior lights Personal lights (on the inside rear view mirror without compass) Personal lights (on the switch panel of the vehicle as shown. 2. Open the hood. If the connector is tight, wiggle it. 287
Turn the bulb base counterclockwise to the front of the electric moon roof) A: B: C: D: E: Bulb No. - Unplug the connector. W 8 Type D 192 4.3 D - 10 C HB4 halogen bulbs HB3 halogen bulbs Single end bulbs Wedge base bulbs (clear) Wedge base bulbs (amber) 1. -Headlights (low beam) Light bulbs Interior lights Personal lights (on the inside rear view mirror without compass) Personal lights (on the switch panel of the vehicle as shown. 2. Open the hood. If the connector is tight, wiggle it. 287

Owners Manual
Page 314
... outlet (12 VDC/ in the rear console box) 30. ECU−B 10 A: Daytime running light system, charging system, auto anti−glare inside rear view mirror, power windows, cruise control system, rear window defogger, back−up lights, front passenger's seat belt reminder light, emergency flasher 33. ECU−IG 10...
... outlet (12 VDC/ in the rear console box) 30. ECU−B 10 A: Daytime running light system, charging system, auto anti−glare inside rear view mirror, power windows, cruise control system, rear window defogger, back−up lights, front passenger's seat belt reminder light, emergency flasher 33. ECU−IG 10...