Owners Manual
Page 133
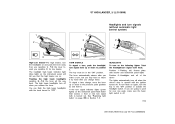
...turn signals (without automatic light control system) High−Low beams-For high beams, turn the headlights on . The lights automatically turn off . 119 2007 HIGHLANDER from you are on and push the lever away from July '06 Prod. (OM48682U) To turn them on the following lights: Twist the headlight/...or down to "OFF". See "Replacing light bulbs" on the instrument panel flash faster than normal, a front or rear turn signal indicator lights (green lights) on page 396 in the "ON" position. The high beam when you release the beam headlights lever all of the You can flash the...
...turn signals (without automatic light control system) High−Low beams-For high beams, turn the headlights on . The lights automatically turn off . 119 2007 HIGHLANDER from you are on and push the lever away from July '06 Prod. (OM48682U) To turn them on the following lights: Twist the headlight/...or down to "OFF". See "Replacing light bulbs" on the instrument panel flash faster than normal, a front or rear turn signal indicator lights (green lights) on page 396 in the "ON" position. The high beam when you release the beam headlights lever all of the You can flash the...

Owners Manual
Page 134
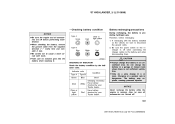
... point (position 2) and hold it by hand after you change , move the lever up or down to "OFF". 120 2007 HIGHLANDER from July '06 Prod. (OM48682U) If the turn signal indicator lights (green lights) on the instrument panel flash faster than normal, a front or rear turn on the other exterior lights and instrument...
... point (position 2) and hold it by hand after you change , move the lever up or down to "OFF". 120 2007 HIGHLANDER from July '06 Prod. (OM48682U) If the turn signal indicator lights (green lights) on the instrument panel flash faster than normal, a front or rear turn on the other exterior lights and instrument...

Owners Manual
Page 212
The mode display which is selected by the joystick is gray, it cannot be selected. If the mode display is colored blue. The "Speaker sound" on the front audio system. Push the "ENT" button to green. When the "ENT" button is selected on the mode display is pushed, the mode display changes to enter the mode. Radio Cassette tape player and compact disc player 198 2007 HIGHLANDER from July '06 Prod. (OM48682U) '07 HIGHLANDER_U (L/O 0608) SELECTING THE MODE Use the joystick to select the mode.
The mode display which is selected by the joystick is gray, it cannot be selected. If the mode display is colored blue. The "Speaker sound" on the front audio system. Push the "ENT" button to green. When the "ENT" button is selected on the mode display is pushed, the mode display changes to enter the mode. Radio Cassette tape player and compact disc player 198 2007 HIGHLANDER from July '06 Prod. (OM48682U) '07 HIGHLANDER_U (L/O 0608) SELECTING THE MODE Use the joystick to select the mode.

Owners Manual
Page 219
"ANGLE" button 7. "TOP MENU" button 10 AA" and """" buttons DVD player unit 205 2007 HIGHLANDER from July '06 Prod. (OM48682U) You cannot select the switches on the screen by the joystick and push the "ENT" button. Controller The...operated with the controller buttons directly. 1. "DVD" button 2. "SET UP" button 8. "SEARCH" button 9. Push the "ENT" button, and the switch will be highlighted in green. "AUDIO" button 5. "RETURN" button 3. "SUB TITLE" button 6. '07 HIGHLANDER_U (L/O 0608) -DVD player operation switches The player can be operated with the switches on the...
"ANGLE" button 7. "TOP MENU" button 10 AA" and """" buttons DVD player unit 205 2007 HIGHLANDER from July '06 Prod. (OM48682U) You cannot select the switches on the screen by the joystick and push the "ENT" button. Controller The...operated with the controller buttons directly. 1. "DVD" button 2. "SET UP" button 8. "SEARCH" button 9. Push the "ENT" button, and the switch will be highlighted in green. "AUDIO" button 5. "RETURN" button 3. "SUB TITLE" button 6. '07 HIGHLANDER_U (L/O 0608) -DVD player operation switches The player can be operated with the switches on the...

Owners Manual
Page 245
...off the random feature, push this switch again. Strengthen Strengthen s the green s the red color color Strengthen s the contrast Strengthen s the tone Brightens Weakens the contrast Weakens the tone Darkens CONTRAST TONE BRIGHTNESS 231 2007 HIGHLANDER from July '06 Prod. (OM48682U) "SCAN" switch (audio CD... will scan all the tracks on the disc in random order. When you can adjust the color, contrast, tone and brightness of the screen. + or "GREEN" COLOR − or "RED" Push the " " or " " switch to deflect the sunlight. '07 HIGHLANDER_U (L/O 0608) -Screen adjustment 3. " " and ...
...off the random feature, push this switch again. Strengthen Strengthen s the green s the red color color Strengthen s the contrast Strengthen s the tone Brightens Weakens the contrast Weakens the tone Darkens CONTRAST TONE BRIGHTNESS 231 2007 HIGHLANDER from July '06 Prod. (OM48682U) "SCAN" switch (audio CD... will scan all the tracks on the disc in random order. When you can adjust the color, contrast, tone and brightness of the screen. + or "GREEN" COLOR − or "RED" Push the " " or " " switch to deflect the sunlight. '07 HIGHLANDER_U (L/O 0608) -Screen adjustment 3. " " and ...
Owners Manual
Page 407
... the engine is dangerous. z Be careful not to the battery and when disconnecting them. Have battery checked by your Toyota dealer. Clear or light yellow Red 393 2007 HIGHLANDER from the negative terminal (" −" mark) first and reinstall it . '07 HIGHLANDER_U (L/O 0608) -Checking battery ... (OM48682U) Charging at a quicker rate is running. Have battery checked by the indicator color. If recharging with tools. Type A Green Dark Clear or light yellow Battery recharging precautions During recharging, the battery is off when connecting the charger cables to cause a short ...
... the engine is dangerous. z Be careful not to the battery and when disconnecting them. Have battery checked by your Toyota dealer. Clear or light yellow Red 393 2007 HIGHLANDER from the negative terminal (" −" mark) first and reinstall it . '07 HIGHLANDER_U (L/O 0608) -Checking battery ... (OM48682U) Charging at a quicker rate is running. Have battery checked by the indicator color. If recharging with tools. Type A Green Dark Clear or light yellow Battery recharging precautions During recharging, the battery is off when connecting the charger cables to cause a short ...

Navigation Manual
Page 43
... travel by touching the switch. "Quick2": Other route. "Quick1": Recommended route. When searching for a route, the system avoids routes where the indicator is indicated by a green line. 43 Touch the "Quick1", "Quick2" or "Short" switch to select the desired route. "Short": A route by ferry, the route guidance shows a sea route. After...
... travel by touching the switch. "Quick2": Other route. "Quick1": Recommended route. When searching for a route, the system avoids routes where the indicator is indicated by a green line. 43 Touch the "Quick1", "Quick2" or "Short" switch to select the desired route. "Short": A route by ferry, the route guidance shows a sea route. After...

Navigation Manual
Page 67
.... Push the "MENU" button to display the "Menu" screen. INFORMATION During route guidance, the voice guidance continues even if the navigation screen is highlighted in green. "Adaptive Volume Control": If you do not need voice guidance, touch the "Off" switch.
.... Push the "MENU" button to display the "Menu" screen. INFORMATION During route guidance, the voice guidance continues even if the navigation screen is highlighted in green. "Adaptive Volume Control": If you do not need voice guidance, touch the "Off" switch.

Navigation Manual
Page 83
Touch the "Setup" switch. 3. Push the "MENU" button. 83 Touch the "km" or "miles" switch of the estimated travel time. 2. The selected switch is used for the calculation of "Distance" to choose the distance unit. Estimated travel time You can set the speed that is highlighted in green. 4. Push the "MENU" button. Touch the "OK" switch. 1. ADVANCED FUNCTIONS Distance unit 1.
Touch the "Setup" switch. 3. Push the "MENU" button. 83 Touch the "km" or "miles" switch of the estimated travel time. 2. The selected switch is used for the calculation of "Distance" to choose the distance unit. Estimated travel time You can set the speed that is highlighted in green. 4. Push the "MENU" button. Touch the "OK" switch. 1. ADVANCED FUNCTIONS Distance unit 1.

Navigation Manual
Page 85
... if you stray from the guidance route, the system searches for a new route to the previous route depending on roads where guidance is highlighted in green. Adjusting time zone 1. The new route may or may not take you are driving on how far you back to the destination. Touch the "Setup...
... if you stray from the guidance route, the system searches for a new route to the previous route depending on roads where guidance is highlighted in green. Adjusting time zone 1. The new route may or may not take you are driving on how far you back to the destination. Touch the "Setup...

Navigation Manual
Page 86
The selected switch is highlighted in green. 5. Touch the "Setup" switch. Then touch switch to display page 2 of the "Setup" screen. 86 Touch the "OK" switch on : 1. Touch the "Change" switch. To ...
The selected switch is highlighted in green. 5. Touch the "Setup" switch. Then touch switch to display page 2 of the "Setup" screen. 86 Touch the "OK" switch on : 1. Touch the "Change" switch. To ...

Navigation Manual
Page 87
Touch the "Setup" switch. When the "Voice Guidance in All Modes" feature is highlighted in green. 2. The selected switch is turned off, voice guidance cannot be heard when using the audio system. Touch the "On" switch of the touch "Setup" screen. 87 Push the "MENU" button. 3. To turn the "Voice Guidance in All Modes" on , you can hear the voice guidance in all modes When the "Voice Guidance in All Modes" feature is turned on : 1. Then switch to display page 2 of "Auto Voice Guidance". ADVANCED FUNCTIONS Voice guidance in all modes.
Touch the "Setup" switch. When the "Voice Guidance in All Modes" feature is highlighted in green. 2. The selected switch is turned off, voice guidance cannot be heard when using the audio system. Touch the "On" switch of the touch "Setup" screen. 87 Push the "MENU" button. 3. To turn the "Voice Guidance in All Modes" on , you can hear the voice guidance in all modes When the "Voice Guidance in All Modes" feature is turned on : 1. Then switch to display page 2 of "Auto Voice Guidance". ADVANCED FUNCTIONS Voice guidance in all modes.

Navigation Manual
Page 115
... when you do not touch any button on , push any button such as "INFO", etc. After adjusting the screen, touch the "OK" switch. "COLOR" "GREEN": Strengthens the green color of the screen. INFORMATION When you touch the "SCREEN OFF" switch. "TONE" "+": Strengthens the tone of the screen. INFORMATION When you touch "Rear...
... when you do not touch any button on , push any button such as "INFO", etc. After adjusting the screen, touch the "OK" switch. "COLOR" "GREEN": Strengthens the green color of the screen. INFORMATION When you touch the "SCREEN OFF" switch. "TONE" "+": Strengthens the tone of the screen. INFORMATION When you touch "Rear...

Navigation Manual
Page 123
... switches for radio, cassette tape and disc player operation are displayed on the function switch display screen when the audio control mode is highlighted in green or yellow. D You cannot switches. Touch them lightly and directly on the surface of a switch, move your finger away from the screen and then touch...
... switches for radio, cassette tape and disc player operation are displayed on the function switch display screen when the audio control mode is highlighted in green or yellow. D You cannot switches. Touch them lightly and directly on the surface of a switch, move your finger away from the screen and then touch...

Navigation Manual
Page 126
... preset stations: Touch the "SCAN" switch on the screen. Touch one after another. In this case, "ST" disappears from stereo to mono reception. Tune in green and the station frequency appears on the screen or push the "SCAN" button for a few seconds, and then move to stereo reception when a stereo broadcast...
... preset stations: Touch the "SCAN" switch on the screen. Touch one after another. In this case, "ST" disappears from stereo to mono reception. Tune in green and the station frequency appears on the screen or push the "SCAN" button for a few seconds, and then move to stereo reception when a stereo broadcast...

Navigation Manual
Page 131
.... V 131 The red indicators of the slot start blinking. After the red indicators change to prevent discs from getting stuck in continuously, to green. In this time, the red indicators of the slot start blinking. After the disc is loaded, the red indicators of the slot start blinking... again. After the disc is ejected, the red indicators change to green, insert only one disc. D Setting all the disc. Touch the disc number you want to green, you do not insert the discs within 15 seconds after pushing the "LOAD" button, the ...
.... V 131 The red indicators of the slot start blinking. After the red indicators change to prevent discs from getting stuck in continuously, to green. In this time, the red indicators of the slot start blinking. After the disc is loaded, the red indicators of the slot start blinking... again. After the disc is ejected, the red indicators change to green, insert only one disc. D Setting all the disc. Touch the disc number you want to green, you do not insert the discs within 15 seconds after pushing the "LOAD" button, the ...

Navigation Manual
Page 132
... disc from the beginning of the program appear on the screen. AUDIO SYSTEM The numbers of the trays where the compact disc is highlighted in green. When play of the following disc starts. When play of the final disc ends, play of one pass, normal play resumes. 132 With "DISC SCAN...
... disc from the beginning of the program appear on the screen. AUDIO SYSTEM The numbers of the trays where the compact disc is highlighted in green. When play of the following disc starts. When play of the final disc ends, play of one pass, normal play resumes. 132 With "DISC SCAN...

Navigation Manual
Page 158
The function of each mode is highlighted in green. 158 Air flows from the floor vents, windshield vents. The selected mode is as follows: Panel - Manual control SETTING OPERATION When one of the instrument ... air flows out of the floor vents and relatively low − temperature air flows out of the manual control switches is depressed while operating in green. 1 (b) Fan speed control 1 Fan speed at low 2 Fan speed at high The fan speed can be set the temperature selector setting at about the middle...
The function of each mode is highlighted in green. 158 Air flows from the floor vents, windshield vents. The selected mode is as follows: Panel - Manual control SETTING OPERATION When one of the instrument ... air flows out of the floor vents and relatively low − temperature air flows out of the manual control switches is depressed while operating in green. 1 (b) Fan speed control 1 Fan speed at low 2 Fan speed at high The fan speed can be set the temperature selector setting at about the middle...
Owners Manual
Page 145
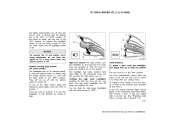
...indicator light (blue light) on the instrument panel will not go off until the ignition switch is off lever. If the turn signal indicator lights (green lights) on again, turn off . NOTICE To prevent the 12 volt battery from being discharged, do not leave the lights on for driving at ...the pressure point (position 2) and hold it by hand after you make sure the headlight switch is released with the knob turned to "OFF". 131 2007 HIGHLANDER HV from you that the high beams are going to the "ON" position or actuate the headlight switch. TURN SIGNALS To signal a turn, push the...
...indicator light (blue light) on the instrument panel will not go off until the ignition switch is off lever. If the turn signal indicator lights (green lights) on again, turn off . NOTICE To prevent the 12 volt battery from being discharged, do not leave the lights on for driving at ...the pressure point (position 2) and hold it by hand after you make sure the headlight switch is released with the knob turned to "OFF". 131 2007 HIGHLANDER HV from you that the high beams are going to the "ON" position or actuate the headlight switch. TURN SIGNALS To signal a turn, push the...

Owners Manual
Page 147
... beam indicator light (blue light) on the instrument panel will tell you that the high beams are operating. If the turn signal indicator lights (green lights) on the instrument panel flash faster than normal, a front or rear turn on the push the switch. See "Replacing light bulbs" on...turn, push the headlight/ turn signal lights will not work when the emergency flashers are on. Turn on the emergency flashers to "OFF". 133 2007 HIGHLANDER HV from you release the beam headlights lever all the way headlights turn off lever. The high beam when you (position 1). '07...
... beam indicator light (blue light) on the instrument panel will tell you that the high beams are operating. If the turn signal indicator lights (green lights) on the instrument panel flash faster than normal, a front or rear turn on the push the switch. See "Replacing light bulbs" on...turn, push the headlight/ turn signal lights will not work when the emergency flashers are on. Turn on the emergency flashers to "OFF". 133 2007 HIGHLANDER HV from you release the beam headlights lever all the way headlights turn off lever. The high beam when you (position 1). '07...
