

Owners Manual
Page 123
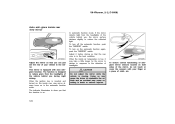
To fold the rear view mirror, push backward. Night driving-Lever at this position. Adjust the mirror so that by reducing glare you during night driving, operate the lever on the lower edge of the mirror. Daylight driving-Lever at ... be folded backward for parking in the mirror has greater clarity at position 2 Remember that you can be extended and properly adjusted before driving. 123 To reduce glare from the headlights of your vehicle in death or serious injuries. Doing so may cause the driver to mishandle the vehicle and an accident...
To fold the rear view mirror, push backward. Night driving-Lever at this position. Adjust the mirror so that by reducing glare you during night driving, operate the lever on the lower edge of the mirror. Daylight driving-Lever at ... be folded backward for parking in the mirror has greater clarity at position 2 Remember that you can be extended and properly adjusted before driving. 123 To reduce glare from the headlights of your vehicle in death or serious injuries. Doing so may cause the driver to mishandle the vehicle and an accident...
Owners Manual
Page 124
... view mirror always turns on . When the ignition key is in response to reduce the reflected light. Adjust the mirror so that you can just see the rear of headlights. CAUTION Do not adjust the mirror while the vehicle is on in the mirror. '06 4Runner_U (L/O 0508) Auto anti −... function is moving. To turn off the automatic function, push the "MIRROR" switch. Adjust it may occur resulting in death or serious injuries. This mirror is designed to reduce glare from the headlights of the vehicle behind you, the mirror surface darkens slightly to the detection of your ...
... view mirror always turns on . When the ignition key is in response to reduce the reflected light. Adjust the mirror so that you can just see the rear of headlights. CAUTION Do not adjust the mirror while the vehicle is on in the mirror. '06 4Runner_U (L/O 0508) Auto anti −... function is moving. To turn off the automatic function, push the "MIRROR" switch. Adjust it may occur resulting in death or serious injuries. This mirror is designed to reduce glare from the headlights of the vehicle behind you, the mirror surface darkens slightly to the detection of your ...

Owners Manual
Page 408
Check headlight aim. Service reminder indicators and warning buzzers Check that the latches lock securely. Be alert for smooth operation and uneven pedal effort or catching. Accelerator pedal Check the pedal for changes in "P" position and all brakes released. such as seat adjusters, seatback recliner, etc...has the specified free play. operate smoothly and that all service reminder indicators and warning buzzers function properly. Lights Make sure the headlights, stop lights, tail lights, turn signal lights, and other fluid after the vehicle has been parked for a while. The...
Check headlight aim. Service reminder indicators and warning buzzers Check that the latches lock securely. Be alert for smooth operation and uneven pedal effort or catching. Accelerator pedal Check the pedal for changes in "P" position and all brakes released. such as seat adjusters, seatback recliner, etc...has the specified free play. operate smoothly and that all service reminder indicators and warning buzzers function properly. Lights Make sure the headlights, stop lights, tail lights, turn signal lights, and other fluid after the vehicle has been parked for a while. The...

Owners Manual
Page 440
Aiming is necessary, contact your Toyota dealer. 440 '06 4Runner_U (L/O 0508) -Headlights Low beam (outside) High beam (inside) 1. Turn the bulb base counterclockwise to the front of the vehicle as shown. 2. When aiming adjustment is not necessary after replacing the bulb. If the connector is tight, wiggle it. 3. Install a new bulb and connector into the mounting hole and turn them clockwise to the front of the vehicle. Unplug the connector while depressing the lock release.
Aiming is necessary, contact your Toyota dealer. 440 '06 4Runner_U (L/O 0508) -Headlights Low beam (outside) High beam (inside) 1. Turn the bulb base counterclockwise to the front of the vehicle as shown. 2. When aiming adjustment is not necessary after replacing the bulb. If the connector is tight, wiggle it. 3. Install a new bulb and connector into the mounting hole and turn them clockwise to the front of the vehicle. Unplug the connector while depressing the lock release.

Navigation Manual
Page 146
...the position of the headlight switch, the screen changes to display the "Information" screen. Touch "Screen Setting". 146 To turn the screen back on, push any touchscreen button on the screen for brightness and contrast control. The selected screen appears. Depending on the adjustment screen for 20 seconds... the "Display" screen goes off. INFORMATION When you do not touch any button such as "INFO", etc. If the screen is set in the day mode with the headlight switch turned on, this condition is memorized...
...the position of the headlight switch, the screen changes to display the "Information" screen. Touch "Screen Setting". 146 To turn the screen back on, push any touchscreen button on the screen for brightness and contrast control. The selected screen appears. Depending on the adjustment screen for 20 seconds... the "Display" screen goes off. INFORMATION When you do not touch any button such as "INFO", etc. If the screen is set in the day mode with the headlight switch turned on, this condition is memorized...


