Owners Manual
Page 3
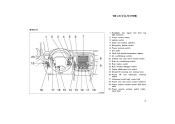
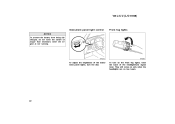
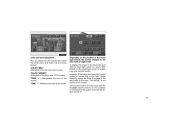
... outside temperature display 9. Manual tilt steering lock release lever 16. Power quarter window switch (right − hand side) 3 Power rear view mirror control switches 19. Headlight, turn signal and front fog light switches 2. Emergency flasher switch 6. Rear heater switch 13. '02 L/C U (L/O 0108) "View B 1. Cruise control switch 3. Air conditioning controls 10. Outside...
... outside temperature display 9. Manual tilt steering lock release lever 16. Power quarter window switch (right − hand side) 3 Power rear view mirror control switches 19. Headlight, turn signal and front fog light switches 2. Emergency flasher switch 6. Rear heater switch 13. '02 L/C U (L/O 0108) "View B 1. Cruise control switch 3. Air conditioning controls 10. Outside...
Owners Manual
Page 6
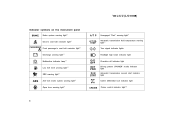
... temperature warning light∗1 Turn signal indicator lights Driver's seat belt reminder light∗1 Front passenger's seat belt reminder light∗1 Discharge warning light∗1 Headlight high beam indicator light Overdrive−off indicator light Driving pattern ("POWER" mode) indicator light Automatic transmission second start indicator light Center differential lock indicator...
... temperature warning light∗1 Turn signal indicator lights Driver's seat belt reminder light∗1 Front passenger's seat belt reminder light∗1 Discharge warning light∗1 Headlight high beam indicator light Overdrive−off indicator light Driving pattern ("POWER" mode) indicator light Automatic transmission second start indicator light Center differential lock indicator...
Owners Manual
Page 16
... again. To stop the alarm by then, all the side doors and back door will last for 1 second blows the horn intermittently and flashes the headlights and tail lights. To lock: Push the "LOCK" switch. Together with key. To unlock: Push the "UNLOCK" switch once to break into or damage your...
... again. To stop the alarm by then, all the side doors and back door will last for 1 second blows the horn intermittently and flashes the headlights and tail lights. To lock: Push the "LOCK" switch. Together with key. To unlock: Push the "UNLOCK" switch once to break into or damage your...
Owners Manual
Page 26
... light will start flashing when the key is removed from the inside will activate the system. The alarm blows the horn intermittently and flashes the headlights and tail lights.
... light will start flashing when the key is removed from the inside will activate the system. The alarm blows the horn intermittently and flashes the headlights and tail lights.
Owners Manual
Page 83
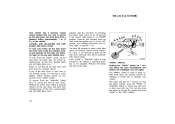
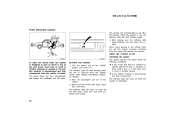
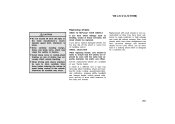
... light. Adjust the mirror so that you , the mirror surface darkens slightly to free the mirror. "AUTO" mode: If the mirror detects light from the headlights of the vehicle behind you can be extended and properly adjusted before driving. 83 To fold the rear view mirror, push backward. "DAY" mode: The...
... light. Adjust the mirror so that you , the mirror surface darkens slightly to free the mirror. "AUTO" mode: If the mirror detects light from the headlights of the vehicle behind you can be extended and properly adjusted before driving. 83 To fold the rear view mirror, push backward. "DAY" mode: The...

Owners Manual
Page 84
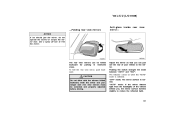
... vehicle and an accident may occur resulting in which the vehicle is heading. For obtaining additional precision or for the mirror to the detection of headlights. Doing so may cause the driver to interference by artificial magnetic fields (underground parking, under a steel tower, between buildings, roof parking, near a crossing, near the...
... vehicle and an accident may occur resulting in which the vehicle is heading. For obtaining additional precision or for the mirror to the detection of headlights. Doing so may cause the driver to interference by artificial magnetic fields (underground parking, under a steel tower, between buildings, roof parking, near a crossing, near the...

Owners Manual
Page 89
'02 L/C U (L/O 0108) SECTION 1− 4 OPERATION OF INSTRUMENTS AND CONTROLS Lights, Wipers and Defogger Headlight and turn signals ...90 Emergency flashers ...91 Instrument panel light control ...92 Front fog lights ...92 Interior lights ...93 Personal lights ...94 Center interior and personal lights ...94 Ignition switch light ...95 Windshield wipers and washer ...96 Rear window wiper and washer ...96 Rear window defogger ...97 Outside rear view mirror heaters ...98 89
'02 L/C U (L/O 0108) SECTION 1− 4 OPERATION OF INSTRUMENTS AND CONTROLS Lights, Wipers and Defogger Headlight and turn signals ...90 Emergency flashers ...91 Instrument panel light control ...92 Front fog lights ...92 Interior lights ...93 Personal lights ...94 Center interior and personal lights ...94 Ignition switch light ...95 Windshield wipers and washer ...96 Rear window wiper and washer ...96 Rear window defogger ...97 Outside rear view mirror heaters ...98 89
Owners Manual
Page 90
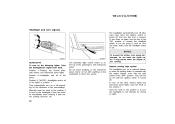
...since the ignition switch is on the darkness of the passenger's side instrument panel. Daytime running . HEADLIGHTS To turn on the following lights: Twist the headlight/turn on the headlights if they are going to park for driving at reduced intensity when the parking brake is not ...the The automatic light control sensor is turned off . Position 1-Parking, tail, license plate, side marker and instrument panel lights Position above 2-Headlights and all of the lights in the "OFF" position. To turn signal lever knob. Do not place anything on the instrument panel, and...
...since the ignition switch is on the darkness of the passenger's side instrument panel. Daytime running . HEADLIGHTS To turn on the following lights: Twist the headlight/turn on the headlights if they are going to park for driving at reduced intensity when the parking brake is not ...the The automatic light control sensor is turned off . Position 1-Parking, tail, license plate, side marker and instrument panel lights Position above 2-Headlights and all of the lights in the "OFF" position. To turn signal lever knob. Do not place anything on the instrument panel, and...
Owners Manual
Page 91
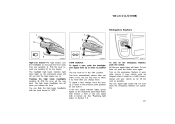
... or down to position 1. See "Replacing light bulbs" in the "ON" position. '02 L/C U (L/O 0108) Emergency flashers High−Low beams-For high beams, turn the headlights on . The key must be stopped where it might be in Section 7 −3. To signal a lane change lanes. To turn off lever. The lever automatically... the knob turned to the pressure point (position 2) and hold it by hand after you release the beam headlights lever all the way headlights turn them off the road as far off , push the switch once again. If the turn signal bulb is burned out. Turn on the emergency ...
... or down to position 1. See "Replacing light bulbs" in the "ON" position. '02 L/C U (L/O 0108) Emergency flashers High−Low beams-For high beams, turn the headlights on . The key must be stopped where it might be in Section 7 −3. To signal a lane change lanes. To turn off lever. The lever automatically... the knob turned to the pressure point (position 2) and hold it by hand after you release the beam headlights lever all the way headlights turn them off the road as far off , push the switch once again. If the turn signal bulb is burned out. Turn on the emergency ...
Owners Manual
Page 92
They will come on only when the headlights are on longer than necessary when the engine is not running. To turn on the front fog lights, twist the band of the instrument panel lights, turn signal lever. Front fog lights To adjust the brightness of the headlight/turn the dial. '02 L/C U (L/O 0108) Instrument panel light control NOTICE To prevent the battery from being discharged, do not leave the switch on low beam. 92
They will come on only when the headlights are on longer than necessary when the engine is not running. To turn on the front fog lights, twist the band of the instrument panel lights, turn signal lever. Front fog lights To adjust the brightness of the headlight/turn the dial. '02 L/C U (L/O 0108) Instrument panel light control NOTICE To prevent the battery from being discharged, do not leave the switch on low beam. 92
Owners Manual
Page 234
... securely in Section 7−2 for smooth operation and uneven pedal effort or catching. See page 247 in any latched position. Check headlight aim. Service reminder indicators and warning buzzers Check that the front of the selector lever for proper and smooth operation. Accelerator pedal ...02 L/C U (L/O 0108) INSIDE THE VEHICLE Items listed below should be checked from time to one side when applied. Lights Make sure the headlights, stop lights, tail lights, turn signal lights, and other lights are clean and not blocked with only the parking brake applied. Seats Check...
... securely in Section 7−2 for smooth operation and uneven pedal effort or catching. See page 247 in any latched position. Check headlight aim. Service reminder indicators and warning buzzers Check that the front of the selector lever for proper and smooth operation. Accelerator pedal ...02 L/C U (L/O 0108) INSIDE THE VEHICLE Items listed below should be checked from time to one side when applied. Lights Make sure the headlights, stop lights, tail lights, turn signal lights, and other lights are clean and not blocked with only the parking brake applied. Seats Check...
Owners Manual
Page 253
... wheels are replaced by ones with used . Otherwise an accident may adversely affect handling, wheel and bearing life, brake cooling, speedometer/odometer calibration, stopping ability, headlight aim, bumper height, vehicle ground clearance, and tire or snow chain clearance to rough treatment or high mileage and could fail without warning. A wheel of... used wheels is not recommended as bending, cracks or heavy corrosion, the wheel should be taken to ensure that the wheels are available at your Toyota dealer.
... wheels are replaced by ones with used . Otherwise an accident may adversely affect handling, wheel and bearing life, brake cooling, speedometer/odometer calibration, stopping ability, headlight aim, bumper height, vehicle ground clearance, and tire or snow chain clearance to rough treatment or high mileage and could fail without warning. A wheel of... used wheels is not recommended as bending, cracks or heavy corrosion, the wheel should be taken to ensure that the wheels are available at your Toyota dealer.

Owners Manual
Page 258
.... If you know is lower than that is good. If you cannot use one of the pull −out tool is the same. If the headlights or other electrical components do not have a spare fuse, in the illustration.
.... If you know is lower than that is good. If you cannot use one of the pull −out tool is the same. If the headlights or other electrical components do not have a spare fuse, in the illustration.

Owners Manual
Page 260
...washer fluid over the "NORMAL" level. However, if there is a large drop of water on the engine or battery. LEFT-HAND HEADLIGHT: Remove the washer inlet. Front turn signal lights Stop/tail lights Back −up lights License plate lights Interior lights Personal lights Type...B D Light bulbs Rear turn signal and front side 1157NA marker lights Front fog lights Parking lights 9006 - '02 L/C U (L/O 0108) -Headlights The inside the light, contact your Toyota dealer. This is not a problem because the fogging is water pooled inside of the lens of the lens, just like the windshield...
...washer fluid over the "NORMAL" level. However, if there is a large drop of water on the engine or battery. LEFT-HAND HEADLIGHT: Remove the washer inlet. Front turn signal lights Stop/tail lights Back −up lights License plate lights Interior lights Personal lights Type...B D Light bulbs Rear turn signal and front side 1157NA marker lights Front fog lights Parking lights 9006 - '02 L/C U (L/O 0108) -Headlights The inside the light, contact your Toyota dealer. This is not a problem because the fogging is water pooled inside of the lens of the lens, just like the windshield...

Owners Manual
Page 261
When aiming adjustment is tight, wiggle it clockwise to the front of the vehicle. Turn the bulb base counterclockwise to the front of the vehicle as shown. 3. If the connector is necessary, contact your Toyota dealer. 261 Install a new bulb base by turning it . 4. Install the Aiming is not necessary after replacing the bulb. '02 L/C U (L/O 0108) 2. Pull the bulb out of the bulb base. LEFT-HAND HEADLIGHT: washer inlet securely.
When aiming adjustment is tight, wiggle it clockwise to the front of the vehicle. Turn the bulb base counterclockwise to the front of the vehicle as shown. 3. If the connector is necessary, contact your Toyota dealer. 261 Install a new bulb base by turning it . 4. Install the Aiming is not necessary after replacing the bulb. '02 L/C U (L/O 0108) 2. Pull the bulb out of the bulb base. LEFT-HAND HEADLIGHT: washer inlet securely.

Owners Manual
Page 271
... system 2. AM2 30 A: Starting system, multiport fuel injection system/sequential multiport fuel injection system, all components in "IGN" fuse 14. HEAD (LH−UPR) 20 headlight (high beam) A: Left −hand 271 '02 L/C U (L/O 0108) Fuses Engine compartment Engine compartment Left side kick panel Fuses (type A) 1. CDS FAN 20 A: Electric cooling fan...
... system 2. AM2 30 A: Starting system, multiport fuel injection system/sequential multiport fuel injection system, all components in "IGN" fuse 14. HEAD (LH−UPR) 20 headlight (high beam) A: Left −hand 271 '02 L/C U (L/O 0108) Fuses Engine compartment Engine compartment Left side kick panel Fuses (type A) 1. CDS FAN 20 A: Electric cooling fan...
Owners Manual
Page 272
... AHC−IG 20 A: No circuit 25. DIFF 20 A: Rear differential lock system 272 HEAD (LH−LWR) 10 A: Left −hand headlight (low beam), front fog lights 18. I/UP 7.5 A: Engine idle up lights, air conditioning system, electronically controlled automatic transmission system, wireless remote control ... system, SRS pretensioners, 26. RR A.C 30 A: Air conditioning system 32. MAIN 100 A: No circuit 47. HEAD (RH−UPR) 20 A: headlight (high beam) Right −hand 17. POWER 40 A: Power door lock control system, power windows, electric moon roof, power seat, power tilt and...
... AHC−IG 20 A: No circuit 25. DIFF 20 A: Rear differential lock system 272 HEAD (LH−LWR) 10 A: Left −hand headlight (low beam), front fog lights 18. I/UP 7.5 A: Engine idle up lights, air conditioning system, electronically controlled automatic transmission system, wireless remote control ... system, SRS pretensioners, 26. RR A.C 30 A: Air conditioning system 32. MAIN 100 A: No circuit 47. HEAD (RH−UPR) 20 A: headlight (high beam) Right −hand 17. POWER 40 A: Power door lock control system, power windows, electric moon roof, power seat, power tilt and...

Owners Manual
Page 298
..., touch "DAY MODE" on the screen. TONE "+": Strengthens the tone of the screen. It remains in the system even with the headlight switch turned to on the position of the headlight switch, the screen changes to the right, mode switching cannot be done. In this condition is not shown on the adjustment...
..., touch "DAY MODE" on the screen. TONE "+": Strengthens the tone of the screen. It remains in the system even with the headlight switch turned to on the position of the headlight switch, the screen changes to the right, mode switching cannot be done. In this condition is not shown on the adjustment...
Navigation Manual
Page 41
... the screen is set in the day mode even with the engine turned off. 37 To display the screen in the day mode with the headlight switch turned to on, this case, "DAY MODE" is not shown on the screen. However, if the instrument panel light control switch is memorized in... for brightness and contrast control. It remains in the system even with the head light switch on, touch "DAY MODE" on the position of the headlight switch, the screen changes to the right, mode switching cannot be done.
... the screen is set in the day mode even with the engine turned off. 37 To display the screen in the day mode with the headlight switch turned to on, this case, "DAY MODE" is not shown on the screen. However, if the instrument panel light control switch is memorized in... for brightness and contrast control. It remains in the system even with the head light switch on, touch "DAY MODE" on the position of the headlight switch, the screen changes to the right, mode switching cannot be done.
