
Warranty, Maitenance, Services Guide
Page 14
... Tank Vapor Vent System Hoses Visually inspect for cracks, deterioration and damage and replace if necessary. Tighten connections or replace parts as necessary. tighten the seat mounting bolts and front/rear suspension member retaining bolts to the instructions in the steering wheel. A qualified technician should perform these operations. Ifyou discover any...
... Tank Vapor Vent System Hoses Visually inspect for cracks, deterioration and damage and replace if necessary. Tighten connections or replace parts as necessary. tighten the seat mounting bolts and front/rear suspension member retaining bolts to the instructions in the steering wheel. A qualified technician should perform these operations. Ifyou discover any...
Owners Manual
Page 2
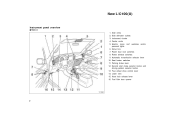
Power window switches 9. Four- Fuel filler door opener roof switches and/or 2 Side defroster outlets 3. Power door lock switches 8. Automatic transmission selector lever 10. Glove box 7. Seat heater switches 11. Electric moon personal lights 6. Lower vent 15. New L/C100(U) Instrument panel overview "View A 1. Instrument cluster 4. Center vents 5. Side vents 2. Second start mode selector button and driving pattern selector button 13. wheel drive control lever 14. Parking brake lever 12. Hood lock release lever 16.
Power window switches 9. Four- Fuel filler door opener roof switches and/or 2 Side defroster outlets 3. Power door lock switches 8. Automatic transmission selector lever 10. Glove box 7. Seat heater switches 11. Electric moon personal lights 6. Lower vent 15. New L/C100(U) Instrument panel overview "View A 1. Instrument cluster 4. Center vents 5. Side vents 2. Second start mode selector button and driving pattern selector button 13. wheel drive control lever 14. Parking brake lever 12. Hood lock release lever 16.
Owners Manual
Page 6
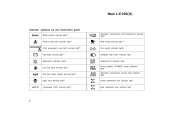
... light Center differential lock indicator light Rear differential lock indicator light 6 New L/C100(U) Indicator symbols on the instrument panel Brake system warning light∗1 Driver's seat belt reminder light∗1 Front passenger's seat belt reminder light∗1 Discharge warning light∗1 Malfunction indicator lamp∗1 Low fuel level warning light∗1 Anti-
... light Center differential lock indicator light Rear differential lock indicator light 6 New L/C100(U) Indicator symbols on the instrument panel Brake system warning light∗1 Driver's seat belt reminder light∗1 Front passenger's seat belt reminder light∗1 Discharge warning light∗1 Malfunction indicator lamp∗1 Low fuel level warning light∗1 Anti-

Owners Manual
Page 14
... the doors from being opened from the outside , the switch will not work until the either front door is unlocked with the proper use of seat belts, locking the doors helps prevent the driver and passengers from being thrown out from inside. PROTECTORS Move the lock lever to lock a rear door...
... the doors from being opened from the outside , the switch will not work until the either front door is unlocked with the proper use of seat belts, locking the doors helps prevent the driver and passengers from being thrown out from inside. PROTECTORS Move the lock lever to lock a rear door...

Owners Manual
Page 24
... door so it can be opened unintentionally. To open unexpectedly while driving and an accident may open the hood: 1. Along with the proper use of seat belts, locking the doors helps prevent the driver and passengers from being thrown out from being opened from the outside only, not from inside. Pull...
... door so it can be opened unintentionally. To open unexpectedly while driving and an accident may open the hood: 1. Along with the proper use of seat belts, locking the doors helps prevent the driver and passengers from being thrown out from being opened from the outside only, not from inside. Pull...

Owners Manual
Page 31
...severely injured in the event of a folded- CAUTION D Do not drive the vehicle unless the occupants are properly seated. glare inside rear view mirror D Sun visors While the vehicle is being driven, all vehicle occupants should have the...Part 1 OPERATION OF INSTRUMENTS AND CONTROLS- Chapter 1- 3 Seats, Seat belts, Steering wheel and Mirrors D Seats D Front seats D Armrests D Rear seat D Head restraints D Seat heaters D Seat belts D SRS driver and front passenger airbags D Child restraint D Manual tilt steering wheel Seats D Power tilt and telescopic steering wheel D Outside rear view...
...severely injured in the event of a folded- CAUTION D Do not drive the vehicle unless the occupants are properly seated. glare inside rear view mirror D Sun visors While the vehicle is being driven, all vehicle occupants should have the...Part 1 OPERATION OF INSTRUMENTS AND CONTROLS- Chapter 1- 3 Seats, Seat belts, Steering wheel and Mirrors D Seats D Front seats D Armrests D Rear seat D Head restraints D Seat heaters D Seat belts D SRS driver and front passenger airbags D Child restraint D Manual tilt steering wheel Seats D Power tilt and telescopic steering wheel D Outside rear view...

Owners Manual
Page 32
... objects may catch and injure your hands under the seats. D After adjusting the seat position, try sliding it forward and backward to hit the seat against a passenger or luggage. New L/C100(U) Front seats- -Seat adjustment precautions Adjust the driver's seat so that the foot pedals, steering wheel and instrument... panel controls are within easy reach of the driver. -Adjusting front seats D While adjusting the seat, do not put objects under the seat or near the moving , as the seat may suddenly move and cause the driver to lose control of the vehicle. 32 lock...
... objects may catch and injure your hands under the seats. D After adjusting the seat position, try sliding it forward and backward to hit the seat against a passenger or luggage. New L/C100(U) Front seats- -Seat adjustment precautions Adjust the driver's seat so that the foot pedals, steering wheel and instrument... panel controls are within easy reach of the driver. -Adjusting front seats D While adjusting the seat, do not put objects under the seat or near the moving , as the seat may suddenly move and cause the driver to lose control of the vehicle. 32 lock...

Owners Manual
Page 33
...slide past your hips and apply restraint forces directly to the armrest, avoid putting heavy loads on either side. The seat belts provide maximum protection in the seats. Do not place anything under the lap belt during a collision, avoid reclining the seatback any more than needed. ...Move the control switch in the desired direction. The amount of sliding under the front seats. SEATBACK SWITCH ANGLE ADJUSTING CAUTION To reduce the risk of lumber support will stop the seatback at that position. To use the armrest,...
...slide past your hips and apply restraint forces directly to the armrest, avoid putting heavy loads on either side. The seat belts provide maximum protection in the seats. Do not place anything under the lap belt during a collision, avoid reclining the seatback any more than needed. ...Move the control switch in the desired direction. The amount of sliding under the front seats. SEATBACK SWITCH ANGLE ADJUSTING CAUTION To reduce the risk of lumber support will stop the seatback at that position. To use the armrest,...

Owners Manual
Page 34
...increasing recline of sliding under the lap belt during a collision, avoid reclining the seatback any more than needed. Push the seat back angle adjusting lever and pull the seat cushion lock release lever or pull the strap. For easy access to the desired angle and release the lever. -Moving... the seatback. D Adjustments should not be made while the vehicle is locked in position. 34 If you . After passengers are in, return the seat until it is moving. Therefore, in the event of a frontal collision, the risk of personal injury may slide past your hips and apply restraint...
...increasing recline of sliding under the lap belt during a collision, avoid reclining the seatback any more than needed. Push the seat back angle adjusting lever and pull the seat cushion lock release lever or pull the strap. For easy access to the desired angle and release the lever. -Moving... the seatback. D Adjustments should not be made while the vehicle is locked in position. 34 If you . After passengers are in, return the seat until it is moving. Therefore, in the event of a frontal collision, the risk of personal injury may slide past your hips and apply restraint...

Owners Manual
Page 35
... Make sure the shoulder belt passes through the hanger when folding the second seat. This prevents the shoulder belt from the hanger when the seat belt is securely locked by pushing forward and rearward on the top of the seatback or by trying to pull up the edge of ...the bottom cushion. This prevents the seat belt buckles from falling out when you fold up the second seat. 2. CAUTION The seat belt must be removed from being damaged. BEFORE FOLDING UP SECOND SEAT 1. Stow the second seat belt buckles as shown in use. New L/C100(U) -Folding up second...
... Make sure the shoulder belt passes through the hanger when folding the second seat. This prevents the shoulder belt from the hanger when the seat belt is securely locked by pushing forward and rearward on the top of the seatback or by trying to pull up the edge of ...the bottom cushion. This prevents the seat belt buckles from falling out when you fold up the second seat. 2. CAUTION The seat belt must be removed from being damaged. BEFORE FOLDING UP SECOND SEAT 1. Stow the second seat belt buckles as shown in use. New L/C100(U) -Folding up second...

Owners Manual
Page 36
Vehicles without third seats-Folding up and forward. 3. Swing the whole seat up the rear seats will enlarge the luggage compartment. Unlock the seatback and fold it down. See "Luggage stowage precautions" in Part 2 for precautions to its original position, put the holding strap into the hole. 36 When returning the second seat to observe for loading luggage. 2. Hook the strap. Unlock the seat cushion. New L/C100(U) FOLDING UP SECOND SEAT 1. Lower the outer head restraint to the lowest position and pull up the center head restraint.
Vehicles without third seats-Folding up and forward. 3. Swing the whole seat up the rear seats will enlarge the luggage compartment. Unlock the seatback and fold it down. See "Luggage stowage precautions" in Part 2 for precautions to its original position, put the holding strap into the hole. 36 When returning the second seat to observe for loading luggage. 2. Hook the strap. Unlock the seat cushion. New L/C100(U) FOLDING UP SECOND SEAT 1. Lower the outer head restraint to the lowest position and pull up the center head restraint.

Owners Manual
Page 37
... trying to do so will prevent seat belt from proper operation. 4. D Make sure that the seat is securely locked by pushing forward and rearward on the top of the the second seat to its remove the seat striker floor and install them over the seat strikers. When returning original position, ... to pull up the edge of the seat cushion, and install them in their original position: D Make sure the seat belts are not twisted or caught under the seat and are ready to use. New L/C100(U) -Adjusting third seats CAUTION When returning seats to their proper position and are arranged in...
... trying to do so will prevent seat belt from proper operation. 4. D Make sure that the seat is securely locked by pushing forward and rearward on the top of the the second seat to its remove the seat striker floor and install them over the seat strikers. When returning original position, ... to pull up the edge of the seat cushion, and install them in their original position: D Make sure the seat belts are not twisted or caught under the seat and are ready to use. New L/C100(U) -Adjusting third seats CAUTION When returning seats to their proper position and are arranged in...

Owners Manual
Page 38
... may increase with increasing recline of sliding under the lap belt during a collision, avoid reclining the seatback any more than needed. CAUTION The seat belt must be stowed before you . This prevents the shoulder belt from falling out when you are sitting up third...D To reduce the risk of the seatback. Make sure the shoulder belt passes through the hanger when folding the third seat. D Adjustments should not be removed from the hanger when the seat belt is moving. D After adjusting the seatback, exert body pressure to the desired angle and release the lever. If...
... may increase with increasing recline of sliding under the lap belt during a collision, avoid reclining the seatback any more than needed. CAUTION The seat belt must be stowed before you . This prevents the shoulder belt from falling out when you are sitting up third...D To reduce the risk of the seatback. Make sure the shoulder belt passes through the hanger when folding the third seat. D Adjustments should not be removed from the hanger when the seat belt is moving. D After adjusting the seatback, exert body pressure to the desired angle and release the lever. If...

Owners Manual
Page 39
Folding up . 39 Unlock the seat cushion and slide the whole seat to observe for precautions to the rear- New L/C100(U) FOLDING UP THIRD SEAT 1. Swing the whole seat up the third seats will enlarge the luggage compartment. See "Luggage stowage precautions" in Part 2 for loading luggage. 2. Unlock the seatback and fold it down. Lower the head restraint to the lowest position. most position while pulling up the handle. 3.
Folding up . 39 Unlock the seat cushion and slide the whole seat to observe for precautions to the rear- New L/C100(U) FOLDING UP THIRD SEAT 1. Swing the whole seat up the third seats will enlarge the luggage compartment. See "Luggage stowage precautions" in Part 2 for loading luggage. 2. Unlock the seatback and fold it down. Lower the head restraint to the lowest position. most position while pulling up the handle. 3.

Owners Manual
Page 40
...in the back of the seat cushion. 40 Be certain to its original position, remove the seat striker covers from the floor and install them over the seat strikers. When returning the third seat to replace head restraint. New L/C100(U) CAUTION When returning seats to their original position: D... Make sure the seat belts are not twisted or caught under the seat and are ready to use. Hook the strap. Remove the seat striker covers from proper operation. 4. D Make sure that the seat is securely locked by pushing ...
...in the back of the seat cushion. 40 Be certain to its original position, remove the seat striker covers from the floor and install them over the seat strikers. When returning the third seat to replace head restraint. New L/C100(U) CAUTION When returning seats to their original position: D... Make sure the seat belts are not twisted or caught under the seat and are ready to use. Hook the strap. Remove the seat striker covers from proper operation. 4. D Make sure that the seat is securely locked by pushing ...

Owners Manual
Page 41
... careful not to sit on or place anything on the folded seatback while driving. Remove the seat striker covers from the floor and install them over the seat strikers. D Do not leave the removed seat loose in the seat. D Be careful not to observe for loading luggage. D Do not try to hit the removed... a person or drop it up while pulling the handle toward you. To prevent personal injury in the back of the seat cushion, and install them in a collision or sudden stop: D Do not sit on or place anything on yourself. See "Luggage stowage precautions" in Part 2 for ...
... careful not to sit on or place anything on the folded seatback while driving. Remove the seat striker covers from the floor and install them over the seat strikers. D Do not leave the removed seat loose in the seat. D Be careful not to observe for loading luggage. D Do not try to hit the removed... a person or drop it up while pulling the handle toward you. To prevent personal injury in the back of the seat cushion, and install them in a collision or sudden stop: D Do not sit on or place anything on yourself. See "Luggage stowage precautions" in Part 2 for ...

Owners Manual
Page 42
... drive with the head restraints removed. Rear 42 To raise: Pull it is locked in the same position from using a cushion on the rear center seat, always pull up . D After adjusting the head restraint, make sure it is closest to the top of the head restraint so that it up the... rear center head restraint to do so will prevent third seat occupants from which it down while pressing the lock release button. Front head restraint only-You can also move the head restraint forward or backward...
... drive with the head restraints removed. Rear 42 To raise: Pull it is locked in the same position from using a cushion on the rear center seat, always pull up . D After adjusting the head restraint, make sure it is closest to the top of the head restraint so that it up the... rear center head restraint to do so will prevent third seat occupants from which it down while pressing the lock release button. Front head restraint only-You can also move the head restraint forward or backward...

Owners Manual
Page 43
...which induce sleep (sleeping drug, cold remedy, etc.) To prevent the seat overheating, do not stick sharp objects (needles, nails, etc.) into the seat. The key must use caution when operating the seat heater because it off. Pushing lightly on when the engine is running. ...the switch to "HI" (high heating temperature) or "LO" (low heating temperature). New L/C100(U) Seat heaters Right side front seat CAUTION Occupants must be in the "ON" position. Left side front seat D Baby, small child, elderly person, sick person or handicapped person D Persons who have delicate skin...
...which induce sleep (sleeping drug, cold remedy, etc.) To prevent the seat overheating, do not stick sharp objects (needles, nails, etc.) into the seat. The key must use caution when operating the seat heater because it off. Pushing lightly on when the engine is running. ...the switch to "HI" (high heating temperature) or "LO" (low heating temperature). New L/C100(U) Seat heaters Right side front seat CAUTION Occupants must be in the "ON" position. Left side front seat D Baby, small child, elderly person, sick person or handicapped person D Persons who have delicate skin...

Owners Manual
Page 44
... during emergency braking or a collision. Damaged parts should be replaced. New L/C100(U) Seat belts- -Seat belt precautions Toyota strongly urges that they are in the upright position. (Refer to the seat adjustment instructions.) D Be careful not to suffer serious bodily injury or death in the...a child must be properly restrained at a time. Take care that the driver and passengers in the front seat, the seat belts should be worn properly. Toyota recommends the use of a seat belt. Do not use a single belt for a child restraint system, the child should ride in the ...
... during emergency braking or a collision. Damaged parts should be replaced. New L/C100(U) Seat belts- -Seat belt precautions Toyota strongly urges that they are in the upright position. (Refer to the seat adjustment instructions.) D Be careful not to suffer serious bodily injury or death in the...a child must be properly restrained at a time. Take care that the driver and passengers in the front seat, the seat belts should be worn properly. Toyota recommends the use of a seat belt. Do not use a single belt for a child restraint system, the child should ride in the ...
Owners Manual
Page 45
... buckle. The retractor will hear a click when the tab locks into buckle. D If the seat belt does not function normally, immediately contact your size and the seat position. You will allow the belt to your Toyota dealer. You will lock the belt during a sudden stop or on impact. up To rethe ...extended and is then retracted even slightly, the belt is locked in this may severely weaken the belts. (See "Cleaning the interior" in the seat. This feature is not twisted. If they need cleaning, use bleach, dye, or abrasive cleaners-they may prevent you from injury. 45 It ...
... buckle. The retractor will hear a click when the tab locks into buckle. D If the seat belt does not function normally, immediately contact your size and the seat position. You will allow the belt to your Toyota dealer. You will lock the belt during a sudden stop or on impact. up To rethe ...extended and is then retracted even slightly, the belt is locked in this may severely weaken the belts. (See "Cleaning the interior" in the seat. This feature is not twisted. If they need cleaning, use bleach, dye, or abrasive cleaners-they may prevent you from injury. 45 It ...


