
Owners Manual
Page 83
... prevent the battery from being discharged, do not leave the switch on longer than normal, a front or rear turn signal bulb is not running. TURN SIGNALS To signal a turn, push the headlight/ turn signal lever up or down to the pressure point (position 2) and hold it might be in the "ON" position...
... prevent the battery from being discharged, do not leave the switch on longer than normal, a front or rear turn signal bulb is not running. TURN SIGNALS To signal a turn, push the headlight/ turn signal lever up or down to the pressure point (position 2) and hold it might be in the "ON" position...
Owners Manual
Page 234
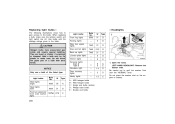
...listed type. Be careful not to the bulbs. Use bulbs with bare hands. 7440 7443 7440 NOTICE Only use a bulb of a bulb with the wattage ratings given in the table. Hold a bulb only by its plastic or metal case. Light bulbs Head lights (high) Head lights (low...lights Personal lights Type A Type B Glovebox light Door courtesy lights Vanity lights W 55 51 Type A B C A B C D E : : : : : HB3 halogen bulbs HB4 halogen bulbs Single end bulbs (ambar) Wedge base bulbs Double end bulbs Bulb No. 9006 - -Headlights W 51 5 21 21/5 21 5 8 5 8 1.4 3 1.5 Type B D D D D D E C E D D E 1. LEFT-HAND...
...listed type. Be careful not to the bulbs. Use bulbs with bare hands. 7440 7443 7440 NOTICE Only use a bulb of a bulb with the wattage ratings given in the table. Hold a bulb only by its plastic or metal case. Light bulbs Head lights (high) Head lights (low...lights Personal lights Type A Type B Glovebox light Door courtesy lights Vanity lights W 55 51 Type A B C A B C D E : : : : : HB3 halogen bulbs HB4 halogen bulbs Single end bulbs (ambar) Wedge base bulbs Double end bulbs Bulb No. 9006 - -Headlights W 51 5 21 21/5 21 5 8 5 8 1.4 3 1.5 Type B D D D D D E C E D D E 1. LEFT-HAND...

Owners Manual
Page 235
When aiming adjustment is not necessary after replacing the bulb. Pull the bulb out of the vehicle. LEFT-HAND HEADLIGHT: washer inlet securely. Install a new bulb base by turning it . 4. Install the Aiming is necessary, contact your Toyota dealer. 235 Turn the bulb base counterclockwise to the front of the bulb base. 2. If the connector is tight, wiggle it clockwise to the front of the vehicle as shown. 3.
When aiming adjustment is not necessary after replacing the bulb. Pull the bulb out of the vehicle. LEFT-HAND HEADLIGHT: washer inlet securely. Install a new bulb base by turning it . 4. Install the Aiming is necessary, contact your Toyota dealer. 235 Turn the bulb base counterclockwise to the front of the bulb base. 2. If the connector is tight, wiggle it clockwise to the front of the vehicle as shown. 3.
Owners Manual
Page 253
...Operation ...109 Reminder light ...109 254 How to start the engine ...167 L Light bulbs Back-up lights ...238 Front fog lights ...235 Front side maker lights ...236 Front turn signal lights ...236 Headlights ...233 License plate lights ...238 Parking lights ...236 Rear turn signal lights ...238 Stop... and tail lights ...237,238 Light bulbs, replacing ...233 Lock Back door ...22 Side doors ...13 Steering column ......
...Operation ...109 Reminder light ...109 254 How to start the engine ...167 L Light bulbs Back-up lights ...238 Front fog lights ...235 Front side maker lights ...236 Front turn signal lights ...236 Headlights ...233 License plate lights ...238 Parking lights ...236 Rear turn signal lights ...238 Stop... and tail lights ...237,238 Light bulbs, replacing ...233 Lock Back door ...22 Side doors ...13 Steering column ......
