
Owners Manual
Page 57
... lever. Emergency flashers High-Low beams-For high beams, turn the headlights on the instrument panel flash faster than normal, a front or rear turn signal bulb is burned out. Flashing the high beam headlights (position 3)-Pull the lever all the way back. The lever automatically returns after you make a turn on...
... lever. Emergency flashers High-Low beams-For high beams, turn the headlights on the instrument panel flash faster than normal, a front or rear turn signal bulb is burned out. Flashing the high beam headlights (position 3)-Pull the lever all the way back. The lever automatically returns after you make a turn on...

Owners Manual
Page 68
Turn the ignition key to "ON", but do not start the engine. If any service reminder indicator or warning buzzer does not function as possible. 63 All the service reminder indicators except the SRS airbag warning light should come on. Have it checked by your Toyota dealer as soon as described above, either the bulb is burned out or the circuit is in need of repair. The "ABS" warning light goes off after about 3 seconds. 3.
Turn the ignition key to "ON", but do not start the engine. If any service reminder indicator or warning buzzer does not function as possible. 63 All the service reminder indicators except the SRS airbag warning light should come on. Have it checked by your Toyota dealer as soon as described above, either the bulb is burned out or the circuit is in need of repair. The "ABS" warning light goes off after about 3 seconds. 3.

Owners Manual
Page 93
... and the parking brake reminder light is set : Pull out on until you that the parking brake is off. ! Parking brake To check the indicator bulb, turn the lever, and push it while setting the parking brake. To release: Press the lock release button, turn the ignition key to avoid inadvertent...
... and the parking brake reminder light is set : Pull out on until you that the parking brake is off. ! Parking brake To check the indicator bulb, turn the lever, and push it while setting the parking brake. To release: Press the lock release button, turn the ignition key to avoid inadvertent...

Owners Manual
Page 184
... Adding washer fluid Parts: S Water S Washer fluid containing antifreeze (for winter use) Tools: S Water S Washer fluid containing antifreeze (for winter use) Tools: S Funnel Replacing light bulbs and units Parts: S Bulb or unit with same number and wattage rating as original (See charts in "Replacing light...
... Adding washer fluid Parts: S Water S Washer fluid containing antifreeze (for winter use) Tools: S Water S Washer fluid containing antifreeze (for winter use) Tools: S Funnel Replacing light bulbs and units Parts: S Bulb or unit with same number and wattage rating as original (See charts in "Replacing light...
Owners Manual
Page 196
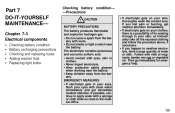
... pain or burning, get immediate medical attention. Chapter 7-3 Electrical components S S S S S Checking battery condition Battery recharging precautions Checking and replacing fuses Adding washer fluid Replacing light bulbs Checking battery condition- -Precautions ! S Avoid contact with tools. Part 7 DO-IT-YOURSELF MAINTENANCE- CAUTION BATTERY PRECAUTIONS The battery produces flammable and explosive hydrogen gas. The...
... pain or burning, get immediate medical attention. Chapter 7-3 Electrical components S S S S S Checking battery condition Battery recharging precautions Checking and replacing fuses Adding washer fluid Replacing light bulbs Checking battery condition- -Precautions ! S Avoid contact with tools. Part 7 DO-IT-YOURSELF MAINTENANCE- CAUTION BATTERY PRECAUTIONS The battery produces flammable and explosive hydrogen gas. The...

Owners Manual
Page 201
...paint. 196 If any other object, in place of the listed type. This may damage your Toyota dealer and most auto parts stores. Light Bulbs and Units Headlight units Headlight bulbs Parking lights Front turn signal lights Rear turn signal lights Stop and tail lights Back-up lights ... a fuse with the electrical system. Use bulbs with water. Add washer fluid. Replacing light bulbs and units- CAUTION Never use engine antifreeze or any washer does not work, the washer tank may use plain water as possible. Have your Toyota dealer correct it may cause extensive damage and...
...paint. 196 If any other object, in place of the listed type. This may damage your Toyota dealer and most auto parts stores. Light Bulbs and Units Headlight units Headlight bulbs Parking lights Front turn signal lights Rear turn signal lights Stop and tail lights Back-up lights ... a fuse with the electrical system. Use bulbs with water. Add washer fluid. Replacing light bulbs and units- CAUTION Never use engine antifreeze or any washer does not work, the washer tank may use plain water as possible. Have your Toyota dealer correct it may cause extensive damage and...

Owners Manual
Page 202
W Type - - - - - 5 10 5 3 1.4 C C C C B A: Single end bulbs B: Wedge base bulbs C: Double end bulbs D: HB2 halogen bulbs 1. Release the clips and remove the radiator grille. Open the hood. The clips can be released with a flatblade screwdriver as shown. 197 -Headlight units Light Bulbs and Units Headlight Interior light Normal cab Xtra-cab Personal lights Door courtesy lights Glovebox light Bulb and Unit No. Loosen the parking light unit retaining screws and remove the units unplugging the connectors. 2.
W Type - - - - - 5 10 5 3 1.4 C C C C B A: Single end bulbs B: Wedge base bulbs C: Double end bulbs D: HB2 halogen bulbs 1. Release the clips and remove the radiator grille. Open the hood. The clips can be released with a flatblade screwdriver as shown. 197 -Headlight units Light Bulbs and Units Headlight Interior light Normal cab Xtra-cab Personal lights Door courtesy lights Glovebox light Bulb and Unit No. Loosen the parking light unit retaining screws and remove the units unplugging the connectors. 2.

Owners Manual
Page 204
Unplug the connector. If the connector is necessary, contact your Toyota dealer. 199 To install a bulb, align the tabs of the bulb with the "TOP" mark upward and snuggle on the connector and the headlight body. Install the rubber cover with the cutouts of the mounting ..., wiggle it. 2. Make sure the rubber cover fits snugly on the boss. Open the hood. Aiming is not necessary after replacing the bulb. Remove the rubber cover. Release the bulb retaining spring and remove the bulb. Install a new bulb and the bulb retaining spring. Then inset the connector. -Headlight...
Unplug the connector. If the connector is necessary, contact your Toyota dealer. 199 To install a bulb, align the tabs of the bulb with the "TOP" mark upward and snuggle on the connector and the headlight body. Install the rubber cover with the cutouts of the mounting ..., wiggle it. 2. Make sure the rubber cover fits snugly on the boss. Open the hood. Aiming is not necessary after replacing the bulb. Remove the rubber cover. Release the bulb retaining spring and remove the bulb. Install a new bulb and the bulb retaining spring. Then inset the connector. -Headlight...
Warranty, Maitenance, Services Guide
Page 17
... IN ABOVE SYSTEMS Data Link Connector* Sensors, Switches, and Valves Hoses,Clamps, Fittings,Tubing, Sealing Gaskets or Devices, and Mounting Hardware Pulleys, Belts, and Idlers Bulbs for malfunctioning indicator (Engine system warning light)* **Spark plugs warranted until first required maintenance only.
... IN ABOVE SYSTEMS Data Link Connector* Sensors, Switches, and Valves Hoses,Clamps, Fittings,Tubing, Sealing Gaskets or Devices, and Mounting Hardware Pulleys, Belts, and Idlers Bulbs for malfunctioning indicator (Engine system warning light)* **Spark plugs warranted until first required maintenance only.

