Owners Manual
Page 1
.... Please leave this Owner's Manual in this manual applies to all models and explains all equipment, including options. Please note that your Toyota dealer knows your vehicle best and is interested in part, without notice. This material may not be reproduced or copied, in whole or... we reserve the right to make changes at any other assistance you can enjoy many years of value-conscious people who drive Toyotas. TOYOTA MOTOR CORPORATION E 1997 TOYOTA MOTOR CORPORATION All rights reserved. Please read it comes to service, remember that this vehicle at the time of resale. The...
.... Please leave this Owner's Manual in this manual applies to all models and explains all equipment, including options. Please note that your Toyota dealer knows your vehicle best and is interested in part, without notice. This material may not be reproduced or copied, in whole or... we reserve the right to make changes at any other assistance you can enjoy many years of value-conscious people who drive Toyotas. TOYOTA MOTOR CORPORATION E 1997 TOYOTA MOTOR CORPORATION All rights reserved. Please read it comes to service, remember that this vehicle at the time of resale. The...
Owners Manual
Page 2
...safety or durability, and may even violate governmental regulations. For scheduled maintenance information, please refer to make sure that Toyota does not warrant these maintenance requirements. This vehicle should know that the specified maintenance is performed. Your responsiblity for ...Owner's Manual Supplement/Maintenance Schedule". Also included in the market. New vehicle warranty Your new vehicle is covered by the following Toyota limited warranties: S New vehicle warranty S Emission control systems warranty S Others For further information, please refer to , or adverse ...
...safety or durability, and may even violate governmental regulations. For scheduled maintenance information, please refer to make sure that Toyota does not warrant these maintenance requirements. This vehicle should know that the specified maintenance is performed. Your responsiblity for ...Owner's Manual Supplement/Maintenance Schedule". Also included in the market. New vehicle warranty Your new vehicle is covered by the following Toyota limited warranties: S New vehicle warranty S Emission control systems warranty S Others For further information, please refer to , or adverse ...
Owners Manual
Page 3
... SRS airbag system, be sure to have the SRS airbag system removed and disposed of by a qualified service shop or by your Toyota dealer before you dispose of your Toyota dealer for precautionary measures or special instructions regarding installation. Installation of a mobile two-way radio system As the installation of a mobile two...
... SRS airbag system, be sure to have the SRS airbag system removed and disposed of by a qualified service shop or by your Toyota dealer before you dispose of your Toyota dealer for precautionary measures or special instructions regarding installation. Installation of a mobile two-way radio system As the installation of a mobile two...

Owners Manual
Page 5
Conserving ll" multigrade engine oil or ILSAC multigrade engine oil is recommended. See page 154 for detailed information. Tire information: See pages 157 through 161. OM16514U Part No. 01999-16514 Printed in period ...101 D How to start ...119 D If your engine stalls while driving ...122 D If your vehicle overheats ...123 D If you have a flat tire ...124 D If your vehicle needs to be towed ...131 D Tips for driving during break- Fuel tank capacity: 45 L (11.9 gal., 9.9 lmp. Tire pressure: See page 175. gal.) Engine oil: API SH, "energy- in Japan 01- 9701- 00 B Publication No....
Conserving ll" multigrade engine oil or ILSAC multigrade engine oil is recommended. See page 154 for detailed information. Tire information: See pages 157 through 161. OM16514U Part No. 01999-16514 Printed in period ...101 D How to start ...119 D If your engine stalls while driving ...122 D If your vehicle overheats ...123 D If you have a flat tire ...124 D If your vehicle needs to be towed ...131 D Tips for driving during break- Fuel tank capacity: 45 L (11.9 gal., 9.9 lmp. Tire pressure: See page 175. gal.) Engine oil: API SH, "energy- in Japan 01- 9701- 00 B Publication No....

Owners Manual
Page 6
Chapter 1-1 Overview of instruments and controls S Instrument panel overview S Instrument cluster overview S Indicator symbols on the instrument panel 1 Part 1 OPERATION OF INSTRUMENTS AND CONTROLS-
Chapter 1-1 Overview of instruments and controls S Instrument panel overview S Instrument cluster overview S Indicator symbols on the instrument panel 1 Part 1 OPERATION OF INSTRUMENTS AND CONTROLS-

Owners Manual
Page 8
Instrument panel light control knob Headlight and turn signal switch Wiper and washer switches Emergency flasher switch Clock Air conditioning controls Car audio Cigarette lighter Ashtray Cup holders Rear window defogger switch Ignition switch Cruise control switch 3 1. 2. 3. 4. 5. 6. 7. 8. 9. 10. 11. 12. 13.
Instrument panel light control knob Headlight and turn signal switch Wiper and washer switches Emergency flasher switch Clock Air conditioning controls Car audio Cigarette lighter Ashtray Cup holders Rear window defogger switch Ignition switch Cruise control switch 3 1. 2. 3. 4. 5. 6. 7. 8. 9. 10. 11. 12. 13.

Owners Manual
Page 9
Service reminder indicators or indicator lights 4. Speedmeter 6. Trip meter 4 Instrument cluster overview "Without tachometer 1. Theft deterrent system indicator 7. Tachometer 8. Fuel gauge 3. Odometer 5. Trip meter reset knob 9. Engine coolant temperature gauge 2.
Service reminder indicators or indicator lights 4. Speedmeter 6. Trip meter 4 Instrument cluster overview "Without tachometer 1. Theft deterrent system indicator 7. Tachometer 8. Fuel gauge 3. Odometer 5. Trip meter reset knob 9. Engine coolant temperature gauge 2.

Owners Manual
Page 10
Fuel gauge 2. Trip meter reset knob 7. Trip meter 5 Odometer 4. Service reminder indicators or indicator lights 3. Speedometer 5. Engine coolant temperature gauge 6. "Without tachometer 1.
Fuel gauge 2. Trip meter reset knob 7. Trip meter 5 Odometer 4. Service reminder indicators or indicator lights 3. Speedometer 5. Engine coolant temperature gauge 6. "Without tachometer 1.

Owners Manual
Page 11
Indicator symbols on the instrument panel Open door warning light*1 Brake system warning light *1 SRS airbag warning light*1 Seat belt reminder light*1 Discharge warning light*1 Headlight high beam indicator light Low oil pressure warning light*1 Overdrive-of f indicator light Cruise control indicator light *2 Turn signal indicator lights Malfunction indicator lamp*1 Low fuel level warning light *1 Anti-lock brake system warning light *1 *1: For details, see "Service reminder indicators and warning buzzer" in Chapter 1-5. *2: If this light flashes, see "Cruise control" in Chapter 1-6. 6
Indicator symbols on the instrument panel Open door warning light*1 Brake system warning light *1 SRS airbag warning light*1 Seat belt reminder light*1 Discharge warning light*1 Headlight high beam indicator light Low oil pressure warning light*1 Overdrive-of f indicator light Cruise control indicator light *2 Turn signal indicator lights Malfunction indicator lamp*1 Low fuel level warning light *1 Anti-lock brake system warning light *1 *1: For details, see "Service reminder indicators and warning buzzer" in Chapter 1-5. *2: If this light flashes, see "Cruise control" in Chapter 1-6. 6
Owners Manual
Page 12
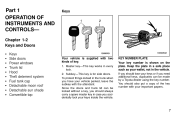
... PLATE Your key number is for side doors. If you should lose your keys or if you need additional keys, duplicates can be made by a Toyota dealer using the key number. You should always carry a spare master key in case you have your keys inside the vehicle. Part 1 OPERATION OF INSTRUMENTS...
... PLATE Your key number is for side doors. If you should lose your keys or if you need additional keys, duplicates can be made by a Toyota dealer using the key number. You should always carry a spare master key in case you have your keys inside the vehicle. Part 1 OPERATION OF INSTRUMENTS...

Owners Manual
Page 13
In the driver's door lock, turning the key once will unlock the driver's door and twice in succession will also lock the door. To lock: Turn the key forward. Closing the door with either side door. Driver's side Passenger's side 8 Side doors LOCKING AND UNLOCKING WITH KEY Insert the key into the keyhole and turn it. To lock: Push the button downward. To unlock: Pull the button upward. To unlock: Turn the key backward. LOCKING AND UNLOCKING WITH INSIDE LOCK BUTTON Move the lock button. Vehicles with power door lock system-Both doors lock and unlock simultaneously with...
In the driver's door lock, turning the key once will unlock the driver's door and twice in succession will also lock the door. To lock: Turn the key forward. Closing the door with either side door. Driver's side Passenger's side 8 Side doors LOCKING AND UNLOCKING WITH KEY Insert the key into the keyhole and turn it. To lock: Push the button downward. To unlock: Pull the button upward. To unlock: Turn the key backward. LOCKING AND UNLOCKING WITH INSIDE LOCK BUTTON Move the lock button. Vehicles with power door lock system-Both doors lock and unlock simultaneously with...

Owners Manual
Page 14
All the doors lock or unlock simultaneously. ! Along with the switch on the front side. It also helps prevent the doors from the vehicle during an accident. To open . The window will fully open : Lightly push down and then release it . 9 The ignition key must be sure that the doors are closed and locked, especially when small children are in the "ON" position. Automatic operation (to open only): Push the switch completely down the switch. To unlock: Push the switch on the driver's door. OPERATING THE DRIVER'S WINDOW Use the switch on the rear side. To close: Pull up and ...
All the doors lock or unlock simultaneously. ! Along with the switch on the front side. It also helps prevent the doors from the vehicle during an accident. To open . The window will fully open : Lightly push down and then release it . 9 The ignition key must be sure that the doors are closed and locked, especially when small children are in the "ON" position. Automatic operation (to open only): Push the switch completely down the switch. To unlock: Push the switch on the driver's door. OPERATING THE DRIVER'S WINDOW Use the switch on the rear side. To close: Pull up and ...

Owners Manual
Page 15
The driver's door also has a switch that they operate the windows safely. When anyone closes the power windows, be operated. ! To close the power windows. S When small children are kept completely inside the vehicle before you push in a serious injury. For front passenger's use For driver's use the power window switches and get trapped in the vehicle, especially with the ignition key still inserted. Use the window lock button to prevent them use of all occupants are in serious accidents. Unattended children can become involved in the vehicle, never let them ...
The driver's door also has a switch that they operate the windows safely. When anyone closes the power windows, be operated. ! To close the power windows. S When small children are kept completely inside the vehicle before you push in a serious injury. For front passenger's use For driver's use the power window switches and get trapped in the vehicle, especially with the ignition key still inserted. Use the window lock button to prevent them use of all occupants are in serious accidents. Unattended children can become involved in the vehicle, never let them ...

Owners Manual
Page 16
To close the trunk lid, lower it and press down on the lock release lever. 11 After closing the trunk lid, try pulling it up on it is securely closed while driving. To open the trunk lid from the driver's seat, pull up to observe in loading luggage. CAUTION Keep the trunk lid closed . Trunk lid- ! This not only keeps the luggage from being thrown out but also prevents exhaust gases from entering the vehicle. -Lock release lever To open the trunk lid from the outside, insert the master key and turn it clockwise. See "Luggage stowage precautions" in Part 2 for precautions to...
To close the trunk lid, lower it and press down on the lock release lever. 11 After closing the trunk lid, try pulling it up on it is securely closed while driving. To open the trunk lid from the driver's seat, pull up to observe in loading luggage. CAUTION Keep the trunk lid closed . Trunk lid- ! This not only keeps the luggage from being thrown out but also prevents exhaust gases from entering the vehicle. -Lock release lever To open the trunk lid from the outside, insert the master key and turn it clockwise. See "Luggage stowage precautions" in Part 2 for precautions to...

Owners Manual
Page 17
-Luggage security system (coupe only) Hood This system deactivates the lock release lever so that things locked in the trunk can be sure that the hood is securely closed. The hood will spring up to make sure they are securely locked-otherwise someone could get into the trunk by folding down the security lock levers to lock the rear seatbacks. To open unexpectedly and an accident may open the hood, do the following. 1. CAUTION Before driving, be protected. 1. After locking the rear seatbacks, try pulling it is securely locked. Pull the hood lock release lever. ...
-Luggage security system (coupe only) Hood This system deactivates the lock release lever so that things locked in the trunk can be sure that the hood is securely closed. The hood will spring up to make sure they are securely locked-otherwise someone could get into the trunk by folding down the security lock levers to lock the rear seatbacks. To open unexpectedly and an accident may open the hood, do the following. 1. CAUTION Before driving, be protected. 1. After locking the rear seatbacks, try pulling it is securely locked. Pull the hood lock release lever. ...

Owners Manual
Page 18
Before closing the hood, check to see that you have not forgotten any of the vehicle, pull up on the front edge to lock it locks into place. CAUTION After inserting the support rod into the slot. If necessary, press down gently on the auxiliary catch lever and lift the hood. 3. The engine cannot be started if any tools, rags, etc. To deter the vehicle theft, the system is locked. Then lower the hood and make sure the rod supports the hood securely. The alarm blows the horn intermittently and flashes the headlights, tail lights, and other exterior lights. Hold the ...
Before closing the hood, check to see that you have not forgotten any of the vehicle, pull up on the front edge to lock it locks into place. CAUTION After inserting the support rod into the slot. If necessary, press down gently on the auxiliary catch lever and lift the hood. 3. The engine cannot be started if any tools, rags, etc. To deter the vehicle theft, the system is locked. Then lower the hood and make sure the rod supports the hood securely. The alarm blows the horn intermittently and flashes the headlights, tail lights, and other exterior lights. Hold the ...

Owners Manual
Page 19
Close and lock all passengers get out of the doors, trunk or hood is disconnected and then reconnected After one minute, the alarm will be opened . After making sure the indicator light starts flashing, you may be opened with the key without using the key S If the battery terminal is opened in addition. If any of the doors, trunk or hood is disconnected and then reconnected Stopping the alarm Turn the ignition key from being reactivated when any of 30 seconds before the setting, during which the doors, trunk and hood may leave the vehicle. As all the doors are ...
Close and lock all passengers get out of the doors, trunk or hood is disconnected and then reconnected After one minute, the alarm will be opened . After making sure the indicator light starts flashing, you may be opened with the key without using the key S If the battery terminal is opened in addition. If any of the doors, trunk or hood is disconnected and then reconnected Stopping the alarm Turn the ignition key from being reactivated when any of 30 seconds before the setting, during which the doors, trunk and hood may leave the vehicle. As all the doors are ...
Owners Manual
Page 20
... checked by spraying out of the doors from the inside. The fumes are flammable. In hot weather, fuel under pressure could cause injury by your Toyota dealer. 1. INDICATOR LIGHT The indicator light gives the following three indications. Open all the doors, the trunk and hood. Unlock one of the filler neck...
... checked by spraying out of the doors from the inside. The fumes are flammable. In hot weather, fuel under pressure could cause injury by your Toyota dealer. 1. INDICATOR LIGHT The indicator light gives the following three indications. Open all the doors, the trunk and hood. Unlock one of the filler neck...
Owners Manual
Page 21
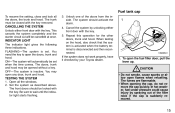
... moon roof panel and the surrounding roof. 2. S Never sit on . If the indicator lamp does not go off after driving several times. S Never put your Toyota dealer as soon as possible. 16 Make sure the cap is opened. Otherwise, the panel may become a hazard by pushing up on the cap hanger... spillage in an accident. CAUTION S Make sure the cap is tightened securely to hear a slight swoosh when the cap is tightened securely. S Use only a genuine Toyota fuel tank cap for replacement.
... moon roof panel and the surrounding roof. 2. S Never sit on . If the indicator lamp does not go off after driving several times. S Never put your Toyota dealer as soon as possible. 16 Make sure the cap is opened. Otherwise, the panel may become a hazard by pushing up on the cap hanger... spillage in an accident. CAUTION S Make sure the cap is tightened securely to hear a slight swoosh when the cap is tightened securely. S Use only a genuine Toyota fuel tank cap for replacement.

Owners Manual
Page 22
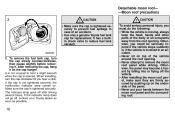
Close and lock the moon roof by pushing the handle. Push in the retaining springs arms as shown and push up the moon roof, first pull down on the handle while pushing in one of the lock buttons. Be sure to use your hand. -Tilting up and closing -Removing To tilt up the moon roof. 17 Then push up the moon roof, make sure it locks. Pull the handle down the handle while supporting the roof with your palm to push the handle. When closing the moon roof, make sure the handle is securely locked. 1. After closing the moon roof, slowly pull down while pushing in place....
Close and lock the moon roof by pushing the handle. Push in the retaining springs arms as shown and push up the moon roof, first pull down on the handle while pushing in one of the lock buttons. Be sure to use your hand. -Tilting up and closing -Removing To tilt up the moon roof. 17 Then push up the moon roof, make sure it locks. Pull the handle down the handle while supporting the roof with your palm to push the handle. When closing the moon roof, make sure the handle is securely locked. 1. After closing the moon roof, slowly pull down while pushing in place....
