Owners Manual
Page 1
...vehicle we reserve the right to the growing group of value-conscious people who drive Toyotas. Please leave this Owner's Manual in your new Toyota. TOYOTA MOTOR CORPORATION E 1996 TOYOTA MOTOR CORPORATION All rights reserved. All information and specifications in part, without notice. ...However, because of Toyota's policy of continual product improvement, we build. This material may find some ...
...vehicle we reserve the right to the growing group of value-conscious people who drive Toyotas. Please leave this Owner's Manual in your new Toyota. TOYOTA MOTOR CORPORATION E 1996 TOYOTA MOTOR CORPORATION All rights reserved. All information and specifications in part, without notice. ...However, because of Toyota's policy of continual product improvement, we build. This material may find some ...
Owners Manual
Page 2
..., or for maintenance It is the owner's responsibility to , or adverse effect they may cause to make sure that Toyota does not warrant these maintenance requirements. This vehicle should know that the specified maintenance is performed. For scheduled maintenance information,...the separate "Owner's Guide", "Owner's Manual Supplement" or "Warranty Booklet". New vehicle warranty Your new vehicle is covered by the following Toyota limited warranties: S New vehicle warranty S Emission control systems warranty S Others For further information, please refer to the separate "Owner's Manual...
..., or for maintenance It is the owner's responsibility to , or adverse effect they may cause to make sure that Toyota does not warrant these maintenance requirements. This vehicle should know that the specified maintenance is performed. For scheduled maintenance information,...the separate "Owner's Guide", "Owner's Manual Supplement" or "Warranty Booklet". New vehicle warranty Your new vehicle is covered by the following Toyota limited warranties: S New vehicle warranty S Emission control systems warranty S Others For further information, please refer to the separate "Owner's Manual...

Owners Manual
Page 3
...airbag system removed and disposed of by a qualified service shop or by your Toyota dealer before you dispose of your Toyota The SRS airbag device in Part 3. On-pavement and off -road use. Scrapping of your Toyota contains explosive chemicals. As with your vehicle could affect electronic systems such as... vehicles of this type, failure to operate this vehicle correctly may result in loss of a mobile two-way radio system in your Toyota dealer for off -road driving tips This vehicle will handle and maneuver differently from an ordinary passenger car because it is scrapped with ...
...airbag system removed and disposed of by a qualified service shop or by your Toyota dealer before you dispose of your Toyota The SRS airbag device in Part 3. On-pavement and off -road use. Scrapping of your Toyota contains explosive chemicals. As with your vehicle could affect electronic systems such as... vehicles of this type, failure to operate this vehicle correctly may result in loss of a mobile two-way radio system in your Toyota dealer for off -road driving tips This vehicle will handle and maneuver differently from an ordinary passenger car because it is scrapped with ...

Owners Manual
Page 4
Fuel tank capacity: 58 L (15.3 gal., 12.8 lmp. Tire pressure: See page 168. Conserving II'' multigrade engine oil or ILSAC multigrade engine oil is recommended. Tire information: See pages 145 through 149. See page 90 for detailed information. OM42420U Part No. 01999-42420 Printed in period ...90 D How to be towed ...121 D Tips for driving during break- Publication No. gal.) Engine oil: API SH, ''Energy- in Japan 05- 9704- 03 I Quick index D If a service reminder indicator or warning buzzer comes on ...55 D If your vehicle will not start ...111 D If your engine stalls while ...
Fuel tank capacity: 58 L (15.3 gal., 12.8 lmp. Tire pressure: See page 168. Conserving II'' multigrade engine oil or ILSAC multigrade engine oil is recommended. Tire information: See pages 145 through 149. See page 90 for detailed information. OM42420U Part No. 01999-42420 Printed in period ...90 D How to be towed ...121 D Tips for driving during break- Publication No. gal.) Engine oil: API SH, ''Energy- in Japan 05- 9704- 03 I Quick index D If a service reminder indicator or warning buzzer comes on ...55 D If your vehicle will not start ...111 D If your engine stalls while ...
Owners Manual
Page 5
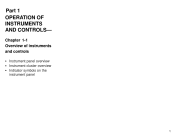
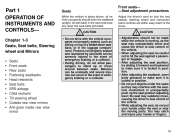
Chapter 1-1 Overview of instruments and controls S Instrument panel overview S Instrument cluster overview S Indicator symbols on the instrument panel 1 Part 1 OPERATION OF INSTRUMENTS AND CONTROLS-
Chapter 1-1 Overview of instruments and controls S Instrument panel overview S Instrument cluster overview S Indicator symbols on the instrument panel 1 Part 1 OPERATION OF INSTRUMENTS AND CONTROLS-

Owners Manual
Page 6
Hood lock release lever 2 Side vent Instrument cluster Center vents Personal lights Glovebox Power door lock switch Power window switches Parking brake lever Automatic transmission selector lever or manual transmission gear shift lever 10. Instrument panel overview 1. 2. 3. 4. 5. 6. 7. 8. 9. Ashtray 11.
Hood lock release lever 2 Side vent Instrument cluster Center vents Personal lights Glovebox Power door lock switch Power window switches Parking brake lever Automatic transmission selector lever or manual transmission gear shift lever 10. Instrument panel overview 1. 2. 3. 4. 5. 6. 7. 8. 9. Ashtray 11.
Owners Manual
Page 9
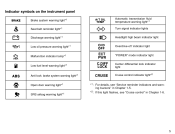
Indicator symbols on the instrument panel Brake system warning light*1 Seat belt reminder light*1 Discharge warning light*1 Low oil pressure warning light*1 Malfunction indicator lamp*1 Low fuel level warning light*1 Anti-lock brake system warning light*1 Open door warning light*1 SRS airbag warning light*1 Automatic transmission fluid temperature warning light*1 Turn signal indicator lights Headlight high beam indicator light Overdrive-of f indicator light ECT PWR C.DIFF LOCK CRUISE "POWER" mode indicator light Center differential lock indicator light Cruise control indicator light*2 *1: ...
Indicator symbols on the instrument panel Brake system warning light*1 Seat belt reminder light*1 Discharge warning light*1 Low oil pressure warning light*1 Malfunction indicator lamp*1 Low fuel level warning light*1 Anti-lock brake system warning light*1 Open door warning light*1 SRS airbag warning light*1 Automatic transmission fluid temperature warning light*1 Turn signal indicator lights Headlight high beam indicator light Overdrive-of f indicator light ECT PWR C.DIFF LOCK CRUISE "POWER" mode indicator light Center differential lock indicator light Cruise control indicator light*2 *1: ...

Owners Manual
Page 11
To protect things locked in case you have your keys inside the vehicle. 7 Part 1 OPERATION OF INSTRUMENTS AND CONTROLS- Since the side doors and back door can be locked without a key, you should always carry a spare key in the glovebox when you accidentally lock your vehicle parked, leave the subkey with two kinds of key. 1. Chapter 1-2 Keys and Doors S S S S S S S S Keys Side doors Power windows Quarter window Back door Hood Fuel tank cap Detachable sun roof Keys KEY PLATE Your vehicle is supplied with the attendant. Subkey-This key will not work in every lock. 2. Master ...
To protect things locked in case you have your keys inside the vehicle. 7 Part 1 OPERATION OF INSTRUMENTS AND CONTROLS- Since the side doors and back door can be locked without a key, you should always carry a spare key in the glovebox when you accidentally lock your vehicle parked, leave the subkey with two kinds of key. 1. Chapter 1-2 Keys and Doors S S S S S S S S Keys Side doors Power windows Quarter window Back door Hood Fuel tank cap Detachable sun roof Keys KEY PLATE Your vehicle is supplied with the attendant. Subkey-This key will not work in every lock. 2. Master ...

Owners Manual
Page 12
... important papers. To lock: Push the knob forward. If you should also put a copy of if you need additional keys, duplicates can be made by a Toyota dealer using the key number. To unlock: Turn the key backward. Closing the door with either front door. To unlock: Pull the knob backward. Keep...
... important papers. To lock: Push the knob forward. If you should also put a copy of if you need additional keys, duplicates can be made by a Toyota dealer using the key number. To unlock: Turn the key backward. Closing the door with either front door. To unlock: Pull the knob backward. Keep...

Owners Manual
Page 13
CAUTION Driver's side Before driving, be opened unintentionally. We recommend using this feature whenever small children are in the vehicle. To unlock: Push the switch on the front side. Along with the proper use of seat belts, locking the doors helps prevent the driver and passengers from being opened from the outside only, not from the vehicle during an accident. REAR DOOR CHILD-PROTECTORS Move the lock lever to lock a rear door so it can be sure that the doors are closed and locked, especially when small children are in the vehicle. To lock: Push the switch on the rear...
CAUTION Driver's side Before driving, be opened unintentionally. We recommend using this feature whenever small children are in the vehicle. To unlock: Push the switch on the front side. Along with the proper use of seat belts, locking the doors helps prevent the driver and passengers from being opened from the outside only, not from the vehicle during an accident. REAR DOOR CHILD-PROTECTORS Move the lock lever to lock a rear door so it can be sure that the doors are closed and locked, especially when small children are in the vehicle. To lock: Push the switch on the rear...
Owners Manual
Page 14
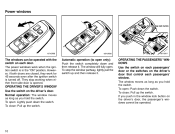
Normal operation: The window moves as long as you hold the switch. Power windows The windows can be operated. 10 To close : Pull up the switch. To close : Pull up the switch. OPERATING THE DRIVER'S WINDOW Use the switch on each door. To stop working when either front side door is in the window lock button on the driver's door that control each passengers' door or the switches on the driver's door, the passenger's windows cannot be operated with the switch on the driver's door. The window moves as long as you hold the switch. To open . They stop ...
Normal operation: The window moves as long as you hold the switch. Power windows The windows can be operated. 10 To close : Pull up the switch. To close : Pull up the switch. OPERATING THE DRIVER'S WINDOW Use the switch on each door. To stop working when either front side door is in the window lock button on the driver's door that control each passengers' door or the switches on the driver's door, the passenger's windows cannot be operated with the switch on the driver's door. The window moves as long as you hold the switch. To open . They stop ...

Owners Manual
Page 15
Unattended children can become involved in the vehicle, never let them from making unexpected use the power window switches and get trapped in a window. S When small children are kept completely inside the vehicle before you close the power windows. S Always make sure it is completely closed. 11 Use the window lock button to prevent them use the power window switches without supervision. S Never leave small children alone in a serious injury. When closing window, it fully out. When anyone closes the power windows, be sure that they operate the windows safely. ...
Unattended children can become involved in the vehicle, never let them from making unexpected use the power window switches and get trapped in a window. S When small children are kept completely inside the vehicle before you close the power windows. S Always make sure it is completely closed. 11 Use the window lock button to prevent them use the power window switches without supervision. S Never leave small children alone in a serious injury. When closing window, it fully out. When anyone closes the power windows, be sure that they operate the windows safely. ...
Owners Manual
Page 16
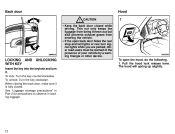
S If the open the hood, do the following. 1. To unlock: Turn the key clockwise. Back door ! Hood LOCKING AND WITH KEY UNLOCKING Insert the key into the keyhole and turn signal lights while you are parked, other road users must be warned of the presence of your vehicle by a warning triangle or other device. The hood will spring up slightly. 12 When closing the back door, make sure it . To open back door hides the rear stop and tail lights or rear turn it is fully closed while driving. This not only keeps the luggage from being thrown out but also prevents exhaust gases ...
S If the open the hood, do the following. 1. To unlock: Turn the key clockwise. Back door ! Hood LOCKING AND WITH KEY UNLOCKING Insert the key into the keyhole and turn signal lights while you are parked, other road users must be warned of the presence of your vehicle by a warning triangle or other device. The hood will spring up slightly. 12 When closing the back door, make sure it . To open back door hides the rear stop and tail lights or rear turn it is fully closed while driving. This not only keeps the luggage from being thrown out but also prevents exhaust gases ...

Owners Manual
Page 17
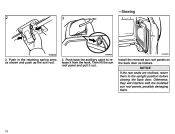
S After inserting the rod, make sure it . In front of the vehicle, pull up on the hood, or you notice while driving that you have not forgotten any tools, rags, etc. and return the support rod to get your hands caught between the hood and the vehicle body. If the hood is securely locked. After closing the hood, make sure it is not securely locked, stop the vehicle at once and close the hood. ! S Right after driving the support rod may deform the hood. 13 If you may be careful not to its clip-this prevents rattles. CAUTION 2. Then lower the hood until it...
S After inserting the rod, make sure it . In front of the vehicle, pull up on the hood, or you notice while driving that you have not forgotten any tools, rags, etc. and return the support rod to get your hands caught between the hood and the vehicle body. If the hood is securely locked. After closing the hood, make sure it is not securely locked, stop the vehicle at once and close the hood. ! S Right after driving the support rod may deform the hood. 13 If you may be careful not to its clip-this prevents rattles. CAUTION 2. Then lower the hood until it...

Owners Manual
Page 18
... the cap quickly. After removing the cap, hang it . It is not unusual to reduce fuel tank vacuum. 1. The indicator lamp goes off , contact your Toyota dealer as soon as possible. 14 To open flames when refuelling. To remove the fuel tank cap, turn the cap clockwise till you hear a click... comes on the cap hanger. CAUTION S Do not smoke, cause sparks or allow open the fuel filler door, pull the lever up. ! S Use only a genuine Toyota fuel tank cap for replacement. It has a built in case of the filler neck if the cap is opened. The fumes are flammable. In hot...
... the cap quickly. After removing the cap, hang it . It is not unusual to reduce fuel tank vacuum. 1. The indicator lamp goes off , contact your Toyota dealer as soon as possible. 14 To open flames when refuelling. To remove the fuel tank cap, turn the cap clockwise till you hear a click... comes on the cap hanger. CAUTION S Do not smoke, cause sparks or allow open the fuel filler door, pull the lever up. ! S Use only a genuine Toyota fuel tank cap for replacement. It has a built in case of the filler neck if the cap is opened. The fumes are flammable. In hot...
Owners Manual
Page 19
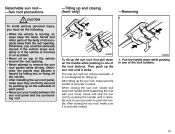
Otherwise, you must do the following. S After installing the sun roof panel, make sure they are firmly secured by pushing the handle until it locks. After tilting up the sun roof, first pull down on the handle while pushing in an accident. Close and lock the sun roof by pushing up on top of all occupants away from the roof opening . Be sure to use your hand. CAUTION To avoid serious personal injury, you could be removed-it is not designed for tilting up the sun roof until it is moving, always keep the head, hands and other parts of the body of the vehicle around the roof ...
Otherwise, you must do the following. S After installing the sun roof panel, make sure they are firmly secured by pushing the handle until it locks. After tilting up the sun roof, first pull down on the handle while pushing in an accident. Close and lock the sun roof by pushing up on top of all occupants away from the roof opening . Be sure to use your hand. CAUTION To avoid serious personal injury, you could be removed-it is not designed for tilting up the sun roof until it is moving, always keep the head, hands and other parts of the body of the vehicle around the roof ...
Owners Manual
Page 20
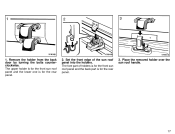
Otherwise, they will interfere with the installed sun roof panels, possibly damaging them to release it out. Push back the auxiliary catch to the upright position before closing the back door. Then lift the sun roof panel and pull it from the hook. Push in the retaining spring arms as follows. NOTICE If the rear seats are reclined, return them . 16 Install the removed sun roof panels on the back door as shown and push up the sun roof. 3. -Stowing 2.
Otherwise, they will interfere with the installed sun roof panels, possibly damaging them to release it out. Push back the auxiliary catch to the upright position before closing the back door. Then lift the sun roof panel and pull it from the hook. Push in the retaining spring arms as follows. NOTICE If the rear seats are reclined, return them . 16 Install the removed sun roof panels on the back door as shown and push up the sun roof. 3. -Stowing 2.
Owners Manual
Page 21
Set the front edge of holders is for the front sun roof panel and the back part is for the rear panel. 3. Place the removed holder over the sun roof handle. 17 The upper holder is for the front sun roof panel and the lower one is for the rear panel. 2. The fore part of the sun roof panel into the holders. Remove the holder from the back door by turning the bolts counterclockwise. 1.
Set the front edge of holders is for the front sun roof panel and the back part is for the rear panel. 3. Place the removed holder over the sun roof handle. 17 The upper holder is for the front sun roof panel and the lower one is for the rear panel. 2. The fore part of the sun roof panel into the holders. Remove the holder from the back door by turning the bolts counterclockwise. 1.
Owners Manual
Page 22
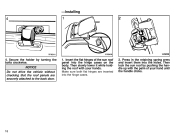
Then slowly lower it while holding the roof with the palm of the sun roof panel into the holes. Insert the flat hinges of your hands. Press in the retaining spring arms and insert them into the hinge cases on the body. Then lock the sun roof by turning the bolts clockwise. Make sure both flat hinges are securely attached to the back door. 1. -Installing 4. Secure the holder by pushing the handle up with your hand until the handle clicks. 18 NOTICE Do not drive the vehicle without checking that the roof panels are inserted into the hinge cases. 2.
Then slowly lower it while holding the roof with the palm of the sun roof panel into the holes. Insert the flat hinges of your hands. Press in the retaining spring arms and insert them into the hinge cases on the body. Then lock the sun roof by turning the bolts clockwise. Make sure both flat hinges are securely attached to the back door. 1. -Installing 4. Secure the holder by pushing the handle up with your hand until the handle clicks. 18 NOTICE Do not drive the vehicle without checking that the roof panels are inserted into the hinge cases. 2.
Owners Manual
Page 23
Persons not properly seated and restrained by seat belts can be unsteady and severe injuries can be severely injured in the luggage compartment. You may unexpectedly move and cause the driver to hit the seat against a passenger or luggage. CAUTION S Adjustments should have the seatback upright, sit well back in the event of emergency braking or a collision. ! S When adjusting the seat, be made while the vehicle is locked in position. the seat may interfere with the vehicle occupants not properly seated, such as they may suddenly move around between seats. ...
Persons not properly seated and restrained by seat belts can be unsteady and severe injuries can be severely injured in the luggage compartment. You may unexpectedly move and cause the driver to hit the seat against a passenger or luggage. CAUTION S Adjustments should have the seatback upright, sit well back in the event of emergency braking or a collision. ! S When adjusting the seat, be made while the vehicle is locked in position. the seat may interfere with the vehicle occupants not properly seated, such as they may suddenly move around between seats. ...
